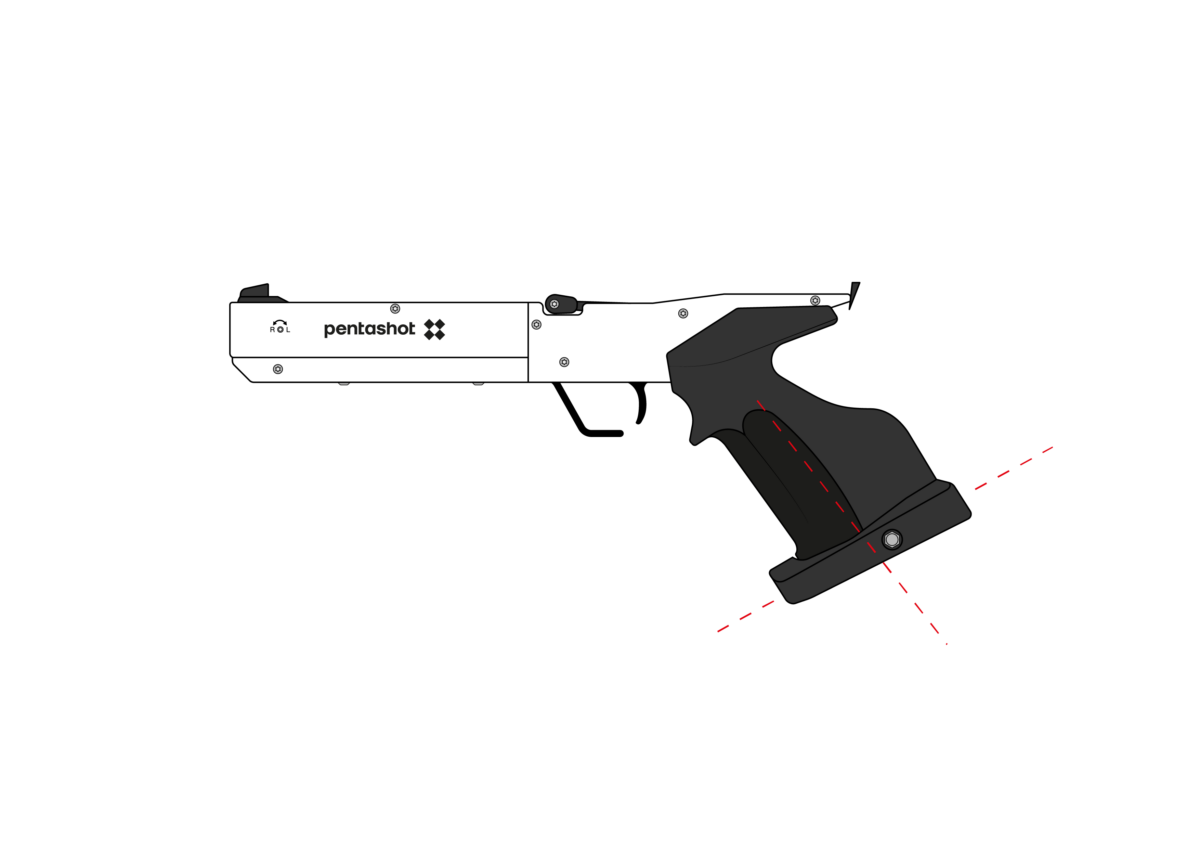
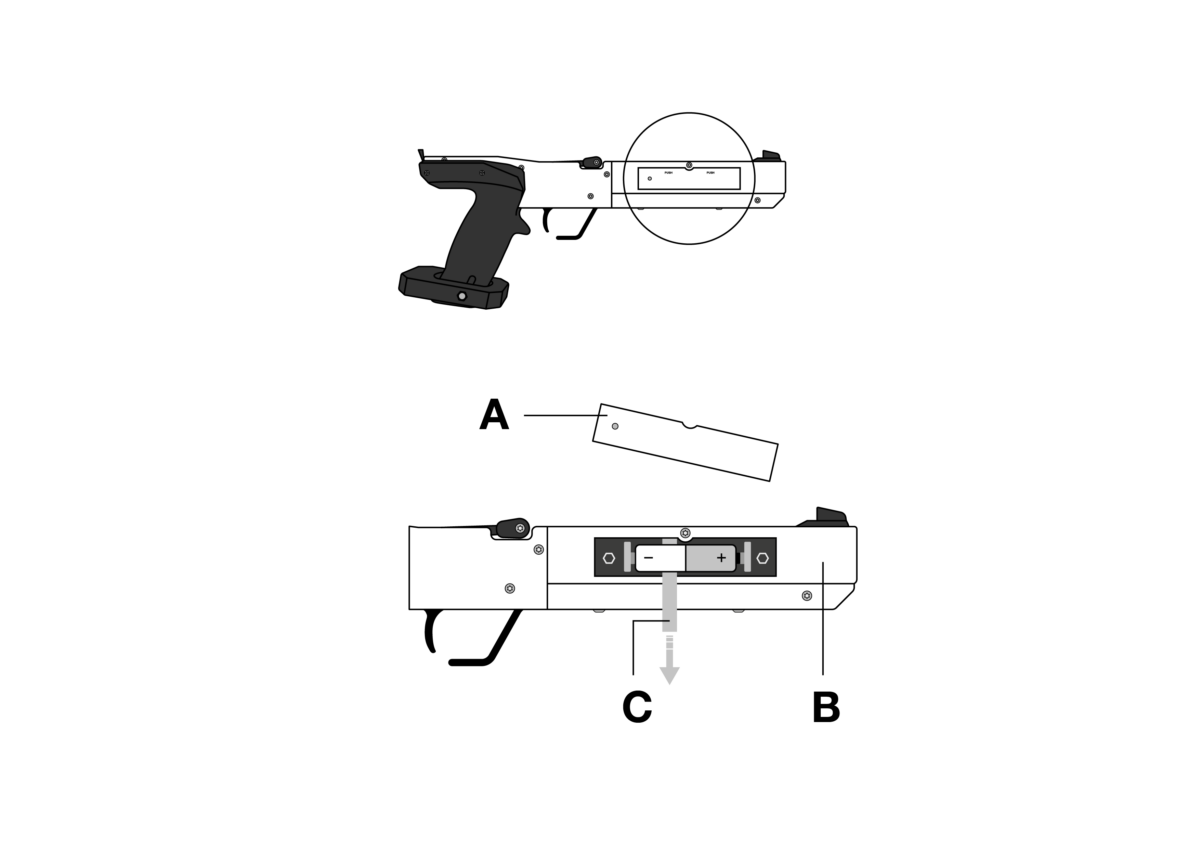
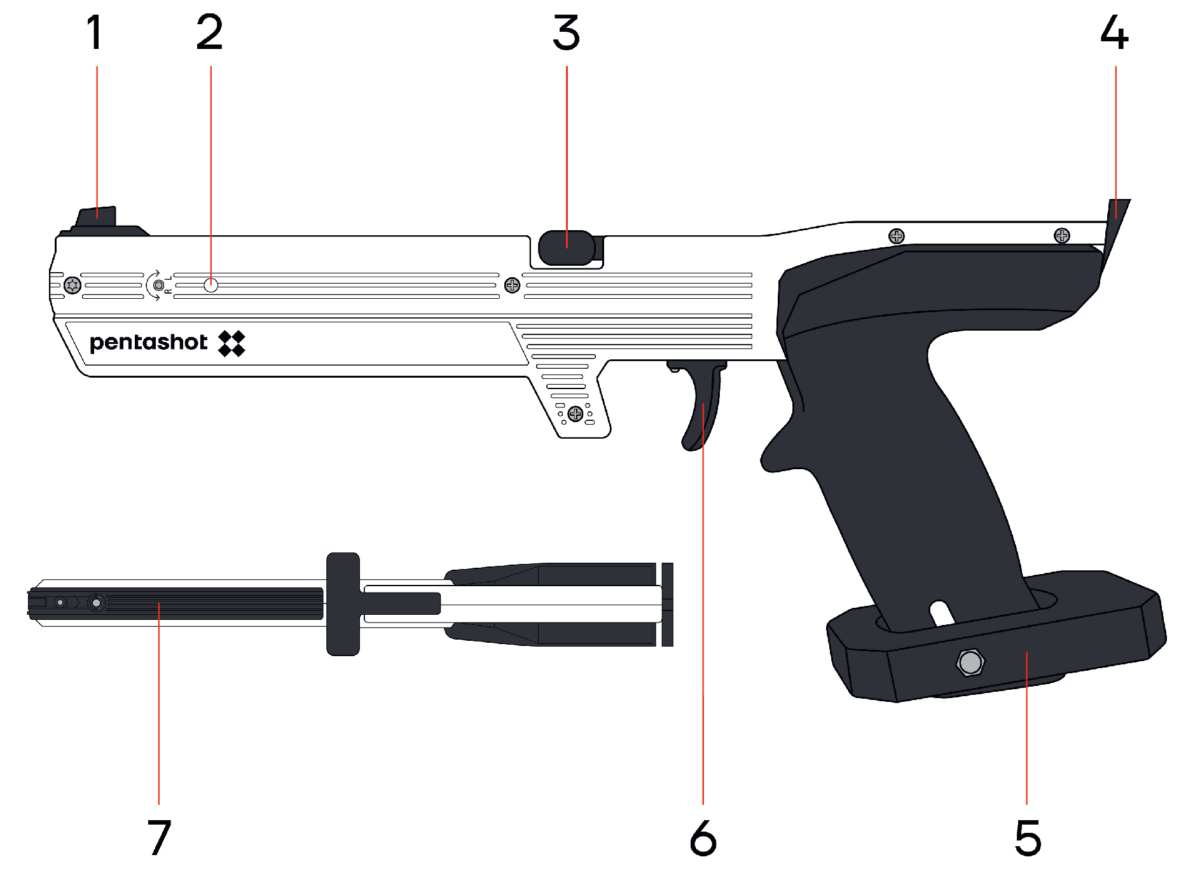
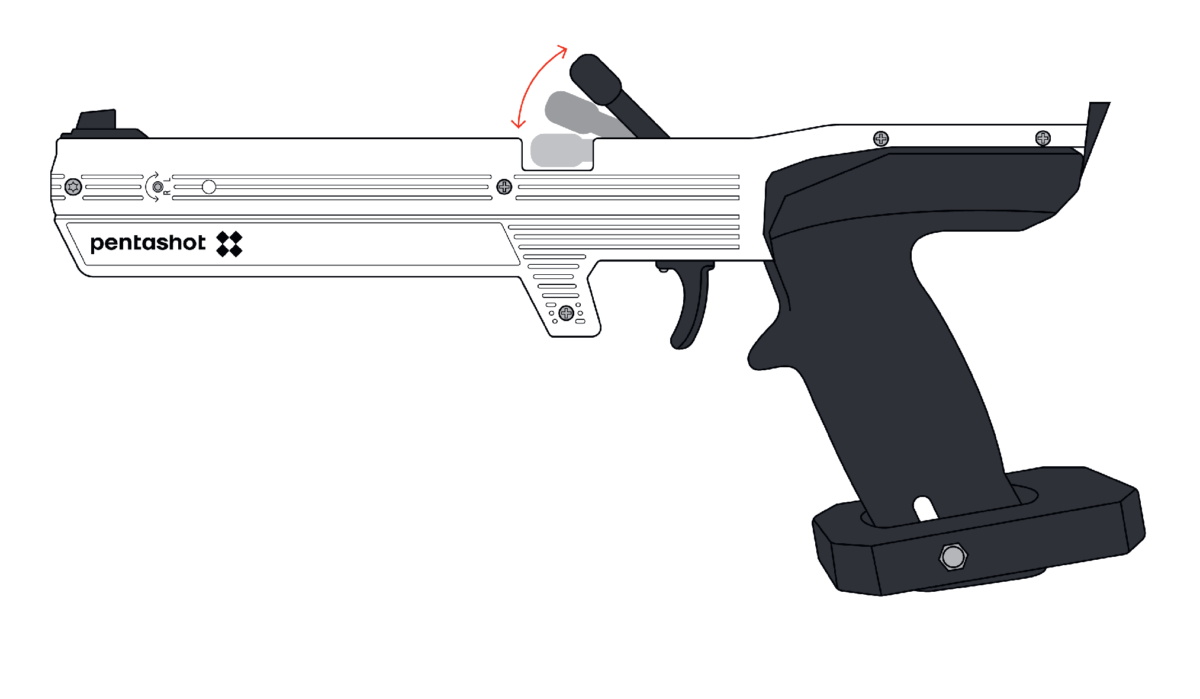
Assembly Guide for GLS e.Start SR – Step-by-Step Instructions
This guide will walk you through the assembly of the GLS e.Start SR. Follow each step and refer to the images for proper assembly.
Safety notes and important information
Keep the emitter clean; wipe off dust with a dry cloth. Never use cleaning agents, solvents or chemicals. Never press any object onto the optics hole. Regularly check the battery inside the simulator body for corrosion or leaks. If you will not be using the simulator for more than a week, you must remove the battery. Also remove the battery before plane travel.
BEFORE USE
The simulator must be used only according to these instructions. Never use the simulator for purposes for which it was not intended. Failure to follow these instructions can expose the user to dangerous laser radiation.
Never break the safety sticker — this will void the product warranty.
In public, carry the simulator in its original case or bag. People who don’t know this type of simulator may mistake it for an ordinary weapon and alert the police
DURING USE
Never aim at people, animals or uncontrolled locations.
When handling the simulator, follow the general rules for handling real weapons.
AFTER USE
After use, store the simulator in its original case.
Protect the simulator from direct sunlight and rain in keeping with the UIPM rules.
LASER RADIATION NEVER LOOK DIRECTLY INTO THE LASER BEAM! CLASS I LASER EQUIPMENT
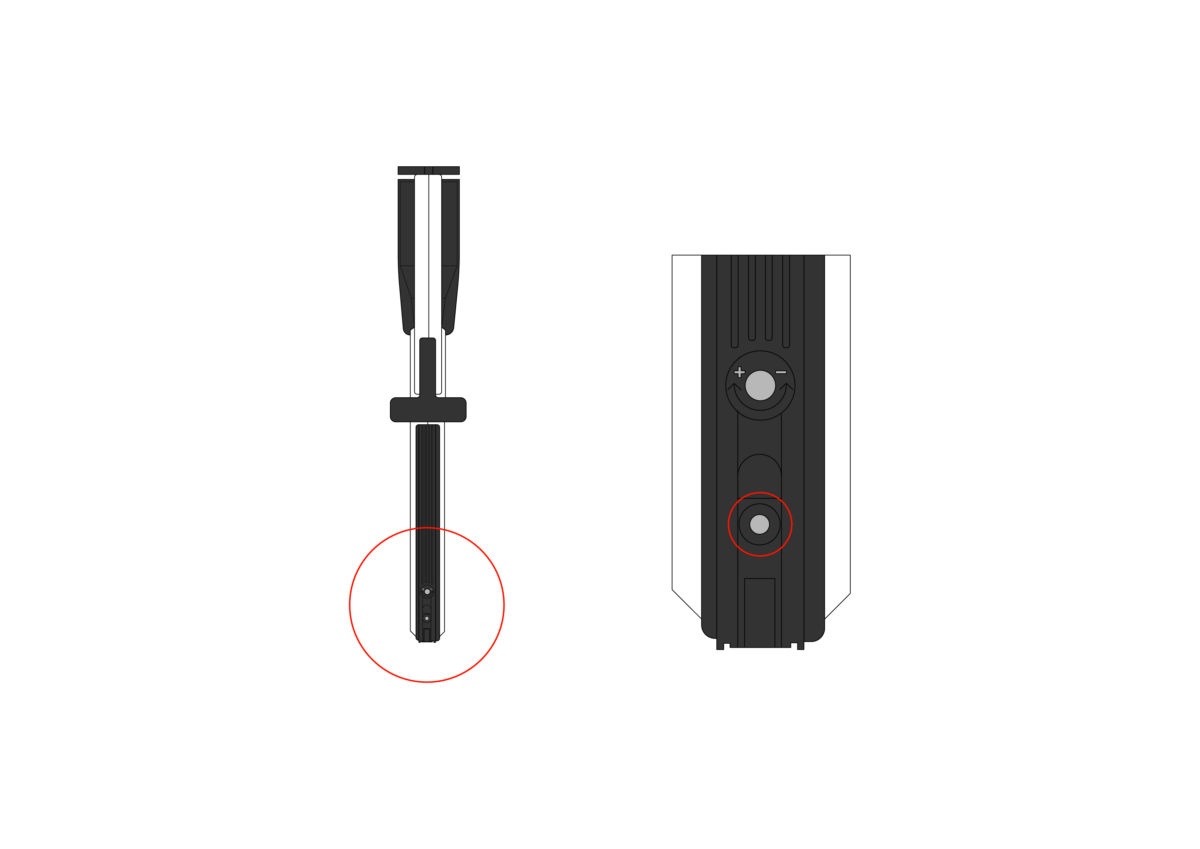
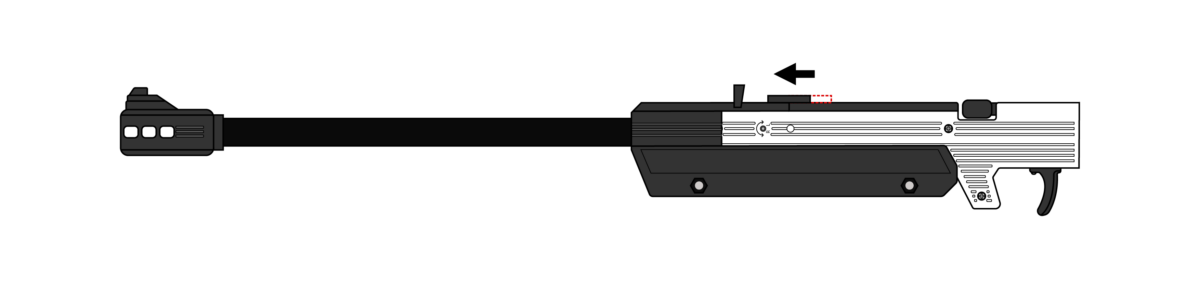
1. Removing the Battery Cover
Step 1: Preparation
Place the device on a stable surface.
Prepare a screwdriver for battery cover removal.
Step 2: Removing the Cover
Unscrew and remove the battery cover.
Step 3: Storing the Cover
Important! Store the battery cover in a safe place to avoid losing it.
Step 4: Continue with Assembly
Once the cover is removed, proceed to the next steps.
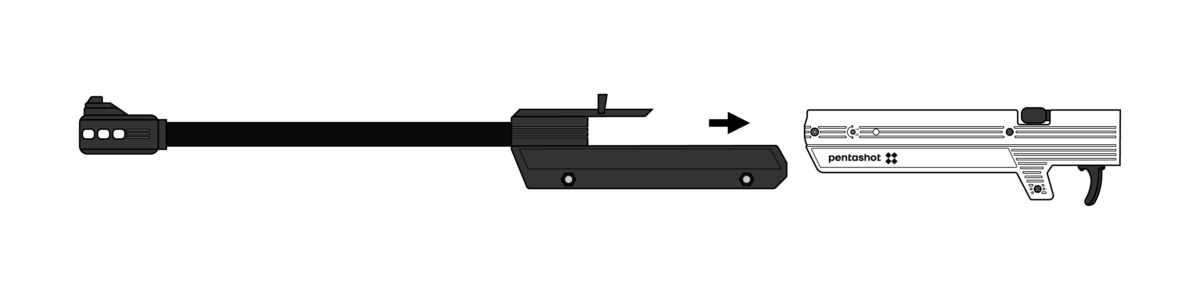
2. Attaching the Barrel
Step 1: Prepare the Components
Gather the barrel, main body, and mounting screws.
Step 2: Insert the Barrel
Slide the barrel into the front section of the body, ensuring proper alignment.
Step 3: Secure the Barrel
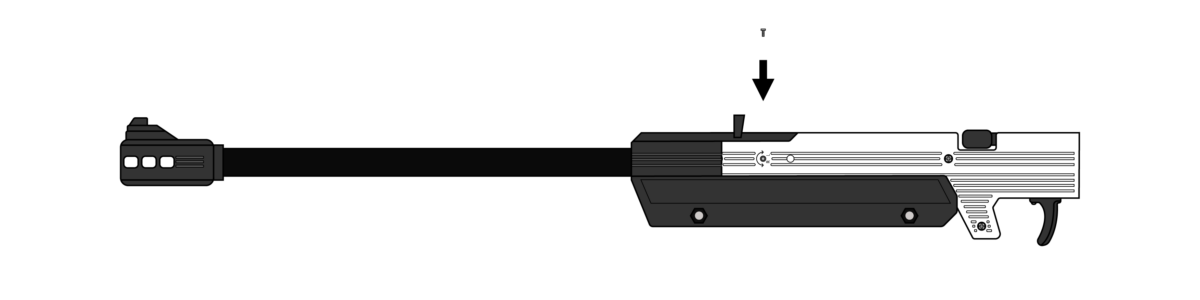
Use the provided screws to fasten the barrel to the body.
Ensure the barrel is firmly attached and does not wobble.
Step 4: Check the Assembly
Verify that the barrel is correctly positioned and securely fastened.
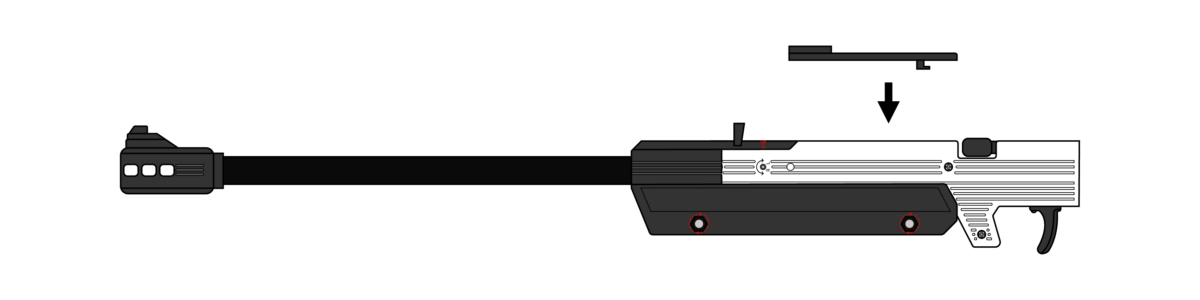
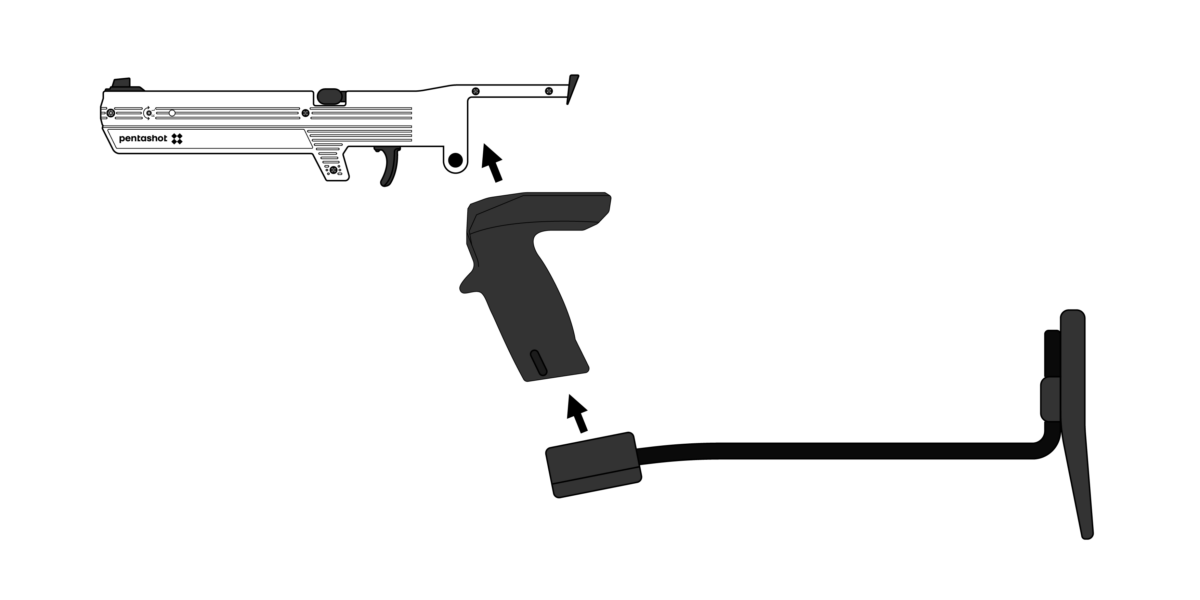
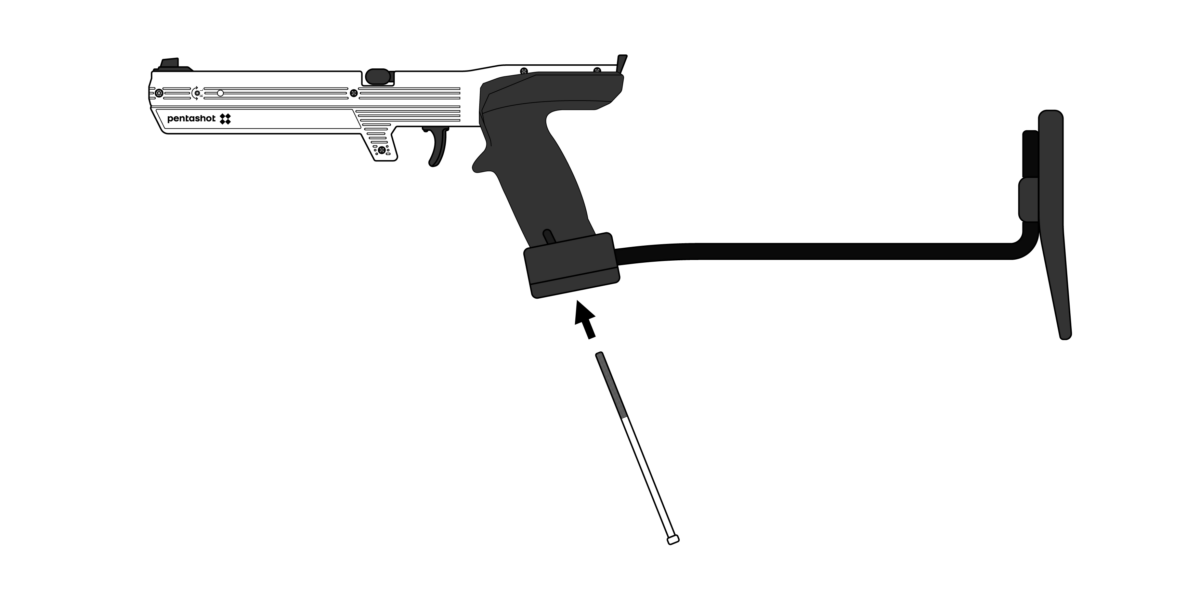
3. Attaching the Stock
Step 1: Prepare the Stock
Gather the stock and mounting screws.
Step 2: Position the Stock
Align the stock with the rear part of the body and match the mounting holes.
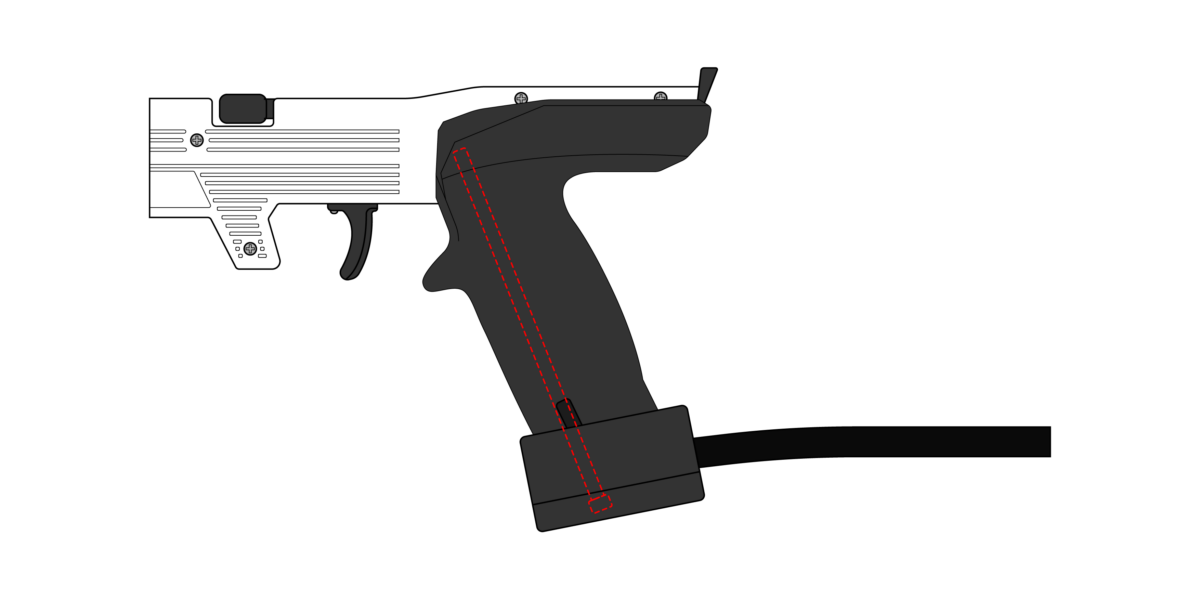
Step 3: Secure the Stock
Fasten the stock to the body using the provided screws.
Step 4: Check the Assembly
Ensure the stock is firmly attached and does not move.
4. Final Assembly Check
Inspect all screws and ensure proper tightening.
Confirm that all parts are securely in place and not loose.
Test the simulator in a safe environment.
PS Bia Hit
Safety instructions and important information
Before use
Keep the target clean; wipe off dust with a dry cloth.
Never use detergents, solvents or chemicals.
Never press any objects against the front surface of the target.
Check the battery in the target periodically for corrosion or leakage. If you will not be using the target for more than a week, we recommend removing the battery.
Also remove the battery before travelling by plane.
The target should be positioned so that sunlight does not directly hit the front surface of the target.
The laser target is an optoelectronic device, its disassembly is prohibited !!!
During use
When handling the target, observe the general rules for handling real weapons.
When using the target in a room with artificial lighting, the correct functioning of the target may be disturbed if the lighting source operates at a frequency of 40 kHz.
Laser emitters with inferior optics may cause incorrect scoring when fired at distances less than 5 metres and at low light levels.
The target can be fired with all laser emitters or simulators with a UIPM laser code of 15.6 ms.
After using
After use, store the target in its original case.
Protect the target from direct sunlight and rain in accordance with UIPM rules.
Description
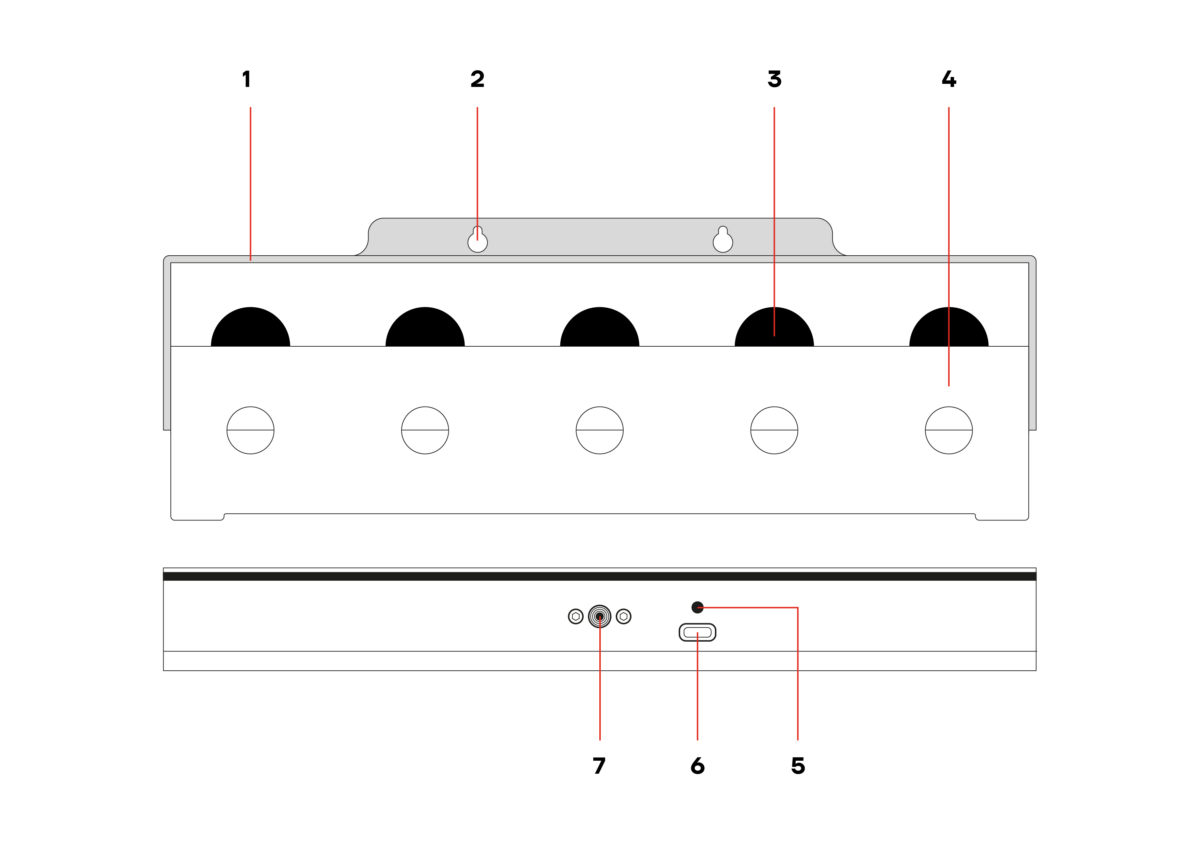
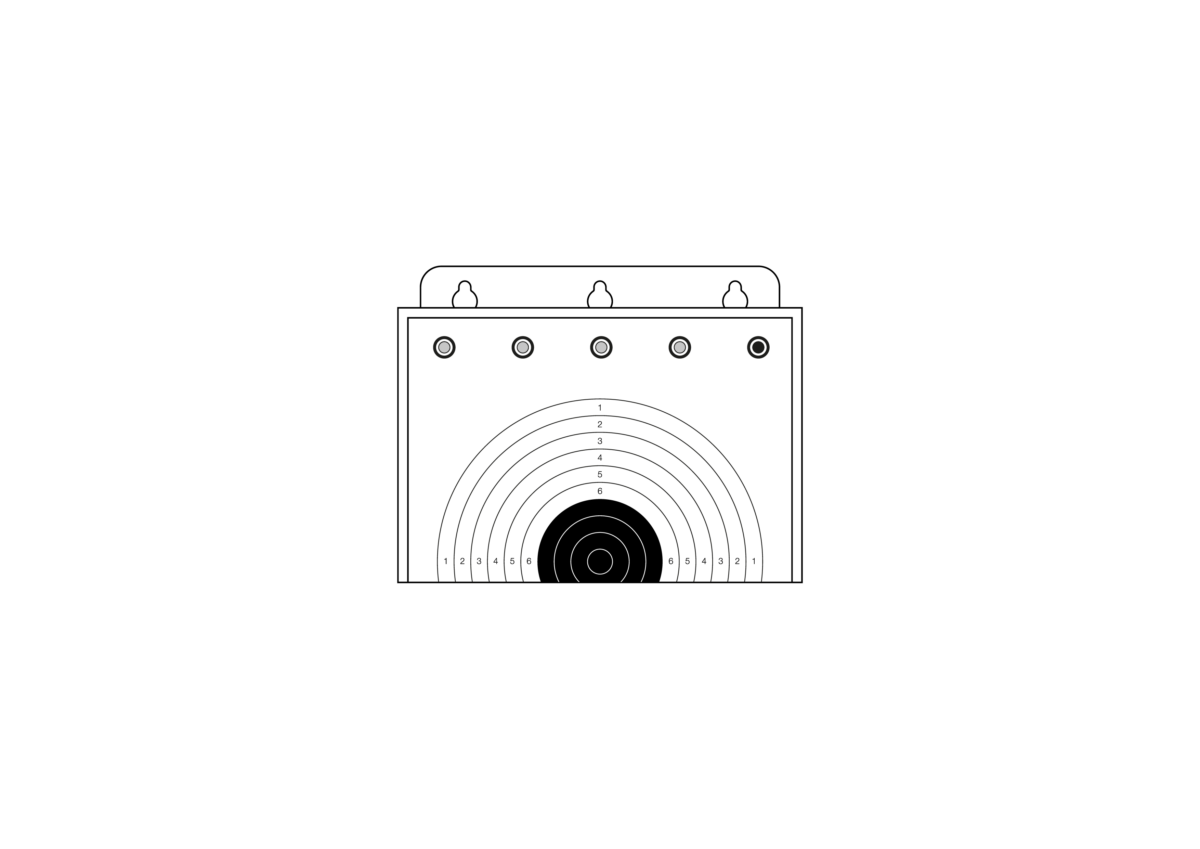
Frontal area with 45mm hit area
Hanging system
Hit zone with LED indication
Front face with 30mm hit area
LED on/off indication
USB-C power connector
Tripod mount
Purpose
PS Bia Hit is designed to simulate shooting in biathlon. The target detects hits in the hit zone, which it signals by lighting a white LED in the corresponding zone. Thanks to mains or power bank power supply, the target is flexible and easy to use in different training conditions. Its simple and reliable system allows for effective training of shooting skills.
Preparation of target for use
The target can be mounted on a tripod using the Pentashot mount or on a wall using the integrated hanging system (2). The mounting of the target must be firm and stable, especially in windy weather. If the target falls to the ground it may be damaged.
Switching on
Plug the USB-C cable into the connector (6) and the target is switched on. The target can be powered from the mains or from a power bank.
Switching off
The target is switched off by disconnecting it from the power supply.
Replacement of front plates
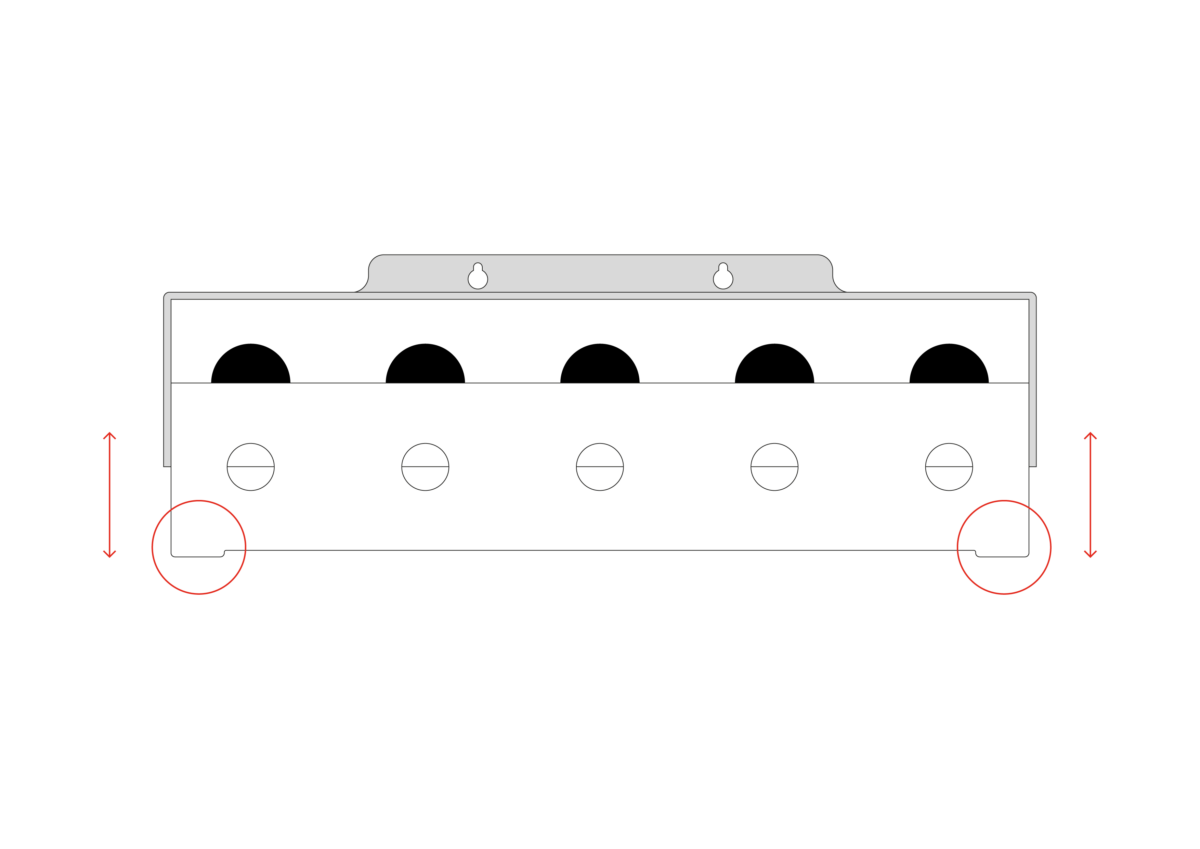
There are two front plates available for the target with different sizes of hitting zones – 45mm and 30mm. The front plate can be changed by lifting it with the beaks in its lower corners.
After fitting the faceplate, make sure that its corners fit correctly into the corners of the target.
Update function
The target can only be updated by the manufacturer or an authorized person.
Technical data
Dimensions
500mm x 300mm x 30 mm
Weight
580g
Hit zone ⌀
Æ 45 mm Æ 30 mm
Shooting distance
From 3 m to 10 m
Shooting time
50 seconds from the first hit of the HIT zone
Integrated signal lights
YES ( inside hit areas )
Tripod mount
YES
Integrated hanging system
YES
Accepted laser signal
15,6 ms UIPM Laser signal
Power supply
Mains electricity or power bank
Resistance to sunlight
min. 70 000 lux
Operating temperature
Fom +10°C to 50°C
Update function
Only the manufacturer is authorized to update the target software
It is forbidden to open or modify the electronic target, except to change the battery. Only the manufacturer or an authorised person may modify the software parameters. The owner of the target must agree to the change in writing. The manufacturer will not accept any liability for damages resulting from such a change.
Warranty
The warranty applies exclusively to defects that have been proven to have occurred during the warranty period as a result of a defect in material or workmanship. Defects arising in this way can only be repaired by the manufacturer or an authorised service centre. The purchaser may file a warranty claim with the manufacturer or an authorized dealer, as applicable.
The warranty period shall commence on the date of purchase or delivery of the goods to the purchaser and the warranty shall remain valid for a period of 24 months.
In particular, the following cases are excluded from warranty repairs:
The product has not been presented to the dealer/manufacturer together with the proof of purchase.
Wear and tear due to use of the product or damage to the product (including damage caused by unqualified installation, improper commissioning, failure to procedures set out in the instructions for use, etc.).
Damage to the product caused by contamination, accidental or catastrophic events, or natural or external events such as storm, fire, water, excessive heat or cold, liquid penetration, etc.
Mechanical damage to the product (e.g. caused by falling, breakage, etc.) or damage caused during transport.
Damage, unauthorised design modifications, incorrect product modifications or other interference with the product by unauthorised persons or service centres.
Storage
It is very important that the target is stored under the right conditions to maintain its good and reliable condition. Always observe the following:
Always remove the battery before storing the target for an extended period of time. This will prevent internal damage to the target should the battery drain.
Store the target in its original packaging (case) in a dry and dark place out of the reach of children.
Do not place any heavy objects or objects that may leak liquids on the case.
Protect the target from the weather, including frost and moisture. The optimum storage temperature is between +5 and +30 °C. The humidity in the storage area must not exceed 60%. Do not store the target in a humid environment where there is a high risk of
Replacement parts
The following spare parts are available for the targets:
front surface
LED lights
USB-C connector
PCB
target box
Spare parts can be ordered by e-mail at sales@pentashot.com or from PENTASHOT partners and dealers. You can find a list of them at www.pentashot.com.
Replacement of major parts may only be carried out by the manufacturer or an authorised person.
PS Nexus
Safety notes and important information
Keep the emitter clean; wipe off dust with a dry cloth. Never use cleaning agents, solvents or chemicals. Never press any object onto the optics hole. Regularly check the battery inside the simulator body for corrosion or leaks. If you will not be using the simulator for more than a week, you must remove the battery. Also remove the battery before plane travel.
BEFORE USE
The simulator must be used only according to these instructions. Never use the simulator for purposes for which it was not intended. Failure to follow these instructions can expose the user to dangerous laser radiation.
Never break the safety sticker — this will void the product warranty.
In public, carry the simulator in its original case or bag. People who don’t know this type of simulator may mistake it for an ordinary weapon and alert the police
DURING USE
Never aim at people, animals or uncontrolled locations.
When handling the simulator, follow the general rules for handling real weapons.
AFTER USE
After use, store the simulator in its original case.
Protect the simulator from direct sunlight and rain in keeping with the UIPM rules.
LASER RADIATION NEVER LOOK DIRECTLY INTO THE LASER BEAM! CLASS I LASER EQUIPMENT
Description
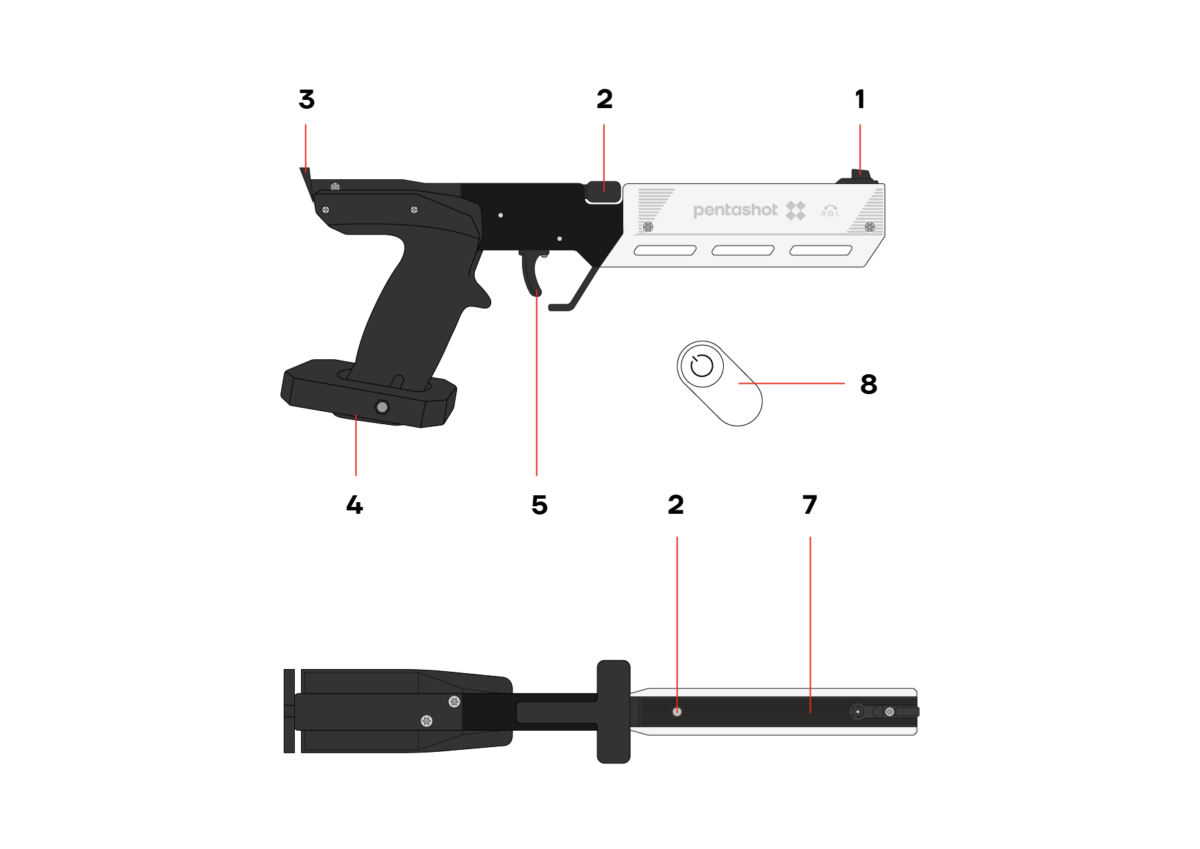
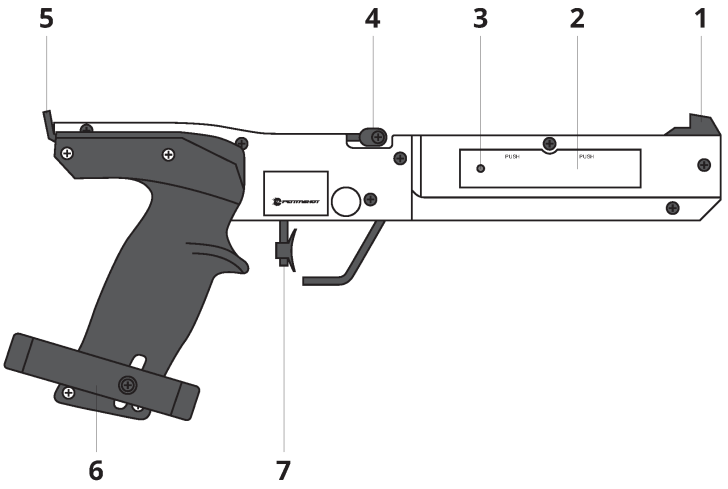
1 — Front sight 2 — Cocking lever 3 — Rear sights 4 — Ambidextrous grip 5 — Trigger 6 — Battery status LED 7 — Battery cover
PURPOSE
The PS Nexus laser simulator is for use in instructional courses, training or competition in modern pentathlon. It is designed to shoot a laser beam activated by a trigger. The PS Nexus laser simulator is used like an FLP20-e laser module emitter with a 15.6 ms code. This code is completely compatible with the standards of the International Modern Pentathlon Union (UIPM).
Preparing the laser simulator for use
TURNING THE SIMULATOR ON
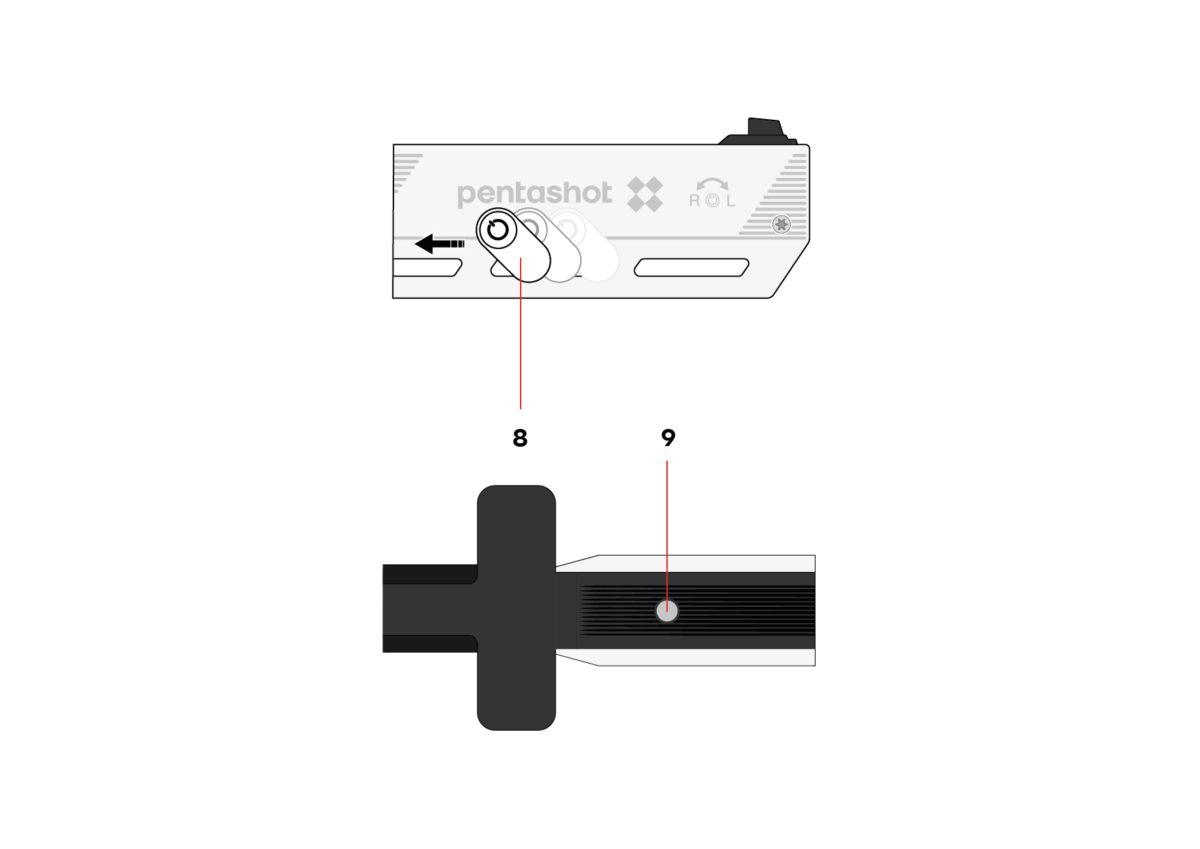
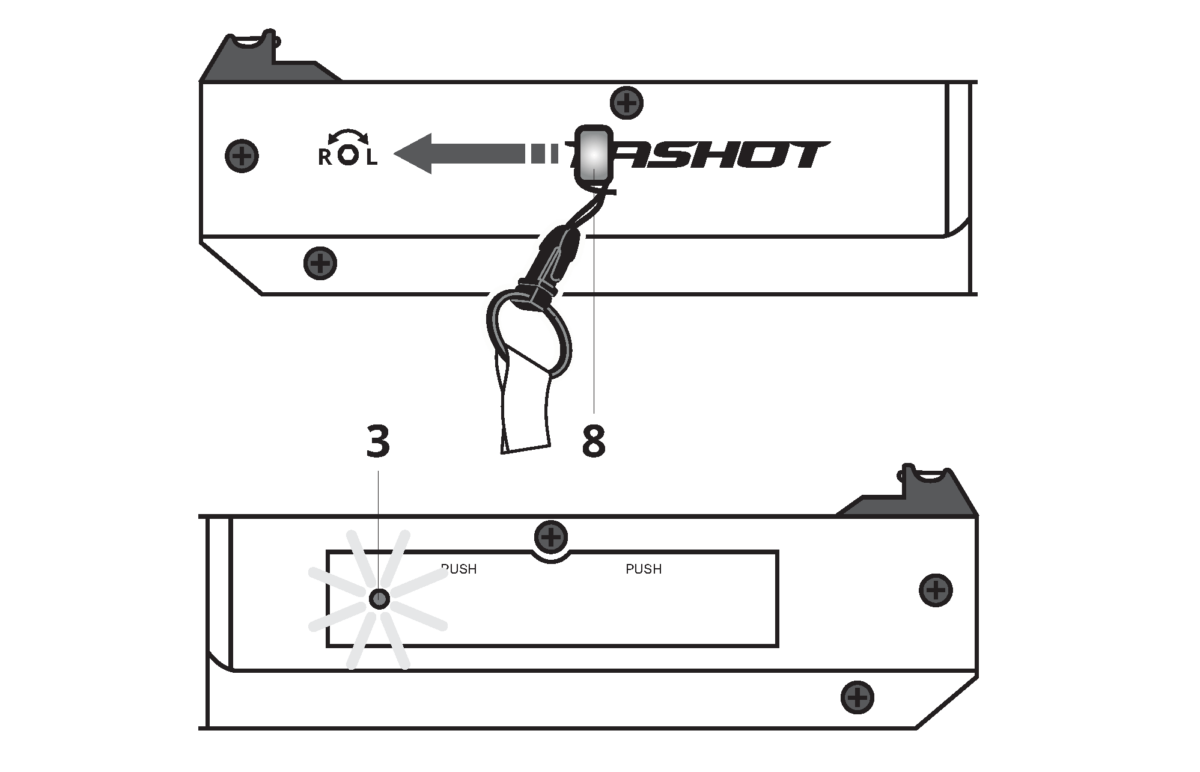
Attach the chip (8) to the simulator body and move it from right to left. This will switch simulator ON and the LED (9) will fl ash. The number of flashes indicates the battery status:
5 fl ashes – the battery is 100% full
4 fl ashes – the battery is at 75% charge level
3 fl ashes – the battery is at 50% charge level
2 fl ashes – the battery is at 25% charge level
1 fl ash – the battery is discharged, replace it
ATTENTION – for models with serial numbers PSNX-0434 and higher, the laser simulator activates after inserting the battery and is immediately ready for use, therefore it does not need a magnet to turn on. Whenever between shots or when not in use, the simulator is in standby mode and, unless the battery is removed, the simulator is always ready for use. This means that it does not even switch off visually.
TURNING THE SIMULATOR OFF
The laser module shuts off about 30 minutes after the last light shot. If you need to turn it off right away, remove the battery from the simulator body.
LASER DOT ALIGNMENT
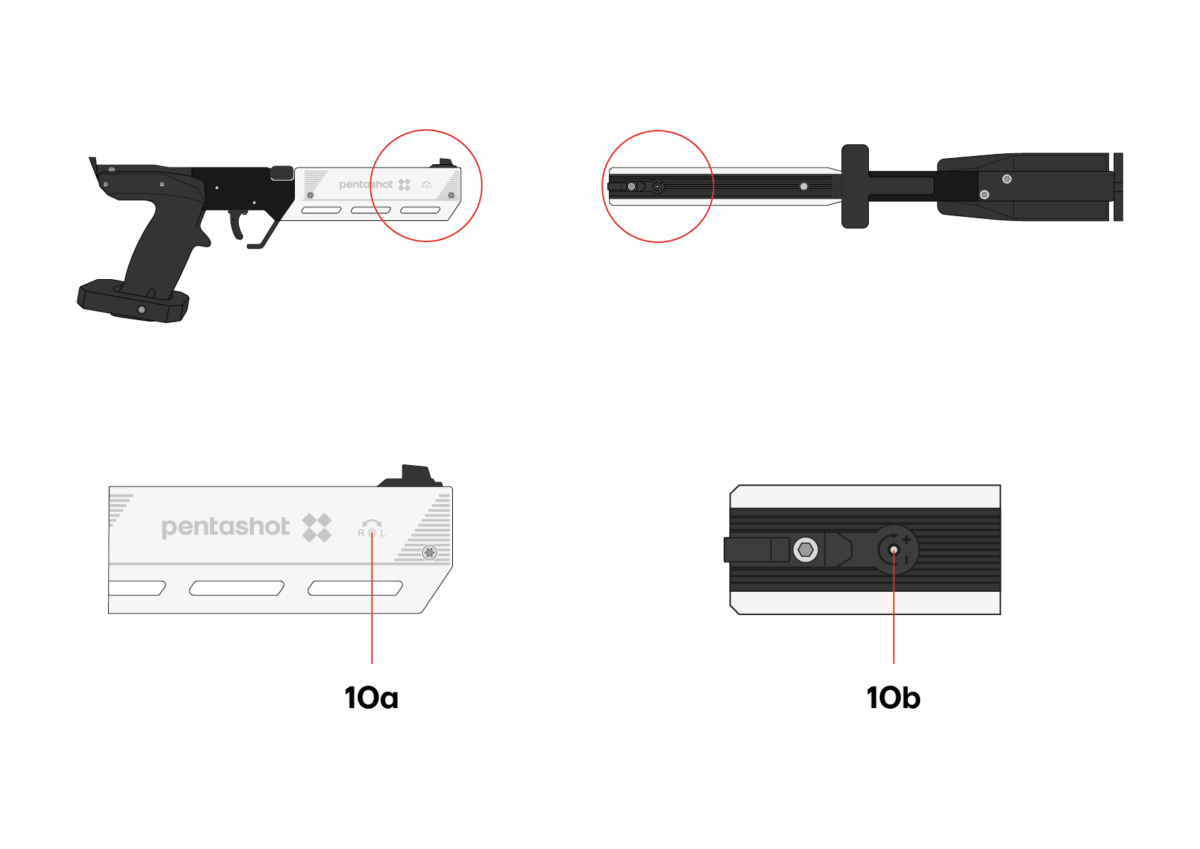
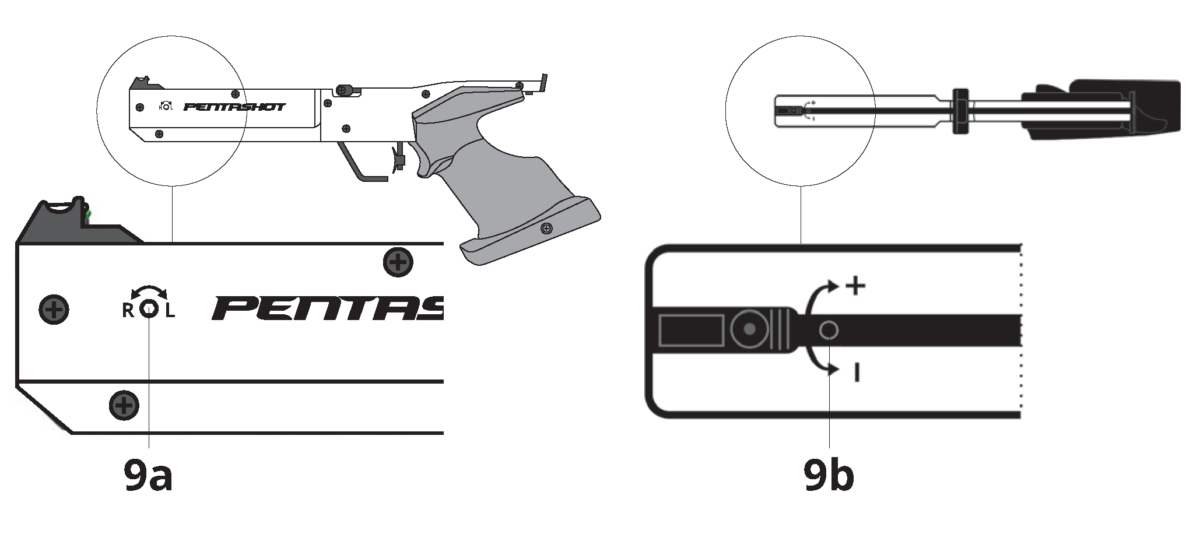
To adjust the sights of the simulator, aim at a white wall or white object 10 metres away and check the alignment of the red laser dots and sights. If necessary, use the adjustment screws to align the laser dots:
Turning screw (10a) clockwise
Turning screw (10a) counter-clockwise
Turning screw (10b) clockwise
Turning screw (10b) counter-clockwise
moves the laser dot to the left
moves the laser dot to the right
moves the laser dot up
moves the laser dot down
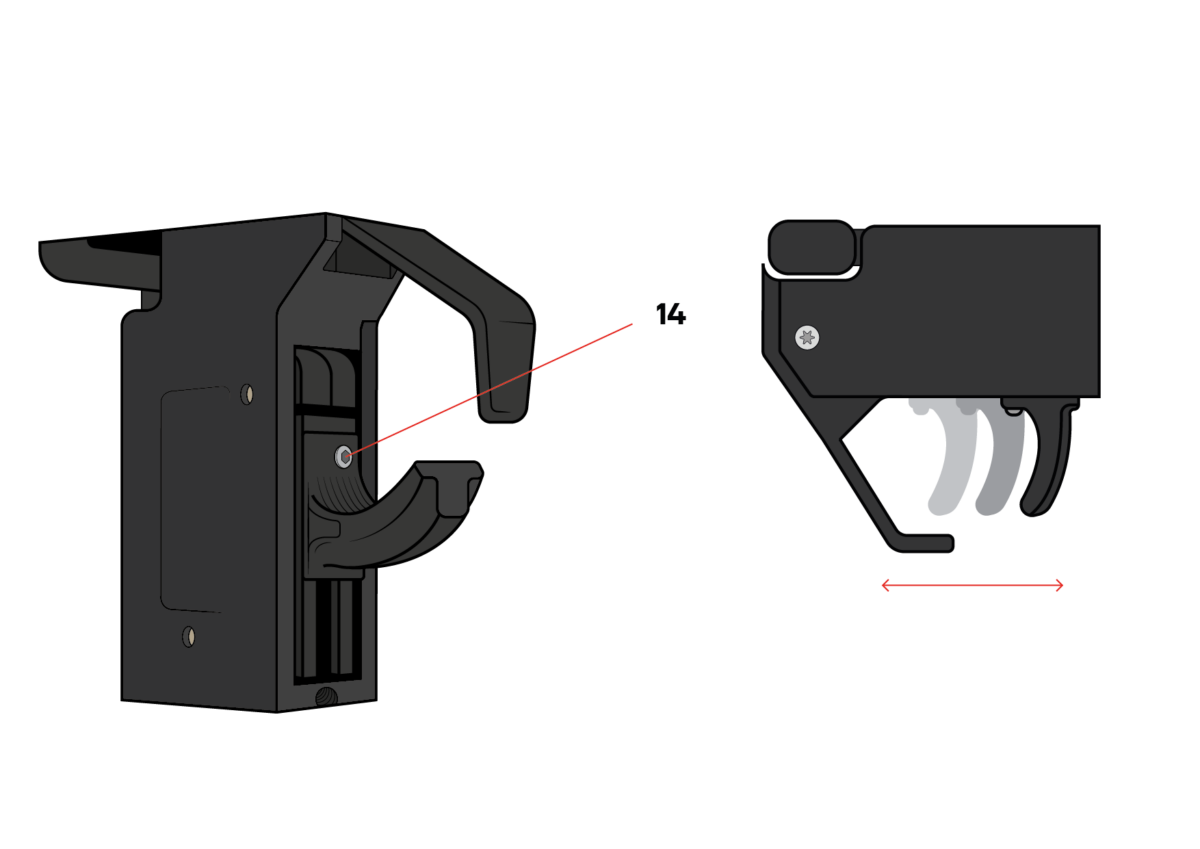
TRIGGER POSITION SETTING
After loosening the screw (14), you can move the trigger position forward or back.
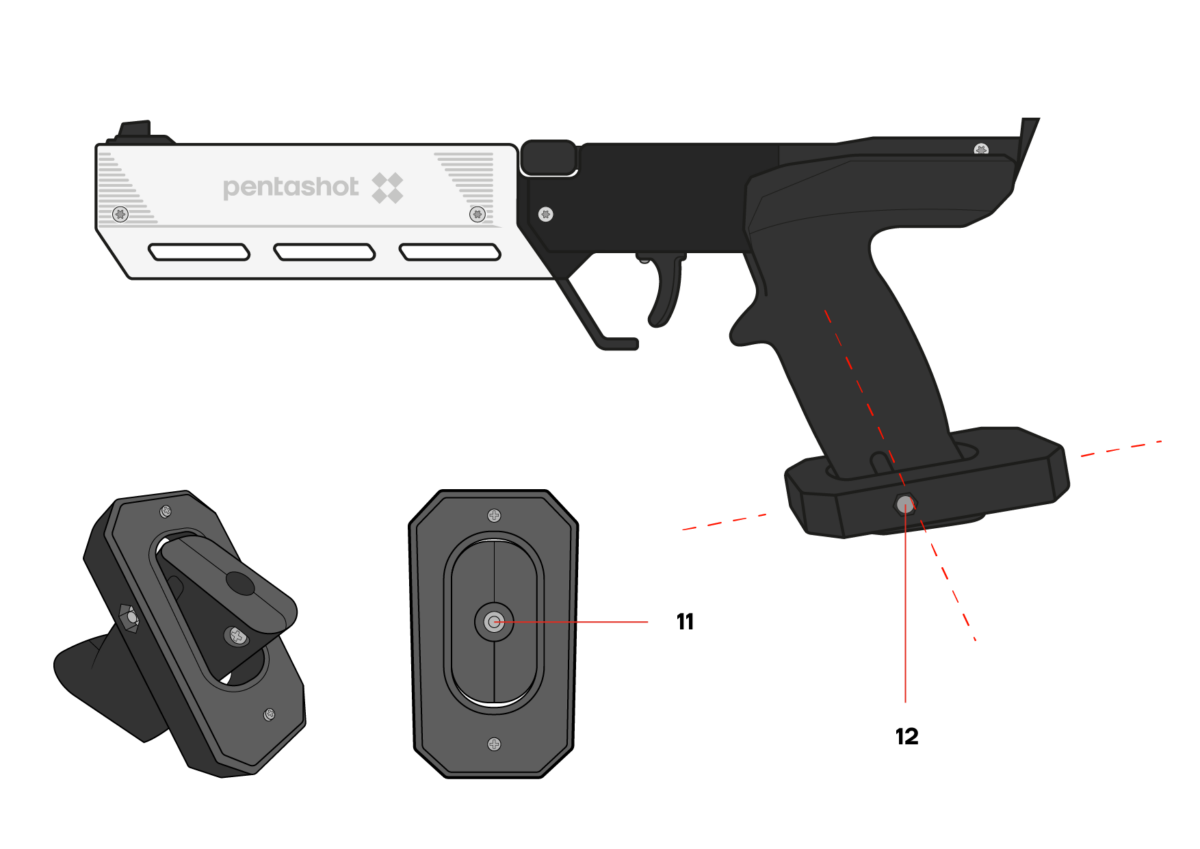
GRIP ADJUSTMENT
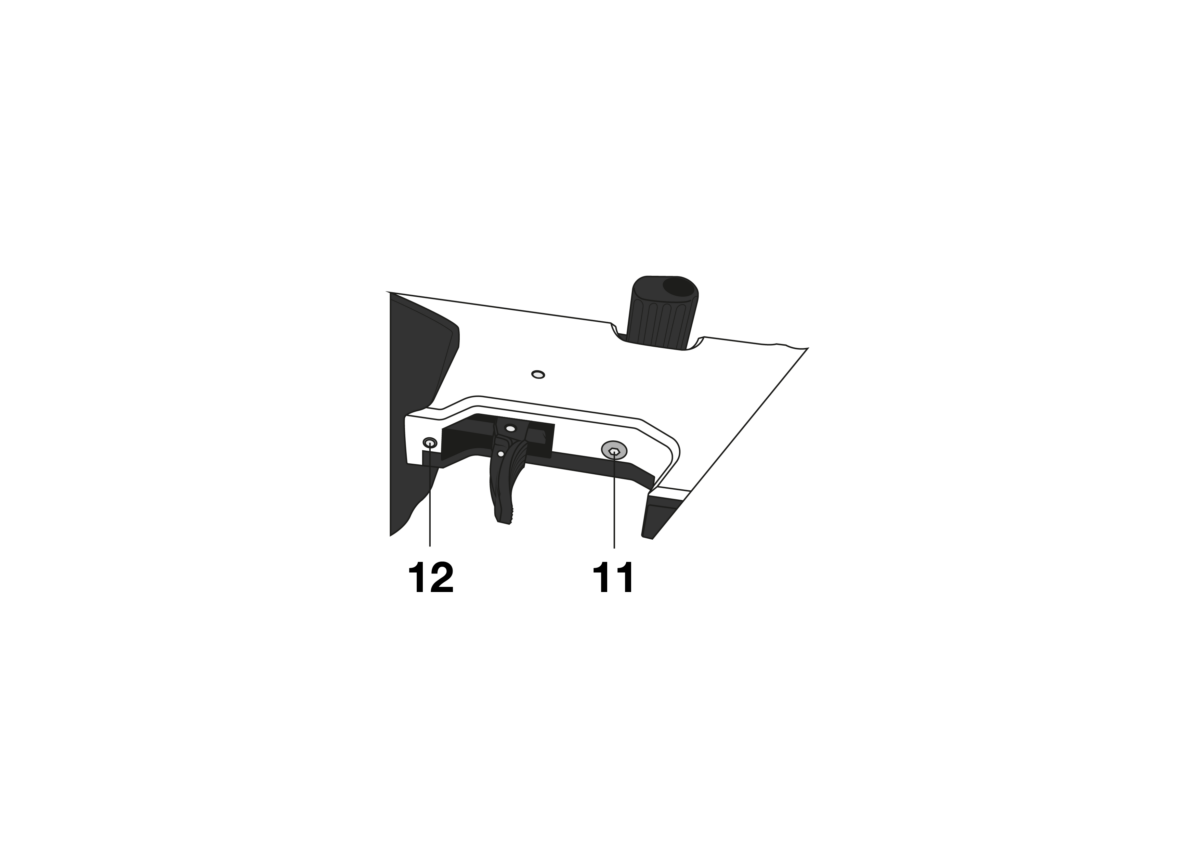
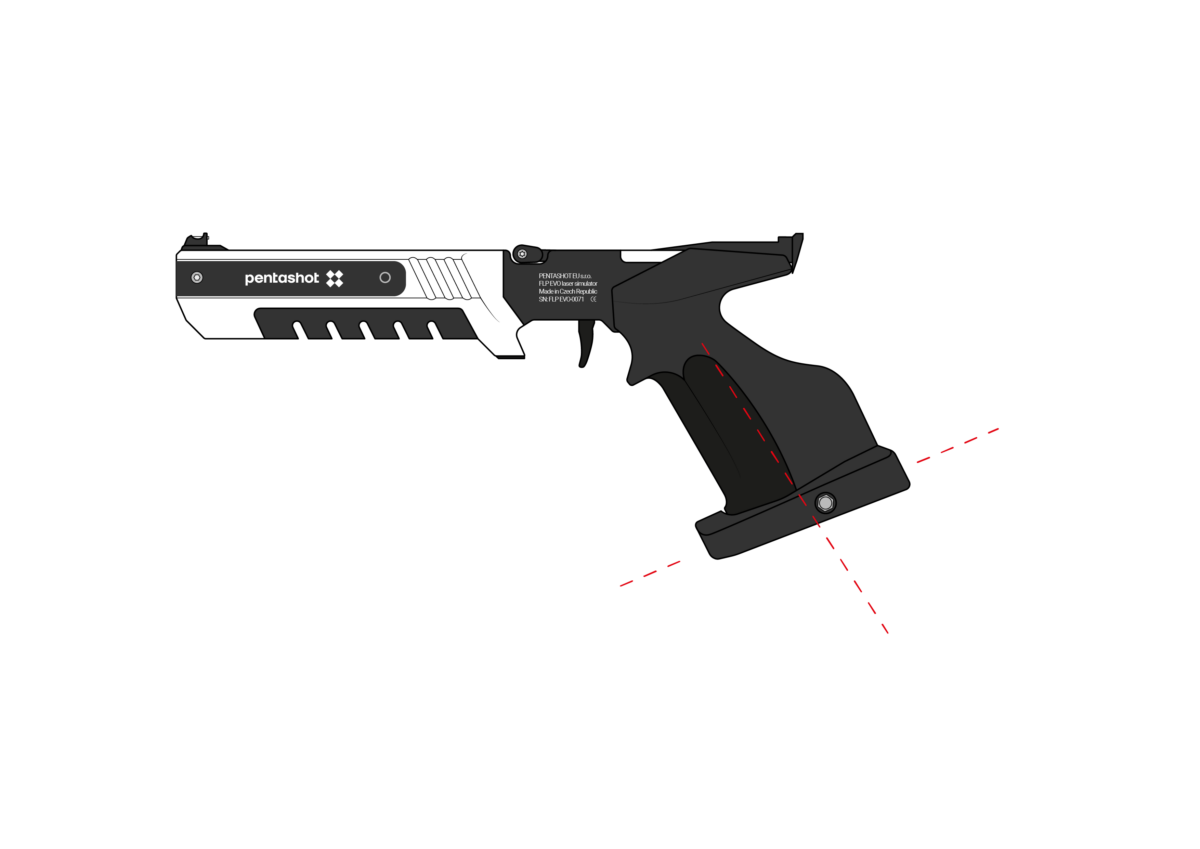
Use the included hex wrench to loosen the small screw at the bottom (11) of the simulator grip. Set the new grip position and secure it using the small screw. Use the included hex wrench to loosen the screw (12) in the grip boot. Then you can change the tilt of the boot. After adjusting the tilt of the boot, tighten the screw (12) again.
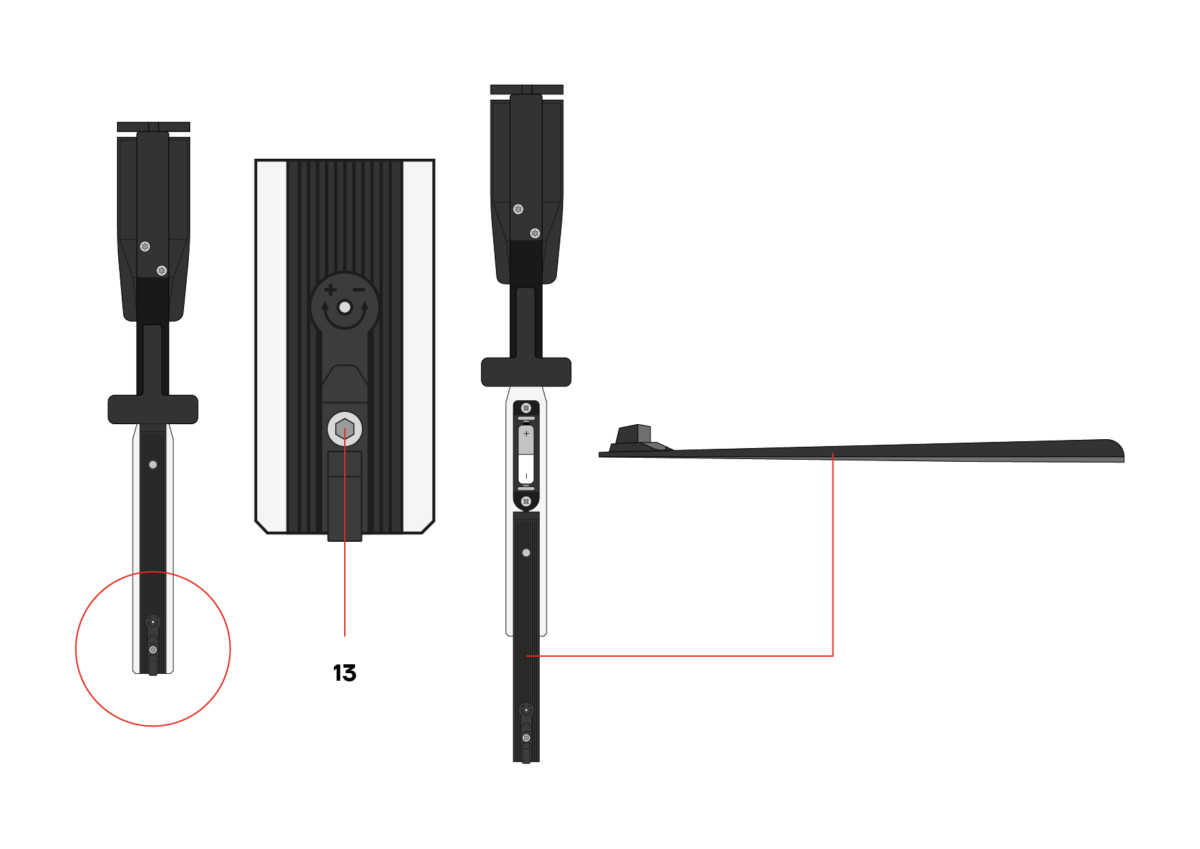
REPLACING THE BATTERY
If the LED signal light fl ashes once or constantly, replace the battery.
Take out the screw (13) that also serves as the fastener for the battery cover (7).
Carefully remove the battery cover (7) completely.
Remove the dead battery using the ribbon and insert a new battery (1.5 V type AAA).
After replacing the battery, carefully put the battery cover back on and fasten it with the screw (13).
UPDATE FUNCTION
Only the manufacturer has access to the laser simulator software.
Technical data
Dimensions
355mm x 150mm x 50mm
Simulator type
Single-acting, laser
Weight
670 g
Shooting distance
From 3 m to 10 m
Laser class
I. (per EN 60825-1:2014)
Laser class certifi cation
No. 1140735 (Electrotechnical Testing Institute, Czech Republic)
Laser module
FLPM20
Laser signal
Laser signal UIPM 15.6 s
Wavelength
650 nm
Diameter of laser beam
4 mm ± 5 % / 10 m
Minimum laser power with low battery
2,5 mW
Minimum laser power with new battery
3,2 mW
Emitter power supply
1.5V AAA alkaline battery
Number of illuminations per one AAA battery
50,000 at 20°C
Operating temperature
From 10°C to 50°C
Update function
Software at manufacturer
THE USER IS ALLOWED TO PERFORM ONLY THE FOLLOWING MAINTENANCE AND ADJUSTMENTS:
adjusting the simulator sights (laser dots)
adjusting the trigger position
adjusting the grip angle
replacing the battery
replacing the simulator grip
It is forbidden to open or modify the laser simulator, other than to change the battery or grip. Only the manufacturer or an authorized person is to change the laser beam parameters. The owner of the simulator must confi rm his consent to the change in writing. The manufacturer will accept no liability for damages resulting from such a change.
Warranty
The warranty applies only to defects in materials and workmanship that can be shown to have appeared during the warranty period. Such defects can be repaired only by the manufacturer or an authorized service representative. The purchaser can make warranty claims to the manufacturer or authorized service representative, depending on the circumstances. The warranty period begins on the day of purchase or delivery to the purchaser and remains valid for 24 months. The following cases are expressly excluded from warranty repair:
The product was not presented to the seller or manufacturer with proof of purchase.
Wear as a result of product use or damage to the product (including damage caused by unqualifi ed installation, incorrect start-up, failure to observe the procedures specifi ed in the user manual, etc.).
Damage to the product due to contamination, accidental or catastrophic events, or due to natural or outdoor events, such as storm, fi re, water, excessive heat or cold, penetration by liquids, etc.
Physical damage to the product (caused by falling breakage, etc.) or damage caused during transport.
Damage, unauthorized design changes, incorrect modifi cations to the product or other interventions into the product made by unauthorized people or service centres.
Storage
It is very important that the laser simulator be stored under the right conditions, so that it will stay reliable and in good condition. Always do the following:
Before storing the simulator for an extended time, always remove the batteries. This prevents damage to the inside of the simulator if the batteries leak.
Store the simulator in the original package (case) in a dry, dark location out of the reach of children.
Do not place any heavy objects on the case, or objects that may leak fl uids.
Protect the simulator from weather, including frost and humidity. The optimal storage temperature is +5°C to 30°C. The air humidity at the storage location must not exceed 60%. Do not store the simulator in a damp environment where there is a high risk of corrosion.
Replacement parts
The following replacement parts are available for the simulator:
front sights
grip
weight
trigger
You can order replacement parts by e-mailing to business@pentashot.eu or from PENTASHOT partners and sellers. You can fi nd a list of them at www.pentashot.eu.
Only the manufacturer or an authorized person is allowed to replace the main parts of the simulator (optics and electronics, including parts of the trigger mechanism).
Disposal
After the laser simulator’s useful life is over, it is not to be discarded with other household waste. Take it to a collection facility or have it disposed of by a specialized company authorized for the purpose.
Used batteries must not be thrown out with standard household waste. Take all used batteries to specialized collection locations.
S-Box Connec ttarget
Safety warnings and important information
Read the instructions for use before first use
Use ONLY approved power supplies or risk destroying the target
No tampering with the structure of the device, no opening by unauthorized persons – possible destruction of the target
Caution when handling and mounting the target – if the target falls due to wind or improper mounting, there is a possibility of destroying the target.
Protection of the target power supply against weather conditions, especially rain and high temperatures
Do not use a damaged target power supply – possibility of electric shock
Keep the target and the target power supply out of reach of children
Store in a dry place with a minimum temperature of 5 °C.
In the event of a malfunction, contact the manufacturer or its authorised representative/dealer.
Only PENTASHOT external lights can be used with this target.
The laser target is an optoelectronic device, its disassembly is prohibited !!!
When using the target in a room with artificial lighting, the correct function of the target may be disturbed if the light source operates at 40 kHz.
Laser emitters with inferior optics may cause incorrect evaluation of the shooting results when shooting from a distance of less than 5 metres and at low light levels.
Description
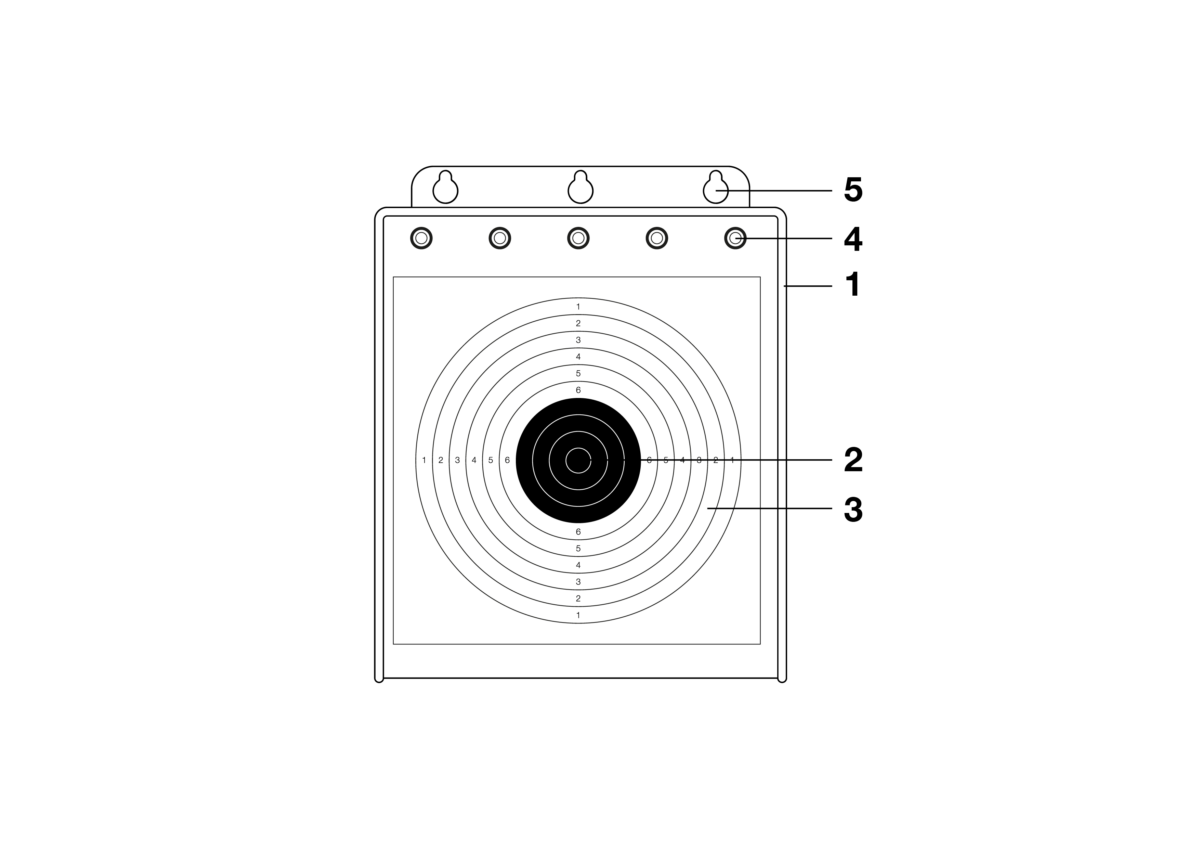
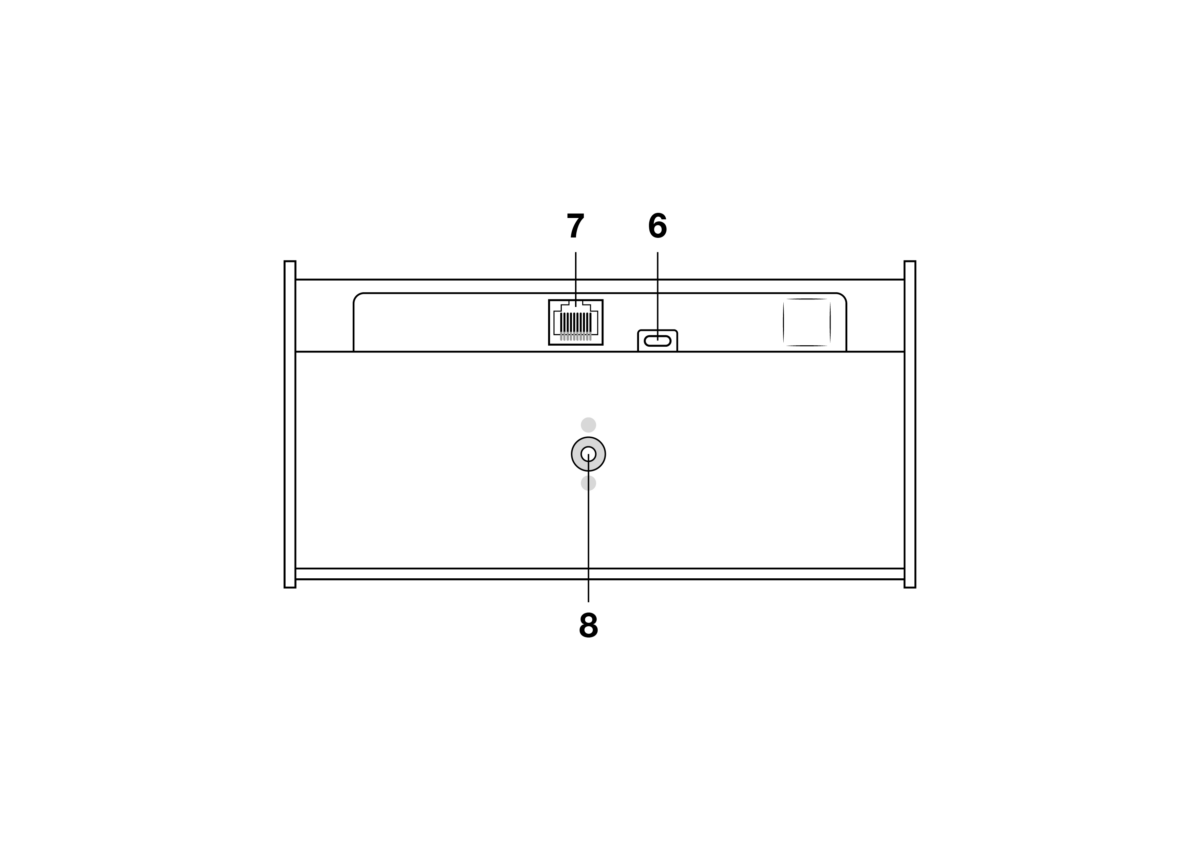
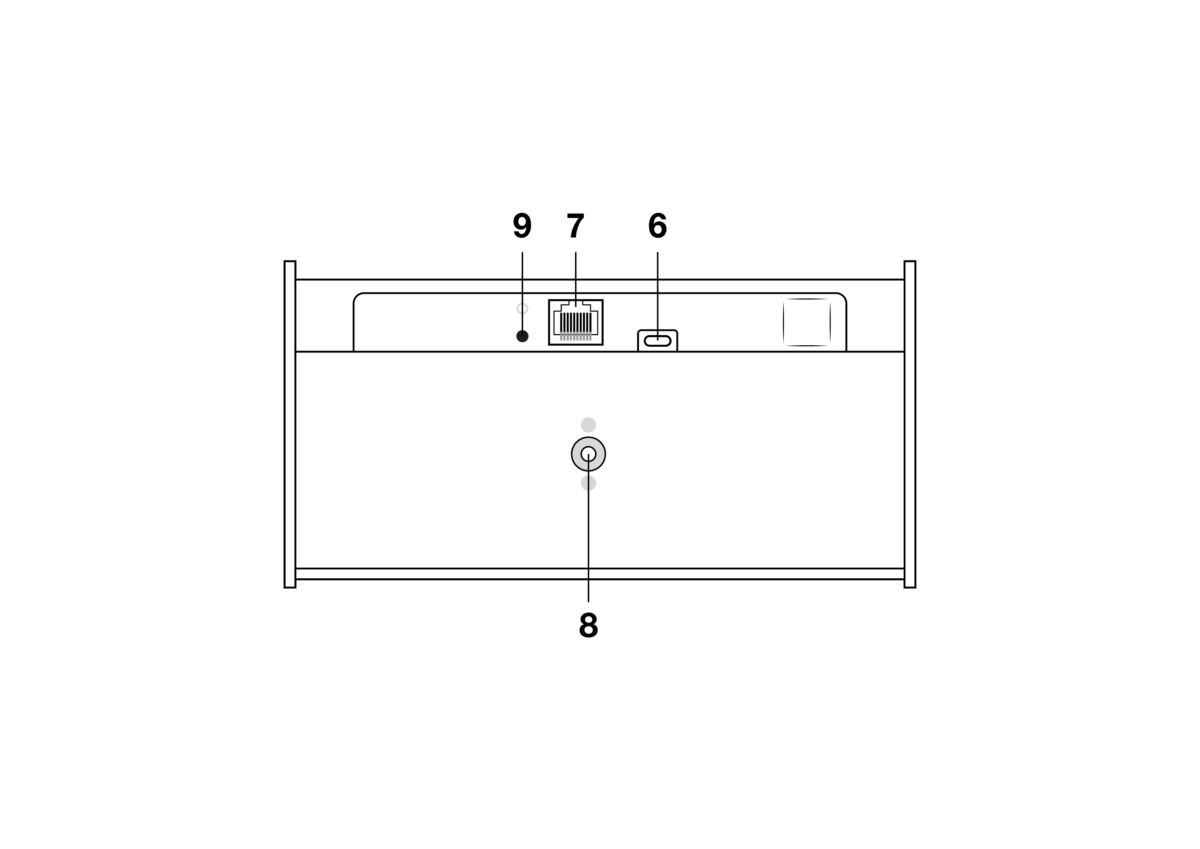
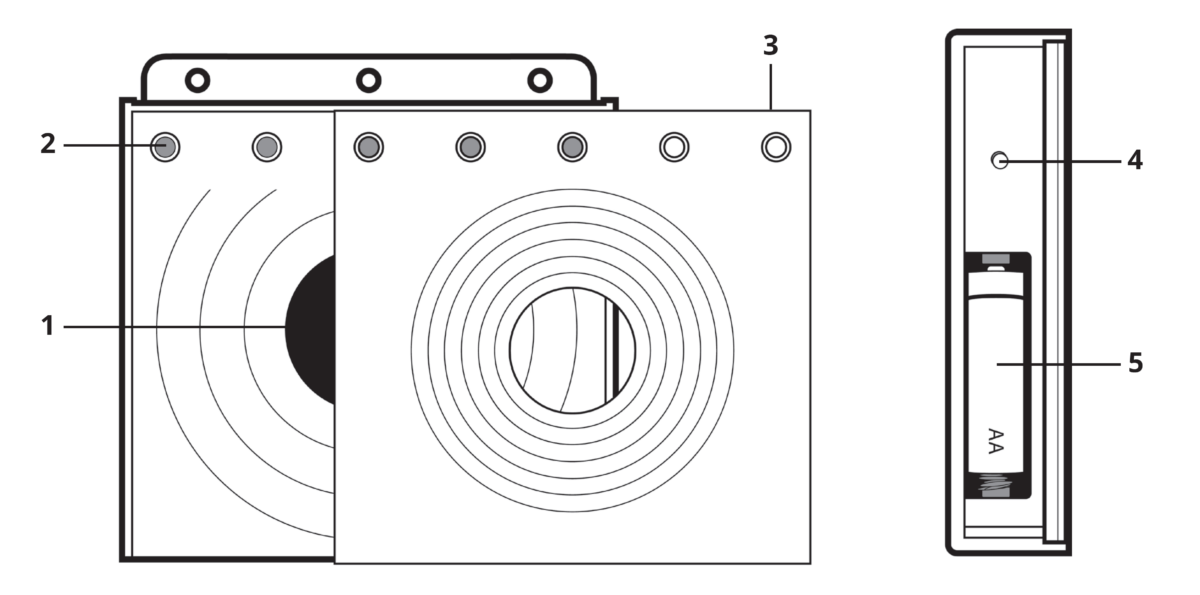
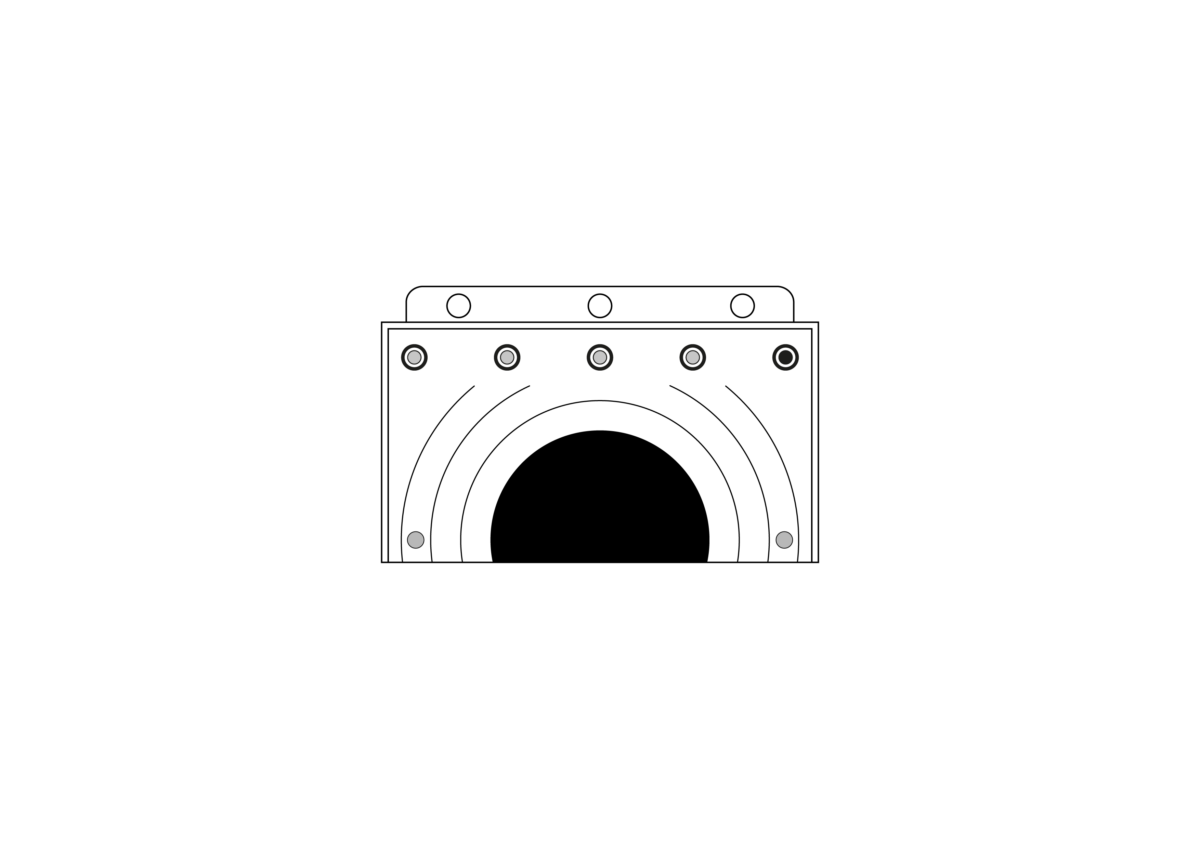
1 — Target 2 — HIT zone 3 — Missing target zone 4 — Built-in signal lights 5 — Hanging holes 6 — USB-C connector for mains power or power bank 7 — UTP connector for external signal lights 8 — Tripod mount 9 — Power button ( for targets from 2023 and serial number SBC 0305 )
Purpose
The S-Box Connect target is for instruction, training and competition specifically for sport laser shooting. The target precisely evaluates contact of the laser beam on the target surface. A shot to the hit zone (2) is signalled when a green built-in signal LED lights up (4). A shot to the miss zone (3) is signalled when a red built-in signal LED lights up. The shooting time is set according to the mode used. The target is powered by the electrical grid or a power bank
(CAUTION: USE ONLY A POWER BANK WITH THE PARAMETERS LISTED IN THIS MANUAL! ANY OTHER MAY DESTROY THE TARGET!).
Preparing the electronic target for use
The target can be mounted on a tripod using the bracket on the bottom of the target /8/ or on a wall (or other vertical surface) using the integrated hanging system /5/. The target can also be placed on a horizontal surface. The mounting of the target must be firm and stable, especially in windy weather. If the target falls to the ground, it may be damaged.
Power supply
The target is powered from the mains using the power supply supplied with the target or from a power bank with the following specifications:
maximum output voltage of 5 V
a minimum power bank output current of 2.4 A (ideally with a USB-C output that has a 3A output)
the total capacity of the power bank should not be less than 10000 mAh power on
Turn on
For targets up to serial number SBC 0304:
Plug the target’s power cable into the USB-C /6/ connector on the target. Then plug the power supply into a power outlet. The built-in LEDs /4/ on the target will start flashing. After approximately 40-50 seconds, the LEDs will turn off and the target is ready to connect to your device – smartphone or tablet. Your device must be equipped with Android or iOS and have Bluetooth enabled. When the app is turned on, the target number will be displayed, which is the same as the serial number on the back of the target. Click on the target number to display the main menu of the app. In it, you can choose from three different modes for shooting, settings, and results.
For targets from serial number SBC 0305 and above:
Press the on/off button /9/. The built-in LEDs /4/ on the target start flashing. After approximately 40-50 seconds, the LEDs will turn off and the target is ready to connect to your device – smartphone or tablet. Your device must be running Android or iOS and have Bluetooth enabled. When the app is turned on, the target number will be displayed, which is the same as the serial number on the back of the target. Click on the target number to display the main menu of the app. In it, you can choose from three different modes for shooting, settings, and results.
Turn off
The target is turned off in the SETUP application by pressing the OFF button. Shutdown is announced by the gradual extinguishing of the signal lights and an audible signal. Physically, the target is turned off by removing the power cable from the USB-C connector on the target.
Update function
App updates appear in Google Play (Android) and the AppStore (Apple iOS).
Only the manufacturer or its authorized person has access to the electronic target software.
Technical data
Dimensions
19 cm width, 24.5 cm height and 10 cm depth
Size of hit zone
Æ 59,5mm
Size of the MISS zone
175 mm x 175 mm
Weight
950 grams (target only)
Shooting distance
5 to 10 metres
Shooting time
50 in competition mode. In individual mode, the shooting time can be adjusted. In training mode, time is not limited.
Power supply
DC 5.1V 3A (only with included adapter), power bank (according to specifications in manual)
Accepted laser signal
UIPM 15.6 ms laser signa
Solar resistance
80 000 LUX
External signal lights
NAVISTREET and PENTASHOT
Operating temperature
+10°C to +50°C
Case protection class
IP52
Update function
App in Google Play or AppStore
Compatible operating systems
Android, iOS
Integrated internal lights
YES
Tripod fitting
YES
Integrated hanging system
YES
Automatic target shut-off
Yes (40 minutes after the last shot)
THE USER CAN PERFORM THE FOLLOWING MAINTENANCE AND SETTINGS:
none
It is forbidden to open or modify the electronic target, except to change the battery. Only the manufacturer or an authorized person may change the software parameters. The owner of the target must agree to the change in writing. The manufacturer will not accept any response.
Warranty
The warranty covers only defects in material and workmanship that can be proven to have been caused to appear during the warranty period. Such defects can only be repaired by the manufacturer or an authorized service representative. The purchaser may file warranty claims with the manufacturer or an authorized service representative, depending on the circumstances.
The warranty period begins on the date of purchase or delivery to the purchaser and remains in effect for a period of 24 months.
The following cases are expressly excluded from warranty repair:
The product has not been presented to the dealer or manufacturer with proof of purchase.
Wear and tear due to use of the product or damage to the product (including damage caused by unqualified installation, improper shipping, failure to follow procedures specified in the owner’s manual, or damage to the product caused by improper installation, improper instructions for use, etc.).
Damage to the product due to contamination, accidental or catastrophic events or due to natural or external events such as storm, fire, water, excessive heat or cold, liquid intrusion, etc.
Physical damage to the product (caused by falling, breakage, etc.) or damage caused during use of the product in transit.
Damage, unauthorised design changes, improper modification of the product or other interference with the product, interference with the product by unauthorised persons or service centres.
Storage
It is very important that the electronic target is stored under the correct conditions to keep it reliable and in good condition. Always observe the following instructions:
Always remove the batteries before storing the target for an extended period of time. This will prevent damage to the battery compartment on the target should the batteries leak.
Store the simulator in its original packaging (case) in a dry and dark place out of the reach of children.
Do not place any heavy objects or objects that may leak liquids on the case. Protect the target from the weather, including frost and moisture. Optimal storage temperature is +5 °C to 30 °C. The humidity in the storage area must not exceed 60%. Do not store the simulator in a humid environment where there is a high risk of corrosion.
Replaceable parts
The following spare parts are available for the targets:
faceplate
LED lights
PCB
target box
Spare parts can be ordered by e-mail at sales@pentashot.com or from PENTASHOT partners and dealers. A list of these can be found at www.pentashot.com . Replacement of major parts may only be carried out by the manufacturer or an authorised person.
Disposal
At the end of the electronic target’s service life, it cannot be discarded with other equipment. Take it to a collection yard or have it disposed of by a specialist company authorised for this purpose.
Used batteries must not be disposed of in normal household waste. Take all used batteries to specialist collection points.
Target Hit&Miss Connect
Safety notes and important information
Before use
Keep the target clean; wipe off dust with a dry cloth.
Never use detergents, solvents or chemicals.
Never press any objects against the front surface of the target.
Check the battery in the target periodically for corrosion or leakage.
If you will not be using the target for more than a week, we recommend removing the battery.
Also remove the battery before travelling by plane.
The target should be positioned so that sunlight does not directly hit the front surface of the target.
The laser target is an optoelectronic device, its disassembly is prohibited !!!
During use
When handling the target, follow the general rules for handling real weapons.
When using the target in a room with artificial lighting, the proper function of the target may be interfered with,if the light source operates at 40 kHz.
Laser emitters with inferior optics may cause incorrect scoring when fired at distances less than 5 metres and at low light levels.
The target can be fired with all laser emitters or simulators with a UIPM laser code of 15.6 ms.
After use
After use, place the target in its original case.
Protect the target from direct sunlight and rain in accordance with UIPM rules
Description
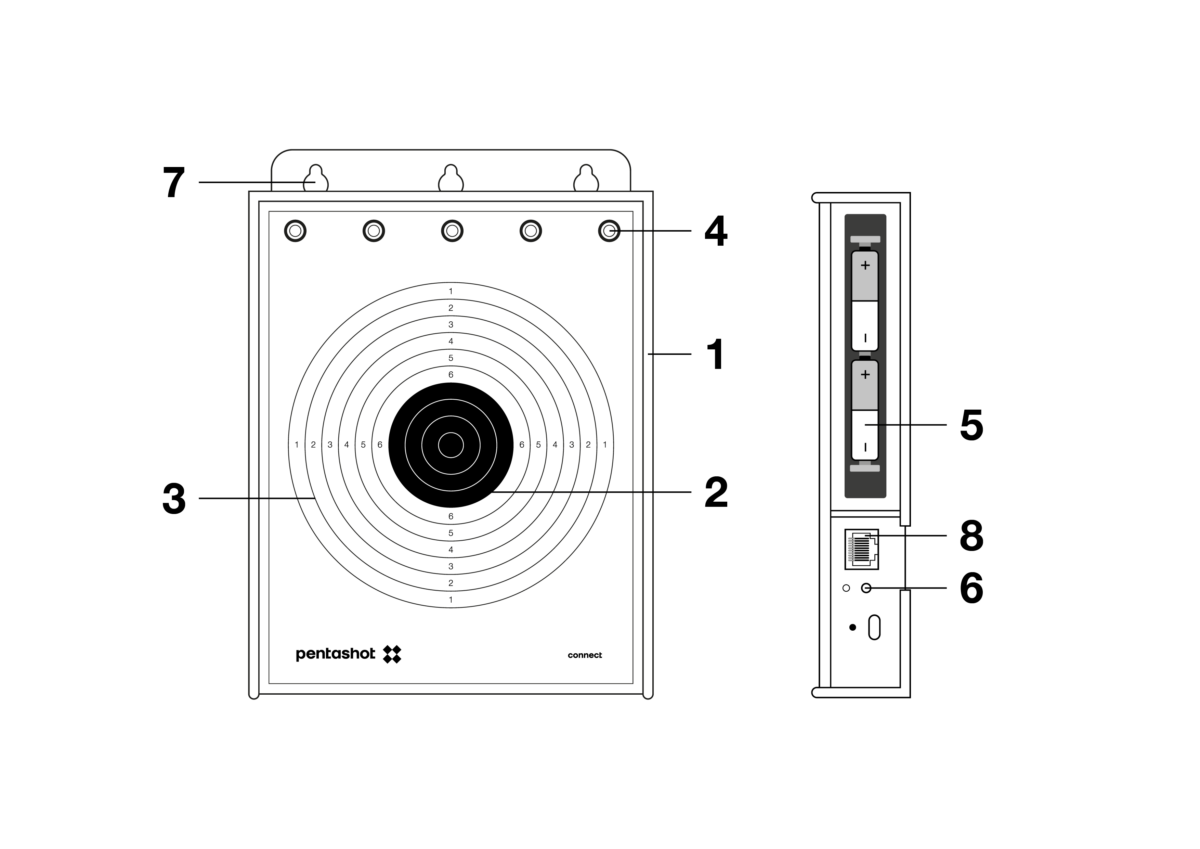
1 — Hit&Miss target 2 — Hit zone 3 — Miss zone 4 — LEDs 5 — Battery 6 — On/Off button (START) 7 — Mounting holes 8 — Connector for external lamps and programming cable
Purpose
The Hit&Miss target is for instruction, training and competition for the laser run in modern pentathlon. The target evaluates the laser beam shot to the hit zones. A shot to the hit zone is signalled when a green LED lights up. A shot to the miss zone is signalled when a red LED lights up. Shooting time is 50 seconds from the first shot to the target’s front surface. After 40 seconds, the first LED on the left flashes slowly for 5 seconds, and after 45 seconds it starts to flash quickly. After 50 seconds, all LEDs flash for 5 seconds. All LEDs also flash after the fifth successful shot to the hit zone. The target runs on two 1.5V AA batteries.
ATTENTION – YOU CAN ONLY USE A POWER BANK WITH THE PARAMETERS LISTED IN THIS MANUAL! OTHERWISE THE TARGET MAY BE DESTROYED!
Preparing the target for use
The target can be mounted on the tripod using the HIT Compact Pentashot target holder or on the wall using the hanging holes /6/. The mounting of the target must be firm and stable, especially in windy weather. If the target falls to the ground it may be damaged.
Power source
The target is powered by two AA 1.5V batteries or a power bank with the following specifications:
output voltage maximum 5V
minimum power bank output current 2.4 A (ideally with USB-C output, which has a 3A output)
the total capacity of the power bank should not be less than 10000 mAh
Turning on
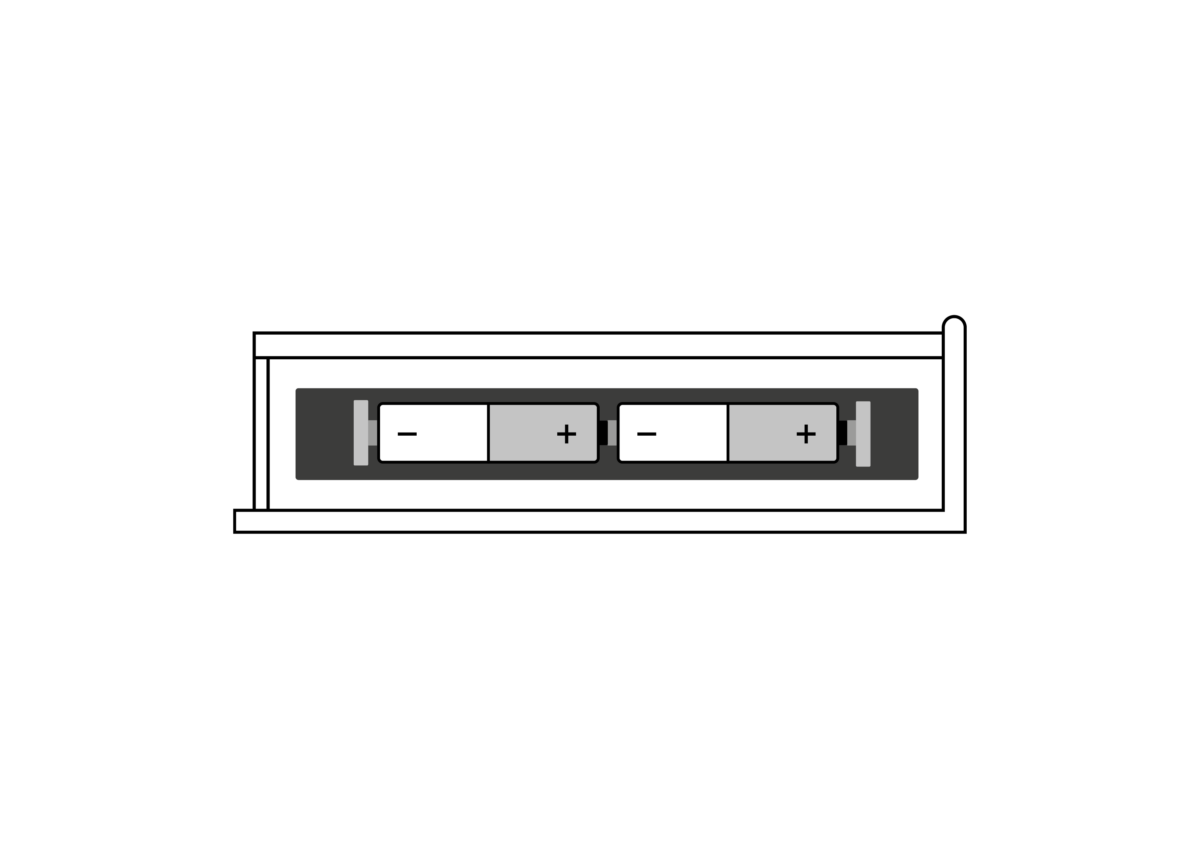
Insert two 1.5V AA batteries into the battery compartment — CAUTION: Make sure to get the polarity right (according to the instructions on the sticker in the battery compartment). Place the target on a level surface or use the holes to hang it on a wall or other prepared surface. Turn the target on with the START button.
After it is turned on, first the green LEDs go on and then the red ones (for just a few seconds). Then the target automatically checks its battery status by lighting up the green LEDs:
5 green LEDs – fully battery
4 green LEDs – battery at 75%
3 green LEDs – battery at 50%
2 green LEDs – battery at 25%
1 green LED – battery dead; replace it
Turning off
You can start shooting at the target. The target automatically shuts off 20 minutes after the last shot. The target can also be turned off by pressing the START button for about 5 seconds. An audible signal shows it has been turned off.
Replacing the battery
Remove the batteries from the battery compartment using the battery tape and insert new batteries.
Make sure the polarity is correct and insert the batteries according to the instructions in the battery compartment.
LED light brightness power supply
If you have a target with serial number HM-8236 or higher, you can use the START button to adjust the brightness of the LED lights after turning on the target.
The setting allows you to switch between lower and higher LED light brightness by pressing the START button. When the target is set to a lower brightness, the light next to the button glows red. When the START button is pressed, the higher brightness of the LED lights is set, the light next to the button is green.
Update function
App updates appear in Google Play (Android) and AppStore (Apple iOS).
The target can be updated only by the manufacturer or an authorized person.
Technical data
Dimensions
270 mm x 190 mm x 32 mm
Size of HIT zone
Æ 59,9mm
Size of MISS zone
180 mm x 175 mm
Weight
684 g with batteries
Shooting distance
From 5 to 10 metres
Shooting time
50 seconds (one round)
Power source
Two 1.5V AA batteries (alkaline recommended) USB cable from the electrical grid
Laser code type
UIPM laser signal 15.6 ms or 25.2 ms
Sunlight resistance
120 000 lux
Compatible external lamps
NAVISTREET
Operating temperature
10°C to 50°C
Degree of casing coverage
IP52
Update function
Google Play and AppStore
Compatible operating system versions
Minimum is Android 4.3 or iOS 11
Integrated signal lights
YES
Tripod mount
NO
Integrated hanging system
YES
THE USER CAN CARRY OUT THE FOLLOWING MAINTENANCE AND SETTINGS:
battery replacement
It is forbidden to open or modify the electronic target, except to change the battery. Only the manufacturer or an authorised person may change the software parameters. The owner of the target must agree to the change in writing. The manufacturer will not accept any liability for damages resulting from such a change.
Warranty
A warranty repair shall apply exclusively to defects that have provably arisen during the effective warranty period, namely as a result of a material defect or a manufacturing defect. Defects arising in such a manner may be remedied only by the manufacturer or an authorized maintenance and service center. The buyer can make a claim under the warranty against the manufacturer or authorized dealer, as the case may be.
The warranty period shall become effective on the day of purchase or delivery of the Goods to the Buyer, and the warranty remains valid for 24 months.
In particular, the following cases are excluded from the warranty repair:
The product has not been returned to the dealer/manufacturer with the proof of purchase.
Wear and tear due to the use of the product or damage to the product (incl. damage caused by unskilled installation, improper commissioning, non-compliance with the procedures defined in the instructions for use, etc.).
Damage to the product caused by contamination, an accidental or disaster event or occurring as a result of natural or external events such as a storm, fire, water, excessive heat or chill, ingress of a liquid, etc.
Mechanical damage to the product (e.g. caused by fall, breaking, etc.) or damage arising during the transportation.
Damage, unauthorized design modifications, improper modification of the product or any other interventions in the product conducted by unauthorized persons or maintenance and service centers.
Storage
It is very important that the target be stored under the right conditions, so that it will stay reliable and in good condition. Always do the following:
Before storing the target for an extended time, always remove the batteries. This prevents damage to the inside of the target if the batteries leak.
Store the target in the original package (case) in a dry, dark location out of the reach of children.
Do not place any heavy objects on the case, or objects that may leak fluids.
Protect the target from weather, including frost and humidity. The optimal storage temperature is +5°C to 30°C. The air humidity at the storage location must not exceed 60%. Do not store the target in a damp environment where there is a high risk of corrosion.
Replacement parts
The following spare parts are available for the targets:
front face
LED lights
battery holder
PCB
target box
Spare parts can be ordered by email at sales@pentashot.com or from PENTASHOT partners and dealers. You can find a list of them at www.pentashot.com .
Replacement of major parts may only be carried out by the manufacturer or an authorized person.
Disposal
Once the Hit Compact target ends its lifetime, do not dispose of it along with other household waste. Take it to a waste disposal site of raw materials or let it be disposed at a specialized company capable of recycling such a material.
Used batteries must not be thrown out with standard household waste. Take all used batteries to specialized collection locations.
Hit Compact target
Safety notes and important information
Before use
Keep the target clean; wipe off dust with a dry cloth.
Never use detergents, solvents or chemicals.
Never press any objects against the front surface of the target.
Check the battery in the target periodically for corrosion or leakage.
If you will not be using the target for more than a week, we recommend removing the battery.
Also remove the battery before travelling by plane.
The target should be positioned so that sunlight does not directly hit the front surface of the target.
The laser target is an optoelectronic device, its disassembly is prohibited !!!
During use
When handling the target, follow the general rules for handling real weapons.
When using the target in a room with artificial lighting, the proper function of the target may be interfered with,if the light source operates at 40 kHz.
Laser emitters with inferior optics may cause incorrect scoring when fired at distances less than 5 metres and at low light levels.
The target can be fired with all laser emitters or simulators with a UIPM laser code of 15.6 ms.
After use
After use, place the target in its original case.
Protect the target from direct sunlight and rain in accordance with UIPM rules
Description
1 — Hit zone 2 — LEDs 3 — Reduction area 4 — Start button 5 — Battery
Purpose
The Hit Compact target is for instruction and training for the laser run in modern pentathlon. The target evaluates the laser beam shot to the hit zone (1). A shot to the hit zone is signalled when a green LED lights up (2). Shooting time is 50 seconds from the first shot to the hit zone. After 40 seconds, the first LED on the left flashes slowly for 5 seconds, and after 45 seconds it starts to flash quickly. After 50 seconds, all LEDs flash for 5 seconds. All LEDs also flash after the fifth successful shot to the hit zone. The target runs on one 1.5V AA battery (5).
Preparing the target for use
The target can be mounted on the tripod using the HIT Compact Pentashot target holder or on the wall using the hanging holes /6/. The mounting of the target must be firm and stable, especially in windy weather. If the target falls to the ground it may be damaged.
Turning on
Insert one 1.5V AA battery into the battery compartment (5). Place the target on a level surface or use the holes to hang it on a wall or other prepared surface. Turn the target on with the START button (4). After it is turned on, first the green LEDs go on and then the red ones (for just a few seconds). Then the target automatically checks its battery status by lighting up the green LEDs:
5 green LEDs – fully battery
4 green LEDs – battery at 75%
3 green LEDs – battery at 50%
2 green LEDs – battery at 25%
1 green LED – battery dead; replace it
Turning off
The target automatically shuts off 20 minutes after the last shot.
Replacing the battery
Remove the batteries from the battery compartment using the battery tape and insert new batteries.
Make sure the polarity is correct and insert the batteries according to the instructions in the battery compartment.
Update function
The target can be updated only by the manufacturer or an authorized person.
Technical data
Dimensions
12 cm wide, 13 cm high and 3.3 cm deep
Weight
684 g with batteries
Size of HIT zone
Æ 59,5 mm Æ 30,0 mm with fitted reducing plate
Shooting distance
From 3 to 10 metres
Shooting time
50 seconds from the first hit of the HIT zone
Integrated signal lights
YES
Tripod mount
NO
Integrated hanging system
YES
Accepted laser signal
15,6 ms UIPM Laser signal
Power source
1x 1.5V AA alkaline battery
Sunlight resistance
min. 70 000 lux
Operating temperature
10°C to 50°C
Update function
Only the manufacturer or an authorized person is authorized to update the target software
THE USER CAN CARRY OUT THE FOLLOWING MAINTENANCE AND SETTINGS:
battery replacement
It is forbidden to open or modify the electronic target, except to change the battery. Only the manufacturer or an authorised person may change the software parameters. The owner of the target must agree to the change in writing.
Warranty
A warranty repair shall apply exclusively to defects that have provably arisen during the effective warranty period, namely as a result of a material defect or a manufacturing defect. Defects arising in such a manner may be remedied only by the manufacturer or an authorized maintenance and service center. The buyer can make a claim under the warranty against the manufacturer or authorized dealer, as the case may be.
The warranty period shall become effective on the day of purchase or delivery of the Goods to the Buyer, and the warranty remains valid for 24 months.
In particular, the following cases are excluded from the warranty repair:
The product has not been returned to the dealer/manufacturer with the proof of purchase.
Wear and tear due to the use of the product or damage to the product (incl. damage caused by unskilled installation, improper commissioning, non-compliance with the procedures defined in the instructions for use, etc.).
Damage to the product caused by contamination, an accidental or disaster event or occurring as a result of natural or external events such as a storm, fire, water, excessive heat or chill, ingress of a liquid, etc.
Mechanical damage to the product (e.g. caused by fall, breaking, etc.) or damage arising during the transportation.
Damage, unauthorized design modifications, improper modification of the product or any other interventions in the product conducted by unauthorized persons or maintenance and service centers.
Storage
It is very important that the target is stored under the correct conditions to maintain its good and reliable condition. Always observe the following:
Always remove the battery before storing the target for an extended period of time. This will prevent internal damage to the target if the battery should leak.
Store the target in its original packaging (case) in a dry and dark place out of the reach of children.
Do not place any heavy objects or objects that may leak liquids on the case.
Protect the target from the weather, including frost and moisture. The optimum storage temperature is between +5 and +30 °C. The humidity in the storage area must not exceed 60%. Do not store the target in a humid environment where there is a high risk of corrosion.
Replacement parts
The following spare parts are available for the targets:
front face
LED lights
battery holder
PCB
target box
Spare parts can be ordered by email at sales@pentashot.com or from PENTASHOT partners and dealers. You can find a list of them at www.pentashot.com .
Replacement of major parts may only be carried out by the manufacturer or an authorized person.
Disposal
Once the Hit Compact target ends its lifetime, do not dispose of it along with other household waste. Take it to a waste disposal site of raw materials or let it be disposed at a specialized company capable of recycling such a material.
Used batteries must not be thrown out with standard household waste. Take all used batteries to specialized collection locations.
Hit & Miss target
Safety notes and important information
Before use
Keep the target clean; wipe off dust with a dry cloth.
Never use detergents, solvents or chemicals.
Never press any objects against the front surface of the target.
Check the battery in the target periodically for corrosion or leakage.
If you will not be using the target for more than a week, we recommend removing the battery.
Also remove the battery before travelling by plane.
The target should be positioned so that sunlight does not directly hit the front surface of the target.
The laser target is an optoelectronic device, its disassembly is prohibited !!!
During use
When handling the target, follow the general rules for handling real weapons.
When using the target in a room with artificial lighting, the proper function of the target may be interfered with,if the light source operates at 40 kHz.
Laser emitters with inferior optics may cause incorrect scoring when fired at distances less than 5 metres and at low light levels.
The target can be fired with all laser emitters or simulators with a UIPM laser code of 15.6 ms.
After use
After use, place the target in its original case.
Protect the target from direct sunlight and rain in accordance with UIPM rules
Description
1 — Hit & Miss target 2 — HIT zone 3 — MISS zone 4 — LEDs 5 — Baterry 6 — On/Off button (START) 7 — Mounting holes 8 — Connector for external lamps and programming cable
Purpose
The Hit & Miss target is for instruction, training and competition for the laser run in modern pentathlon. The target evaluates the laser beam shot to the hit zones. A shot to the hit zone is signalled when a green LED lights up. A shot to the miss zone is signalled when a red LED lights up. Shooting time is 50 seconds from the first shot to the target’s front surface. After 40 seconds, the first LED on the left flashes slowly for 5 seconds, and after 45 seconds it starts to flash quickly. After 50 seconds, all LEDs flash for 5 seconds. All LEDs also flash after the fifth successful shot to the hit zone. The target runs on two 1.5V AA batteries.
Preparing the target for use
Turning on
Insert two 1.5V AA batteries into the battery compartment — CAUTION: Make sure to get the polarity right (according to the instructions on the sticker in the battery compartment). Place the target on a level surface or use the holes to hang it on a wall or other prepared surface. Turn the target on with the START button. After it is turned on, first the green LEDs go on and then the red ones (for just a few seconds). Then the target automatically checks its battery status by lighting up the green LEDs:
5 green LEDs – fully battery
4 green LEDs – battery at 75%
3 green LEDs – battery at 50%
2 green LEDs – battery at 25%
1 green LED – battery dead; replace it
Turning off
You can start shooting at the target. The target automatically shuts off 20 minutes after the last shot. The target can also be turned off by pressing the START button for about 5 seconds. An audible signal shows it has been turned off.
Replacing the battery
Remove the batteries from the battery compartment using the battery tape and insert new batteries.
Make sure the polarity is correct and insert the batteries according to the instructions in the battery compartment.
Adjusting the brightness of the LED lights
If you have a target with serial number HM-8236 or higher, you can use the START button to adjust the brightness of the LED lights after turning on the target.
The setting allows you to switch between lower and higher LED light brightness by pressing the START button. When the target is set to a lower brightness, the light next to the button glows red. When the START button is pressed, the higher brightness of the LED lights is set, the light next to the button is green.
Update function
Only the manufacturer or a person authorised by the manufacturer has access to the laser simulator software.
Technical data
Dimensions
270 mm x 190 mm x 32 mm
Size of HIT zone
Æ 59,9 mm
Size of MISS zone
180 mm x 175 mm
Weight
684 g with batteries
Shooting distance
From 3 to 10 metres
Shooting time
50 seconds (one round)
Power source
Two 1.5V AA batteries (alkaline recommended)
Laser code type
UIPM laser signal 15.6 ms or 25.2 ms
Sunlight resistance
120,000 LUX
Compatible external lamps
NAVISTREET
Operating temperature
10°C to 50°C
Degree of casing coverage
IP52
Update function
Google Play a AppStore
Compatible versions of operating systems
Minimum Android 4.3 or iOS 11
Integrated signal lights
YES
Tripod mount
YES
Integrated hanging system
YES
THE USER CAN CARRY OUT THE FOLLOWING MAINTENANCE AND SETTINGS:
battery replacement
It is forbidden to open or modify the electronic target, except to change the battery. Only the manufacturer or an authorised person may change the software parameters. The owner of the target must agree to the change in writing.
Warranty
A warranty repair shall apply exclusively to defects that have provably arisen during the effective warranty period, namely as a result of a material defect or a manufacturing defect. Defects arising in such a manner may be remedied only by the manufacturer or an authorized maintenance and service center. The buyer can make a claim under the warranty against the manufacturer or authorized dealer, as the case may be.
The warranty period shall become effective on the day of purchase or delivery of the Goods to the Buyer, and the warranty remains valid for 24 months.
In particular, the following cases are excluded from the warranty repair:
The product has not been returned to the dealer/manufacturer with the proof of purchase.
Wear and tear due to the use of the product or damage to the product (incl. damage caused by unskilled installation, improper commissioning, non-compliance with the procedures defined in the instructions for use, etc.).
Damage to the product caused by contamination, an accidental or disaster event or occurring as a result of natural or external events such as a storm, fire, water, excessive heat or chill, ingress of a liquid, etc.
Mechanical damage to the product (e.g. caused by fall, breaking, etc.) or damage arising during the transportation.
Damage, unauthorized design modifications, improper modification of the product or any other interventions in the product conducted by unauthorized persons or maintenance and service centers.
Storage
It is very important to store the Hit & Miss target under the correct conditions to keep it in good, reliable condition. Always do the following:
Before storing the Hit & Miss target with a laser emitter connected for an extended time, always remove the battery. This prevents internal damage to the simulator if the battery leaks.
Store the Hit & Miss target in the original packaging (case) in a dry, dark place out of reach of children.
Do not place any heavy objects on the case, or items that may leak fluids.
Protect the Hit & Miss target from weather, including frost and moisture. The optimal storage temperature is between +5 and +30° C. The storage location’s air humidity must not exceed 60%. Do not store the simulator in a damp environment where there is high risk of corrosion.
Replacement parts
The following spare parts are available for the targets:
front face
battery holder
LED lights
PCB
target box
Spare parts can be ordered by email at sales@pentashot.com or from PENTASHOT partners and dealers. You can find a list of them at www.pentashot.com.
Replacement of major parts may only be carried out by the manufacturer or an authorized person.
Disposal
Once the Hit & Miss target ends its lifetime, do not dispose of it along with other household waste. Take it to a waste disposal site of raw materials or let it be disposed at a specialized company capable of recycling such a material.
GLS 17
Safety notes and important information
Keep the emitters clean by wiping the dust out of them with a dry cloth. Never use any cleaning agents, solvents or chemical preparations. Do not push the emissive hole optic with any object. Regularly check the condition of the battery inside the simulator body to make sure it does not corrode or leak. If you will not be using the simulator for more than one week, you must remove the battery. Also remove the battery before traveling by plane.
BEFORE USAGE
The simulator must be used in accordance with these Instructions only. Never use the simulator for purposes other than those for which it is designed. Failure to follow these instructions may expose the user to dangerous laser radiation.
Do not break the security stamp, otherwise you will lose the warranty on the product.
When in public, carry the simulator in its original case or in a bag. Persons not familiar with this type of simulators may mistake it for a regular weapon and alarm the police.
DURING USAGE
Never aim at people, animals or uncontrolled areas.
While handling the simulator, observe the general rules for manipulation with a real weapon.
WARNING! Failure to follow the above stated instructions may expose the user to dangerous laser radiation.
AFTER USAGE
Bewahren Sie den Simulator nach der Verwendung in dem Originalkoff er auf.
Schützen Sie den Simulator gemäß den UIPM-Regeln vor direkter Sonneneinstrahlung und Regen
LASER RADIATION DO NOT LOOK DIRECTLY INTO THE LASER BEAM! CLASS I. LASER DEVICE
Description
1 — Front sights 2 — Battery cover / battery 3 — Battery status LED indicator 4 — Loading lever 5 — Rear sights 6 — Ambidextrous grip 7 — Trigger
PURPOSE
The GLS 17 laser simulator is designed for use at instructional courses, trainings or modern pentathlon competitions. It is intended for laser beam shooting initiated by a trigger. The GLS 17 laser simulator employs the FLPM20 laser module with a 15.6 ms code as an emitter. The code is fully compatible with the International Modern Pentathlon Union (UIPM) standards
Preparing laser simulator for use
SWITCHING ON
Attach the chip (8) to the simulator body and move it from right to left. This will switch simulator ON and the LED (3) will fl ash. The number of fl ashes indicates the battery status:
5 fl ashes – the battery is 100% full
4 fl ashes – the battery is at 75% charge level
3 fl ashes – the battery is at 50% charge level
2 fl ashes – the battery is at 25% charge level
1 fl ash – the battery is discharged, replace it
After the battery test, the LED light remains constantly blue to indicate the laser is on and ready for use.
The LED fl ashing continuously blue means the battery is discharged and it should be immediately replaced.
SWITCHING OFF
The laser container will switch off approximately 20 minutes after the last shot. In case you need to switch it off immediately, remove the battery from the simulator body.
SETTING THE SIGHTS (ALIGNING THE LASER DOT)
To adjust the simulator sights, aim at a white wall or a white object from a distance of 10 meters and check the alignment of the red laser dot and simulator sights. If necessary, use the adjusting screws to align the laser dot:
Turning the screw (9a) clockwise
Turning the screw (9a) counterclockwise
Turning the screw (9b) clockwise
Turning the screw (9b) counterclockwise
laser dot moves to the left
laser dot moves to the right
laser dot goes upward
laser dot goes downward
IMPORTANT: The movement of the adjusting screws must be very small. One turn of the adjusting screw moves the laser dot by approximately 20 cm at a 10m distance.
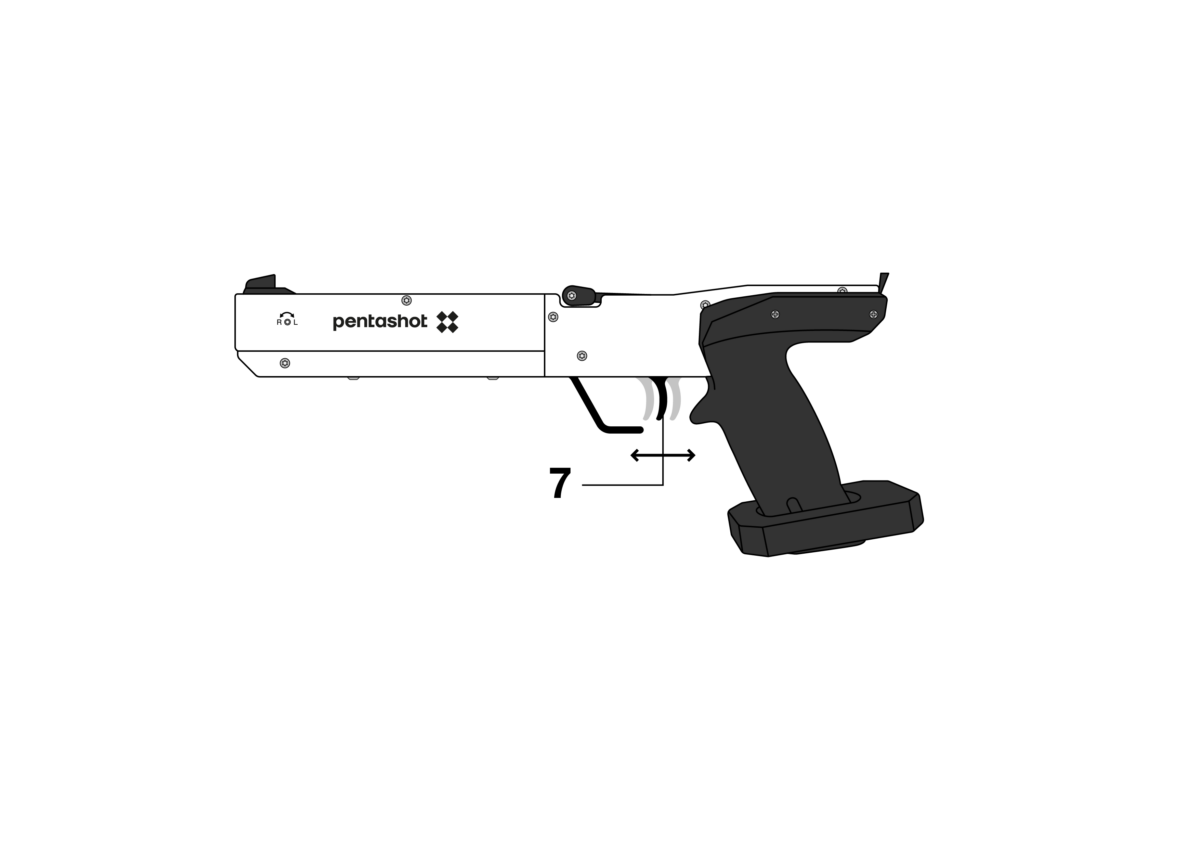
SETTING THE TRIGGER POSITION (ONLY FLP)
There are three available trigger positions. Unscrew the trigger (7) and screw it into position more suitable for you.
SETTING THE GRIP ANGLE (ONLY ANATOMICAL GRIP)
Use the supplied hexagonal key to loosen the small screw on the simulator grip bottom. Set a new position of the grip and fi x it by tightening the small screw.
BATERRY REPLACEMENT
When the LED indicator fl ashes once or is constantly fl ashing, replace the battery.
Press your thumbes on the places marked “Push” and lower the battery cover until it is completely removed.
Remove the discharged battery using the ribbon and insert a new one (AAA 1,5V). Pay attention to the correct polarity of battery!
Reinstall the cover (A).
UPDATE FUNCTION
Only the manufacturer has access to the laser simulator software.
Technical data
Dimensions
355mm x 150mm x 50mm
Simulator type
single-acting, laser
Weight
650 g lighter version GLS 17 “K” 780 g with universal handle 830 g with anatomical handle
Shooting distance
From 3 m to 10 m
Laser class
I. (per EN 60825-1:2014)
Laser class certifi cation
No. 1140735 (Electrotechnical Testing Institute, Czech Republic)
Laser module
FLPM20
Laser signal
15.6 ms UIPM laser signal
Wavelength
650 nm
Diameter of laser beam
4 mm ± 5 % / 10 m
Minimum laser power with weak battery
2,5 mW
Minimum laser power with new battery
3,2 mW
Emitter power supply
1.5V AAA alkaline battery
Number of light shots per AAA battery
50,000 at 20°C
Operating temperature
From 10°C to 50°C
Update function
Software at manufacturer
THE USER CAN ONLY SET OR MAINTAIN THE FOLLOWING:
set the simulator sights (the laser dot)
set the trigger position
set the grip angle
change the battery
change the simulator stock
It is forbidden to open or modify the laser simulator, with the exception of changing the battery or grip. The Laser beam parameters can only be changed by the manufacturer or an authorized person. The simulator owner must confi rm his consent to the change in writing. The manufacturer does not assume responsibility for any damage that would arise from the change.
Warranty
A warranty repair shall apply exclusively to defects that have provably arisen during the eff ective warranty period, namely as a result of a material defect or a manufacturing defect. Defects arising in such a manner may be remedied only by the manufacturer or an authorized maintenance and service center. The buyer can make a claim under the warranty against the manufacturer or authorized dealer, as the case may be.
The warranty period shall become eff ective on the day of purchase or delivery of the Goods to the Buyer, and the warranty remains valid for 24 months.
In particular, the following cases are excluded from the warranty repair:
The product has not been returned to the dealer/manufacturer with the proof of purchase.
Wear and tear due to the use of the product or damage to the product (incl. damage caused by unskilled installation, improper commissioning, non-compliance with the procedures defi ned in the instructions for use, etc.).
Damage to the product caused by contamination, an accidental or disaster event or occurring as a result of natural or external events such as a storm, fi re, water, excessive heat or chill, ingress of a liquid, etc.
Mechanical damage to the product (e.g. caused by fall, breaking, etc.) or damage arising during the transportation.
Damage, unauthorized design modifi cations, improper modifi cation of the product or any other interventions in the product conducted by unauthorized persons or maintenance and service centers.
Storage
It is very important to store the laser simulator under the correct conditions to keep it in good, reliable condition. Always do the following:
Before storing the simulator for an extended time, always remove the battery. This prevents internal damage to the simulator if the battery leaks.
Store the simulator in the original packaging (case) in a dry, dark place out of reach of children.
Do not place any heavy objects on the case, or items that may leak fl uids.
Protect the simulator from weather, including frost and moisture. The optimal storage temperature is between +5 and +30° C. The storage location’s air humidity must not exceed 60%. Do not store the simulator in a damp environment where there is high risk of corrosion.
Spare parts
The following replacement parts are available for the simulator:
front sights
stock
plumb
trigger
Order replacement parts by e-mail from business@pentashot.eu or from PENTASHOT partners and dealers. A list of them can be found at www.pentashot.eu.
Only the manufacturer or an authorized individual has the right to replace the simulator’s main parts (optics and electronics, including parts of the trigger mechanism).
Disposal
Once the laser simulator ends its lifetime, do not dispose of it along with other household waste. Take it to a waste disposal site of raw materials or let it be disposed at a specialized company capable of recycling such a material.
The used battery must not be thrown into a standard dustbin. Collect all used the batteries and dispose them at specialized collection points.
GLS e.Start
Safety notes and important information
Keep the emitter clean; wipe off dust with a dry cloth. Never use cleaning agents, solvents or chemicals. Never press any object onto the optics hole. Regularly check the battery inside the simulator body for corrosion or leaks. If you will not be using the simulator for more than a week, you must remove the battery. Also remove the battery before plane travel.
BEFORE USE
The simulator must be used only according to these instructions. Never use the simulator for purposes for which it was not intended. Failure to follow these instructions can expose the user to dangerous laser radiation.
Never break the safety sticker — this will void the product warranty.
In public, carry the simulator in its original case or bag. People who don’t know this type of simulator may mistake it for an ordinary weapon and alert the police
DURING USE
Never aim at people, animals or uncontrolled locations.
When handling the simulator, follow the general rules for handling real weapons.
AFTER USE
After use, store the simulator in its original case.
Protect the simulator from direct sunlight and rain in keeping with the UIPM rules.
LASER RADIATION NEVER LOOK DIRECTLY INTO THE LASER BEAM! CLASS I LASER EQUIPMENT
Description
1 — Bead (front sights) integrated into the battery cover 2 — Battery status LED 3 — Pull lever 4 — Rear sights 5 — Ämbidextrous grip 6 — Trigger 7 — Battery cover with integrated bead
PURPOSE
The GLS e.Start laser simulator is for use in instructional courses, training or competition in modern pentathlon. It is designed to shoot a laser beam activated by a trigger. The GLS e.Start laser simulator is used like an FLP20-e laser module emitter with a 15.6 ms code. This code is completely compatible with the standards of the International Modern Pentathlon Union (UIPM).
Preparing the laser simulator for use
TURNING THE SIMULATOR ON
Pull the charging lever (3) to the maximum (about 35 degrees). This turns the laser simulator on while charging it for the fi rst shot. After start, the LED (2) on the left side of the simulator body will start to fl ash. The number of fl ashes indicates the battery status.
5 fl ashes – 100% battery charge
4 fl ashes – 75% battery charge
3 fl ashes – 50% battery charge
2 fl ashes – 25% battery charge
1 fl ash – battery is dead and needs replacement.
TURNING THE SIMULATOR OFF
The laser module shuts off about 30 minutes after the last light shot. If you need to turn it off right away, remove the battery from the simulator body.
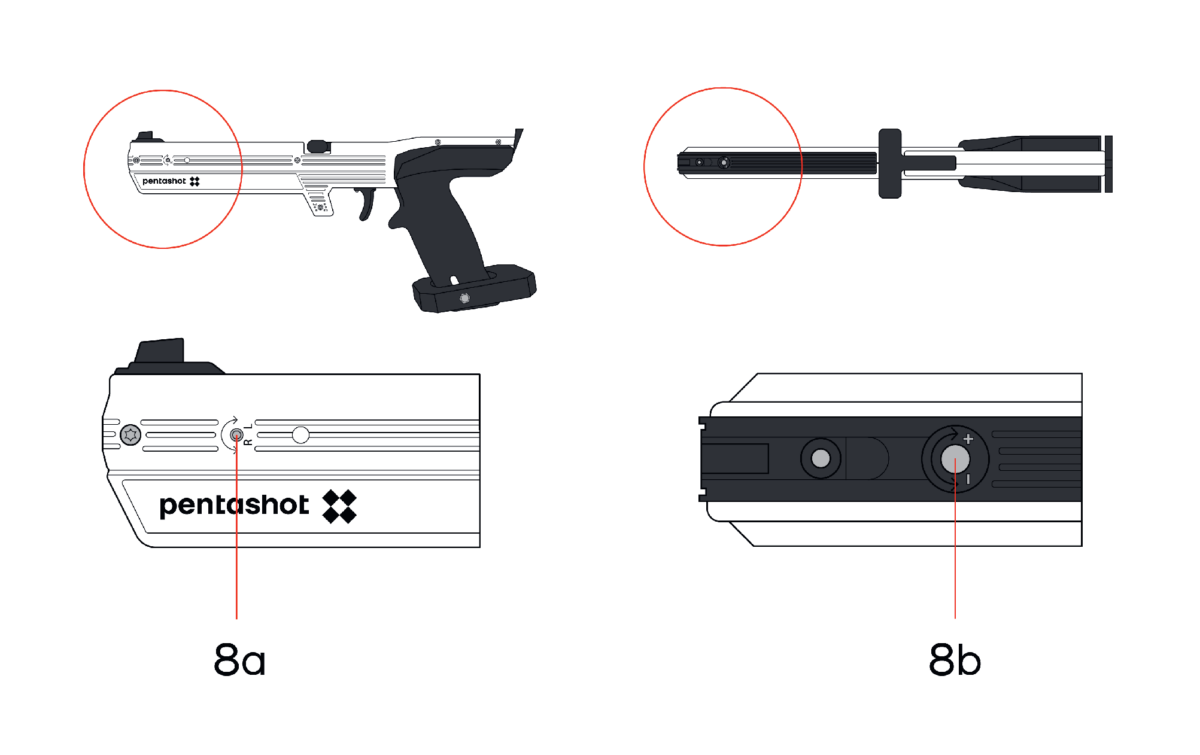
ADJUSTING THE SIMULATOR SIGHTS (LASER DOT ALIGNMENT)
To adjust the sights of the simulator, aim at a white wall or white object 10 metres away and check the alignment of the red laser dots and sights. If necessary, use the adjustment screws to align the laser dots:
Turning screw (8a) clockwise
Turning screw (8a) counter-clockwise
Turning screw (8b) clockwise
Turning screw (8b) counter-clockwise
moves the laser dot to the left
moves the laser dot to the right
moves the laser dot up
moves the laser dot down
ADJUSTING THE SIMULATORS SIGHTS
IMPORTANT: The adjustment screw movements must be very small. One turn of an adjustment screw moves the laser dot about 20 cm at a distance of 10 m
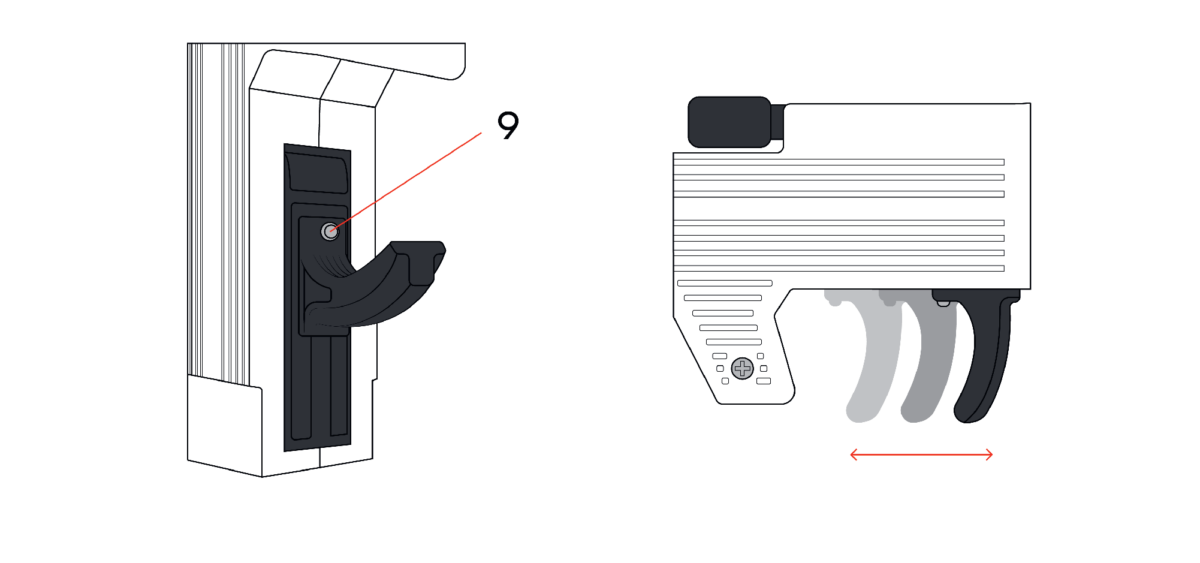
TRIGGER POSITION SETTING
After loosening the screw (9), you can move the trigger position forward or back.
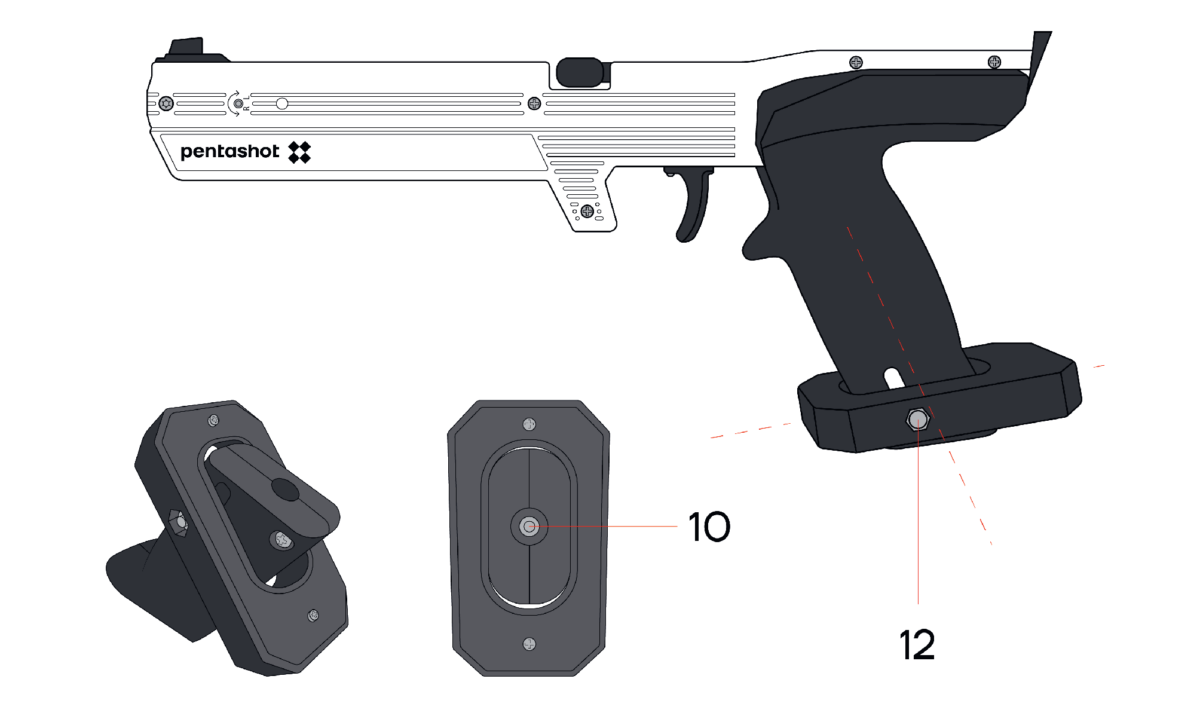
GRIP ADJUSTMENT
Use the included hex wrench to loosen the small screw at the bottom (10) of the simulator grip. Set the new grip position and secure it using the small screw. Use the included hex wrench to loosen the screw (12) in the grip boot. Then you can change the tilt of the boot. After adjusting the tilt of the boot, tighten the screw (12) again.
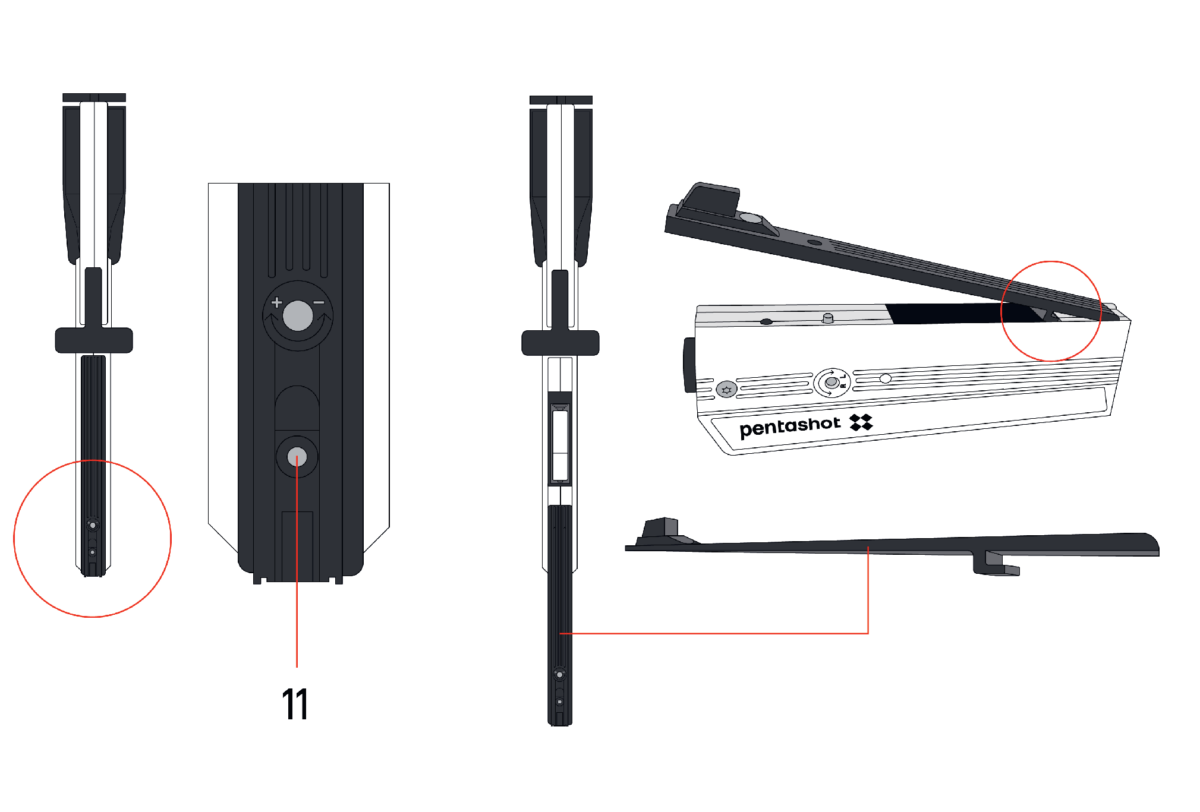
REPLACING THE BATTERY
If the LED signal light fl ashes once or constantly, replace the battery.
Take out the screw (11) that also serves as the fastener for the battery cover (7) with integrated bead (1).
Carefully remove the battery cover (7) completely.
Remove the dead battery using the ribbon and insert a new battery (1.5 V type AAA).
After replacing the battery, carefully put the battery cover back on and fasten it with the screw (11).
UPDATE FUNCTION
Only the manufacturer has access to the laser simulator software.
Technical data
Dimensions
355mm x 150mm x 50mm
Simulator type
Single-acting, laser
Weight
670 g
Shooting distance
From 3 m to 10 m
Laser class
I. (per EN 60825-1:2014)
Laser class certifi cation
No. 1140735 (Electrotechnical Testing Institute, Czech Republic)
Laser module
FLPM20
Laser signal
Laser signal UIPM 15.6 s
Wavelength
650 nm
Diameter of laser beam
4 mm ± 5 % / 10 m
Minimum laser power with low battery
2,5 mW
Minimum laser power with new battery
3,2 mW
Emitter power supply
1.5V AAA alkaline battery
Number of illuminations per one AAA battery
50,000 at 20°C
Operating temperature
From 10°C to 50°C
Update function
Software at manufacturer
THE USER IS ALLOWED TO PERFORM ONLY THE FOLLOWING MAINTENANCE AND ADJUSTMENTS:
adjusting the simulator sights (laser dots)
adjusting the trigger position
adjusting the grip angle
replacing the battery
replacing the simulator grip
It is forbidden to open or modify the laser simulator, other than to change the battery or grip. Only the manufacturer or an authorized person is to change the laser beam parameters. The owner of the simulator must confi rm his consent to the change in writing. The manufacturer will accept no liability for damages resulting from such a change.
Warranty
The warranty applies only to defects in materials and workmanship that can be shown to have appeared during the warranty period. Such defects can be repaired only by the manufacturer or an authorized service representative. The purchaser can make warranty claims to the manufacturer or authorized service representative, depending on the circumstances. The warranty period begins on the day of purchase or delivery to the purchaser and remains valid for 24 months. The following cases are expressly excluded from warranty repair:
The product was not presented to the seller or manufacturer with proof of purchase.
Wear as a result of product use or damage to the product (including damage caused by unqualifi ed installation, incorrect start-up, failure to observe the procedures specifi ed in the user manual, etc.).
Damage to the product due to contamination, accidental or catastrophic events, or due to natural or outdoor events, such as storm, fi re, water, excessive heat or cold, penetration by liquids, etc.
Physical damage to the product (caused by falling breakage, etc.) or damage caused during transport.
Damage, unauthorized design changes, incorrect modifi cations to the product or other interventions into the product made by unauthorized people or service centres.
Storage
It is very important that the laser simulator be stored under the right conditions, so that it will stay reliable and in good condition. Always do the following:
Before storing the simulator for an extended time, always remove the batteries. This prevents damage to the inside of the simulator if the batteries leak.
Store the simulator in the original package (case) in a dry, dark location out of the reach of children.
Do not place any heavy objects on the case, or objects that may leak fl uids.
Protect the simulator from weather, including frost and humidity. The optimal storage temperature is +5°C to 30°C. The air humidity at the storage location must not exceed 60%. Do not store the simulator in a damp environment where there is a high risk of corrosion.
Replacement parts
The following replacement parts are available for the simulator:
front sights
grip
weight
trigger
You can order replacement parts by e-mailing to business@pentashot.eu or from PENTASHOT partners and sellers. You can fi nd a list of them at www.pentashot.eu.
Only the manufacturer or an authorized person is allowed to replace the main parts of the simulator (optics and electronics, including parts of the trigger mechanism).
Disposal
After the laser simulator’s useful life is over, it is not to be discarded with other household waste. Take it to a collection facility or have it disposed of by a specialized company authorized for the purpose.
Used batteries must not be thrown out with standard household waste. Take all used batteries to specialized collection locations.
FLP EVO a FLP EVO Compact
Safety notes and important information
Keep the emitter clean; wipe off dust with a dry cloth. Never use cleaning agents, solvents or chemicals. Never press any object onto the optics hole. Regularly check the battery inside the simulator body for corrosion or leaks. If you will not be using the simulator for more than a week, you must remove the battery. Also remove the battery before plane travel.
BEFORE USAGE
The simulator must be used in accordance with these Instructions only. Never use the simulator for purposes other than those for which it is designed. Failure to follow these instructions may expose the user to dangerous laser radiation.
Do not break the security stamp, otherwise you will lose the warranty on the product.
Use alkaline AAA batteries only. However, never use rechargeable AAA batteries.
When in public, carry the simulator in its original case or in a bag. Persons not familiar with this type of simulators may mistake it for a regular weapon and alarm the police.
DURING USAGE
Never aim at people, animals or uncontrolled areas.
While handling the simulator, observe the general rules for manipulation with a real weapon.
WARNING! Failure to follow the above stated instructions may expose the user to dangerous laser radiation.
AFTER USAGE
After use, store the simulator in its original case.
Protect the simulator from direct sunlight and rain in keeping with the UIPM rules.
LASER RADIATION DO NOT LOOK DIRECTLY INTO THE LASER BEAM! CLASS I. LASER DEVICE
Description
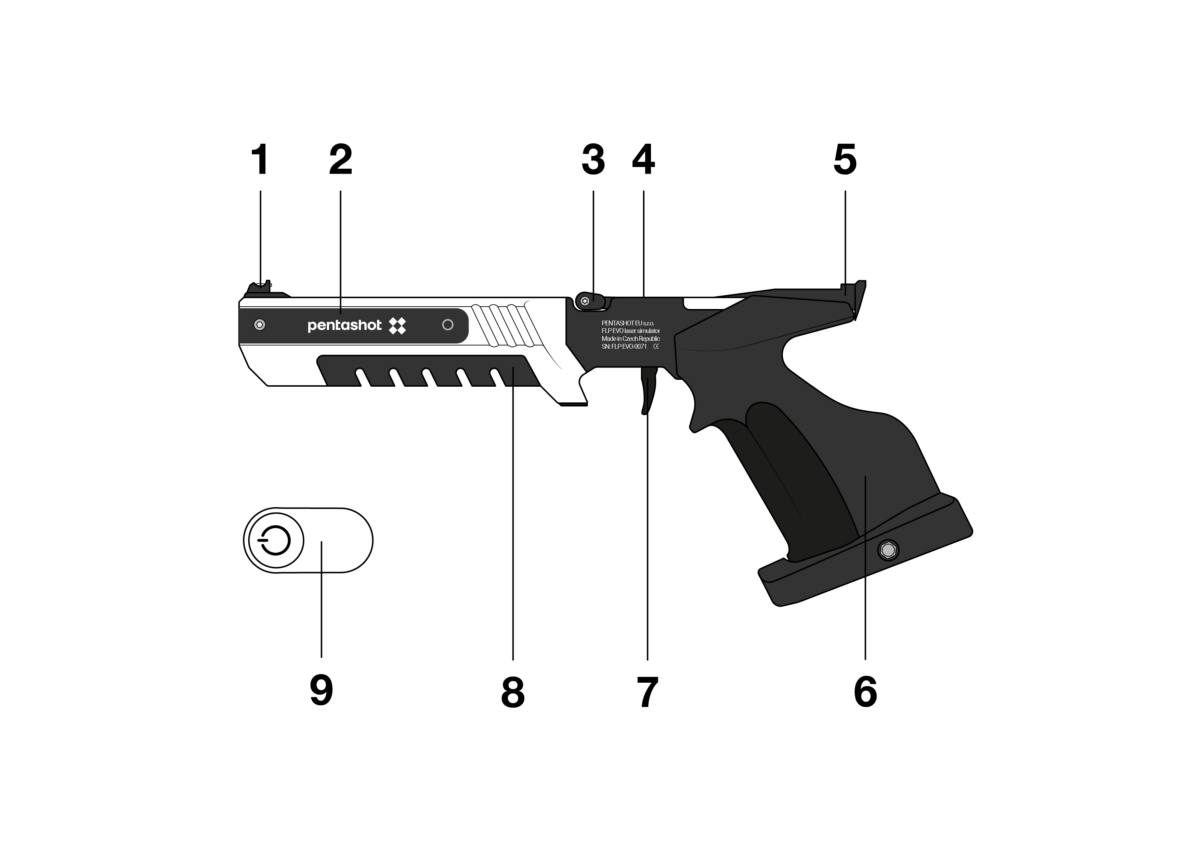
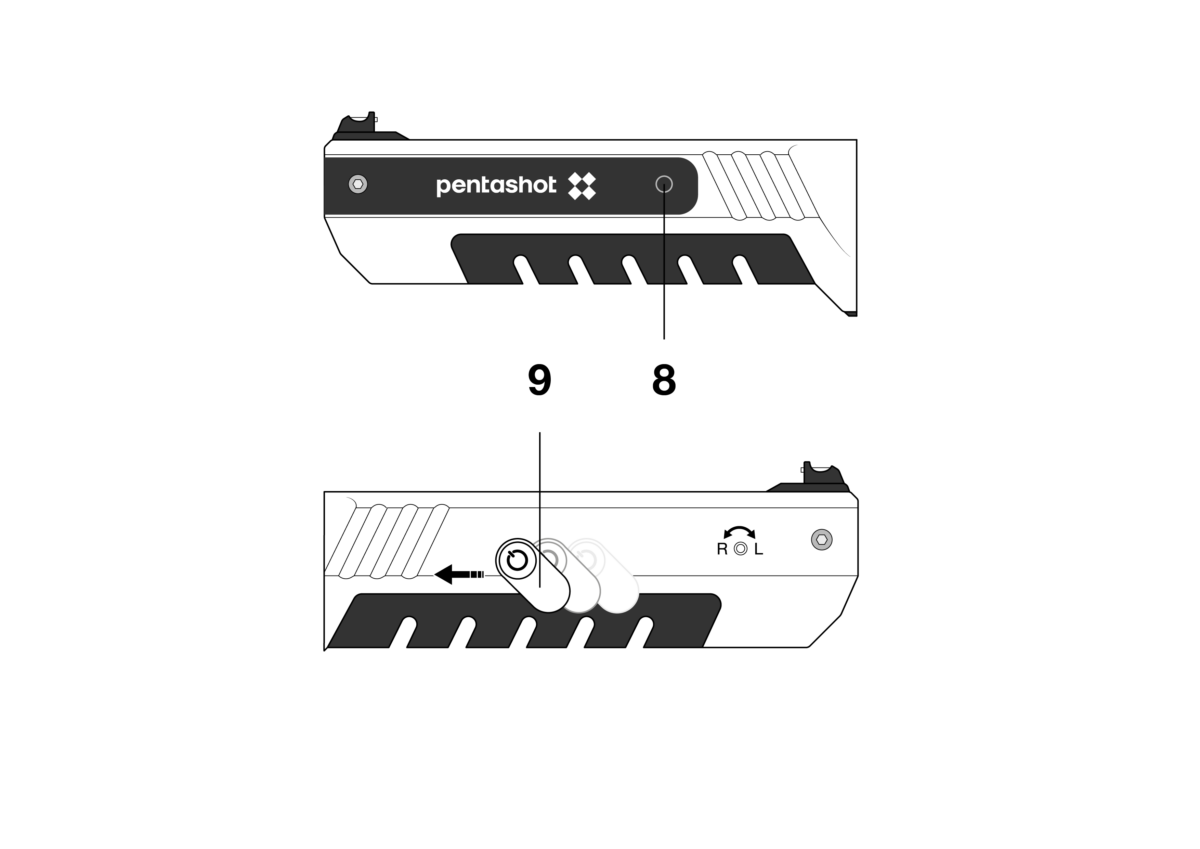
1 — Front sights 2 — Battery cover/battery 3 — LED diode 4 — Loading lever 5 — Rear sights 6 — Anatomical grip 7 — Trigger 8 — Starting magnet 9 — Weight area
PURPOSE
The FLP EVO laser simulator is designed for use at instructional courses, trainings or modern pentathlon competitions. It is intended for laser beam shooting initiated by a trigger.
The FLP EVO laser simulator employs the FLP20 laser module with a 15.6 ms code as an emitter. The code is fully compatible with the International Modern Pentathlon Union (UIPM) standards.
Preparing the laser simulator for use
SWITCHING ON
Attach the chip (8) to the simulator body and move it from right to left. This will switch simulator ON and the LED (9) will fl ash. The number of fl ashes indicates the battery status:
5 flashes – the battery is 100% full
4 flashes – the battery is at 75% charge level
3 flashes – the battery is at 50% charge level
2 flashes – the battery is at 25% charge level
1 flash – the battery is discharged, replace it.
After the battery test, the LED light remains constantly blue to indicate the laser is on and ready for use.
The LED fl ashing continuously blue means the battery is discharged and it should be immediately replaced.
SWITCHING OFF
The laser container will switch off approximately 20 minutes after the last shot. In case you need to switch it off immediately, remove the battery from the simulator body.
SETTING THE LASER DOT POSITION
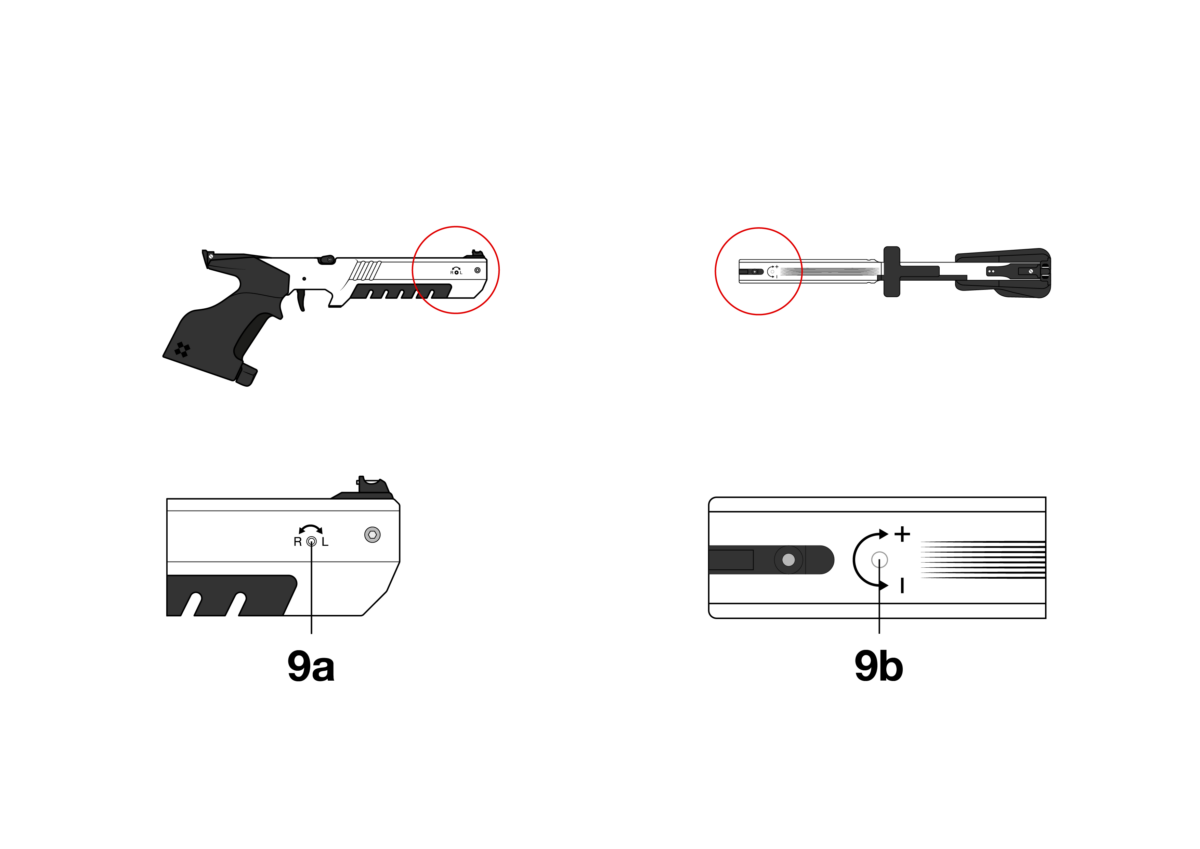
To adjust the simulator sights, aim at a white wall or a white object from a distance of 10 meters and check the alignment of the red laser dot and simulator sights. If necessary, use the adjusting screws to align the laser dot:
Turning the screw (10a) clockwise
Turning the screw (10a) counterclockwise
Turning the screw (10b) clockwise
Turning the screw (10b) counterclockwise
laser dot moves to the right
laser dot moves to the left
laser dot goes upward
laser dot goes downward
IMPORTANT: The movement of the adjusting screws must be very small.
SETTING THE TRIGGER POSITION
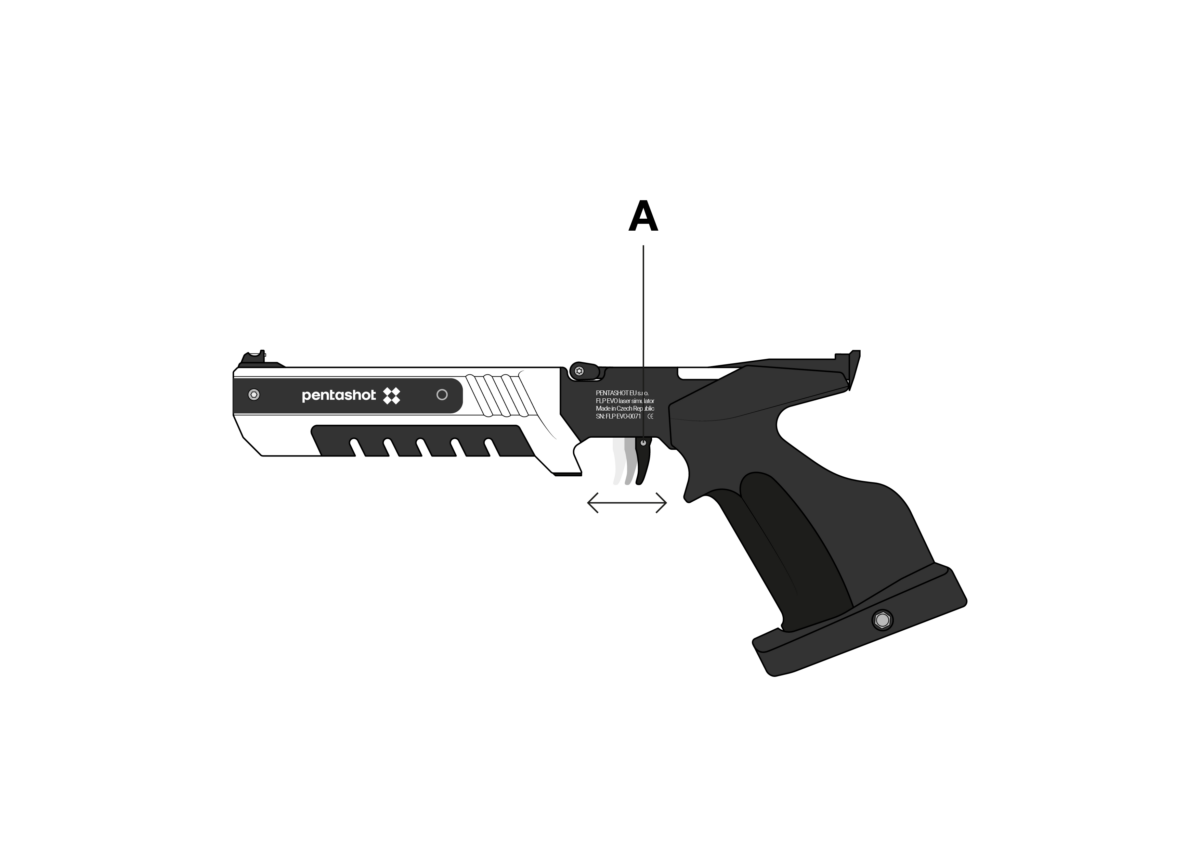
After loosening the screw (A) you can change the position of the trigger forward or backward.
SETTING THE SEAR ENGAGEMENT AND TRAVEL
Sear engagement setting Thesear engagement is already exactly adjusted by the manufacturer and it is not recommended to change it. In case you still need to change its setting, carry out the following:
Turn the screw (11) counterclockwise by one turn.
Load the simulator by means of the lever.
Turn the screw (11) very slowly clockwise untill simulator shoots by itself.
Turn the screw (11) counterclockwise by one 1/4 turn.
By this, the sear engagement is set. Check the correct function by few shots.
First stage travel
Turning the screw (14) clockwise reduce the fi rst stage travel. Turning the screw counterclockwise (14) increases the fi rst stage travel.
SETTING THE GRIP ANGLE
Use the supplied hexagonal key to loosen the small screw on the simulator grip bottom. Set a new position of the grip and fi x it by tightening the small screw.
BATERRY REPLACEMENT
When the LED indicator fl ashes once or is constantly fl ashing, replace the battery.
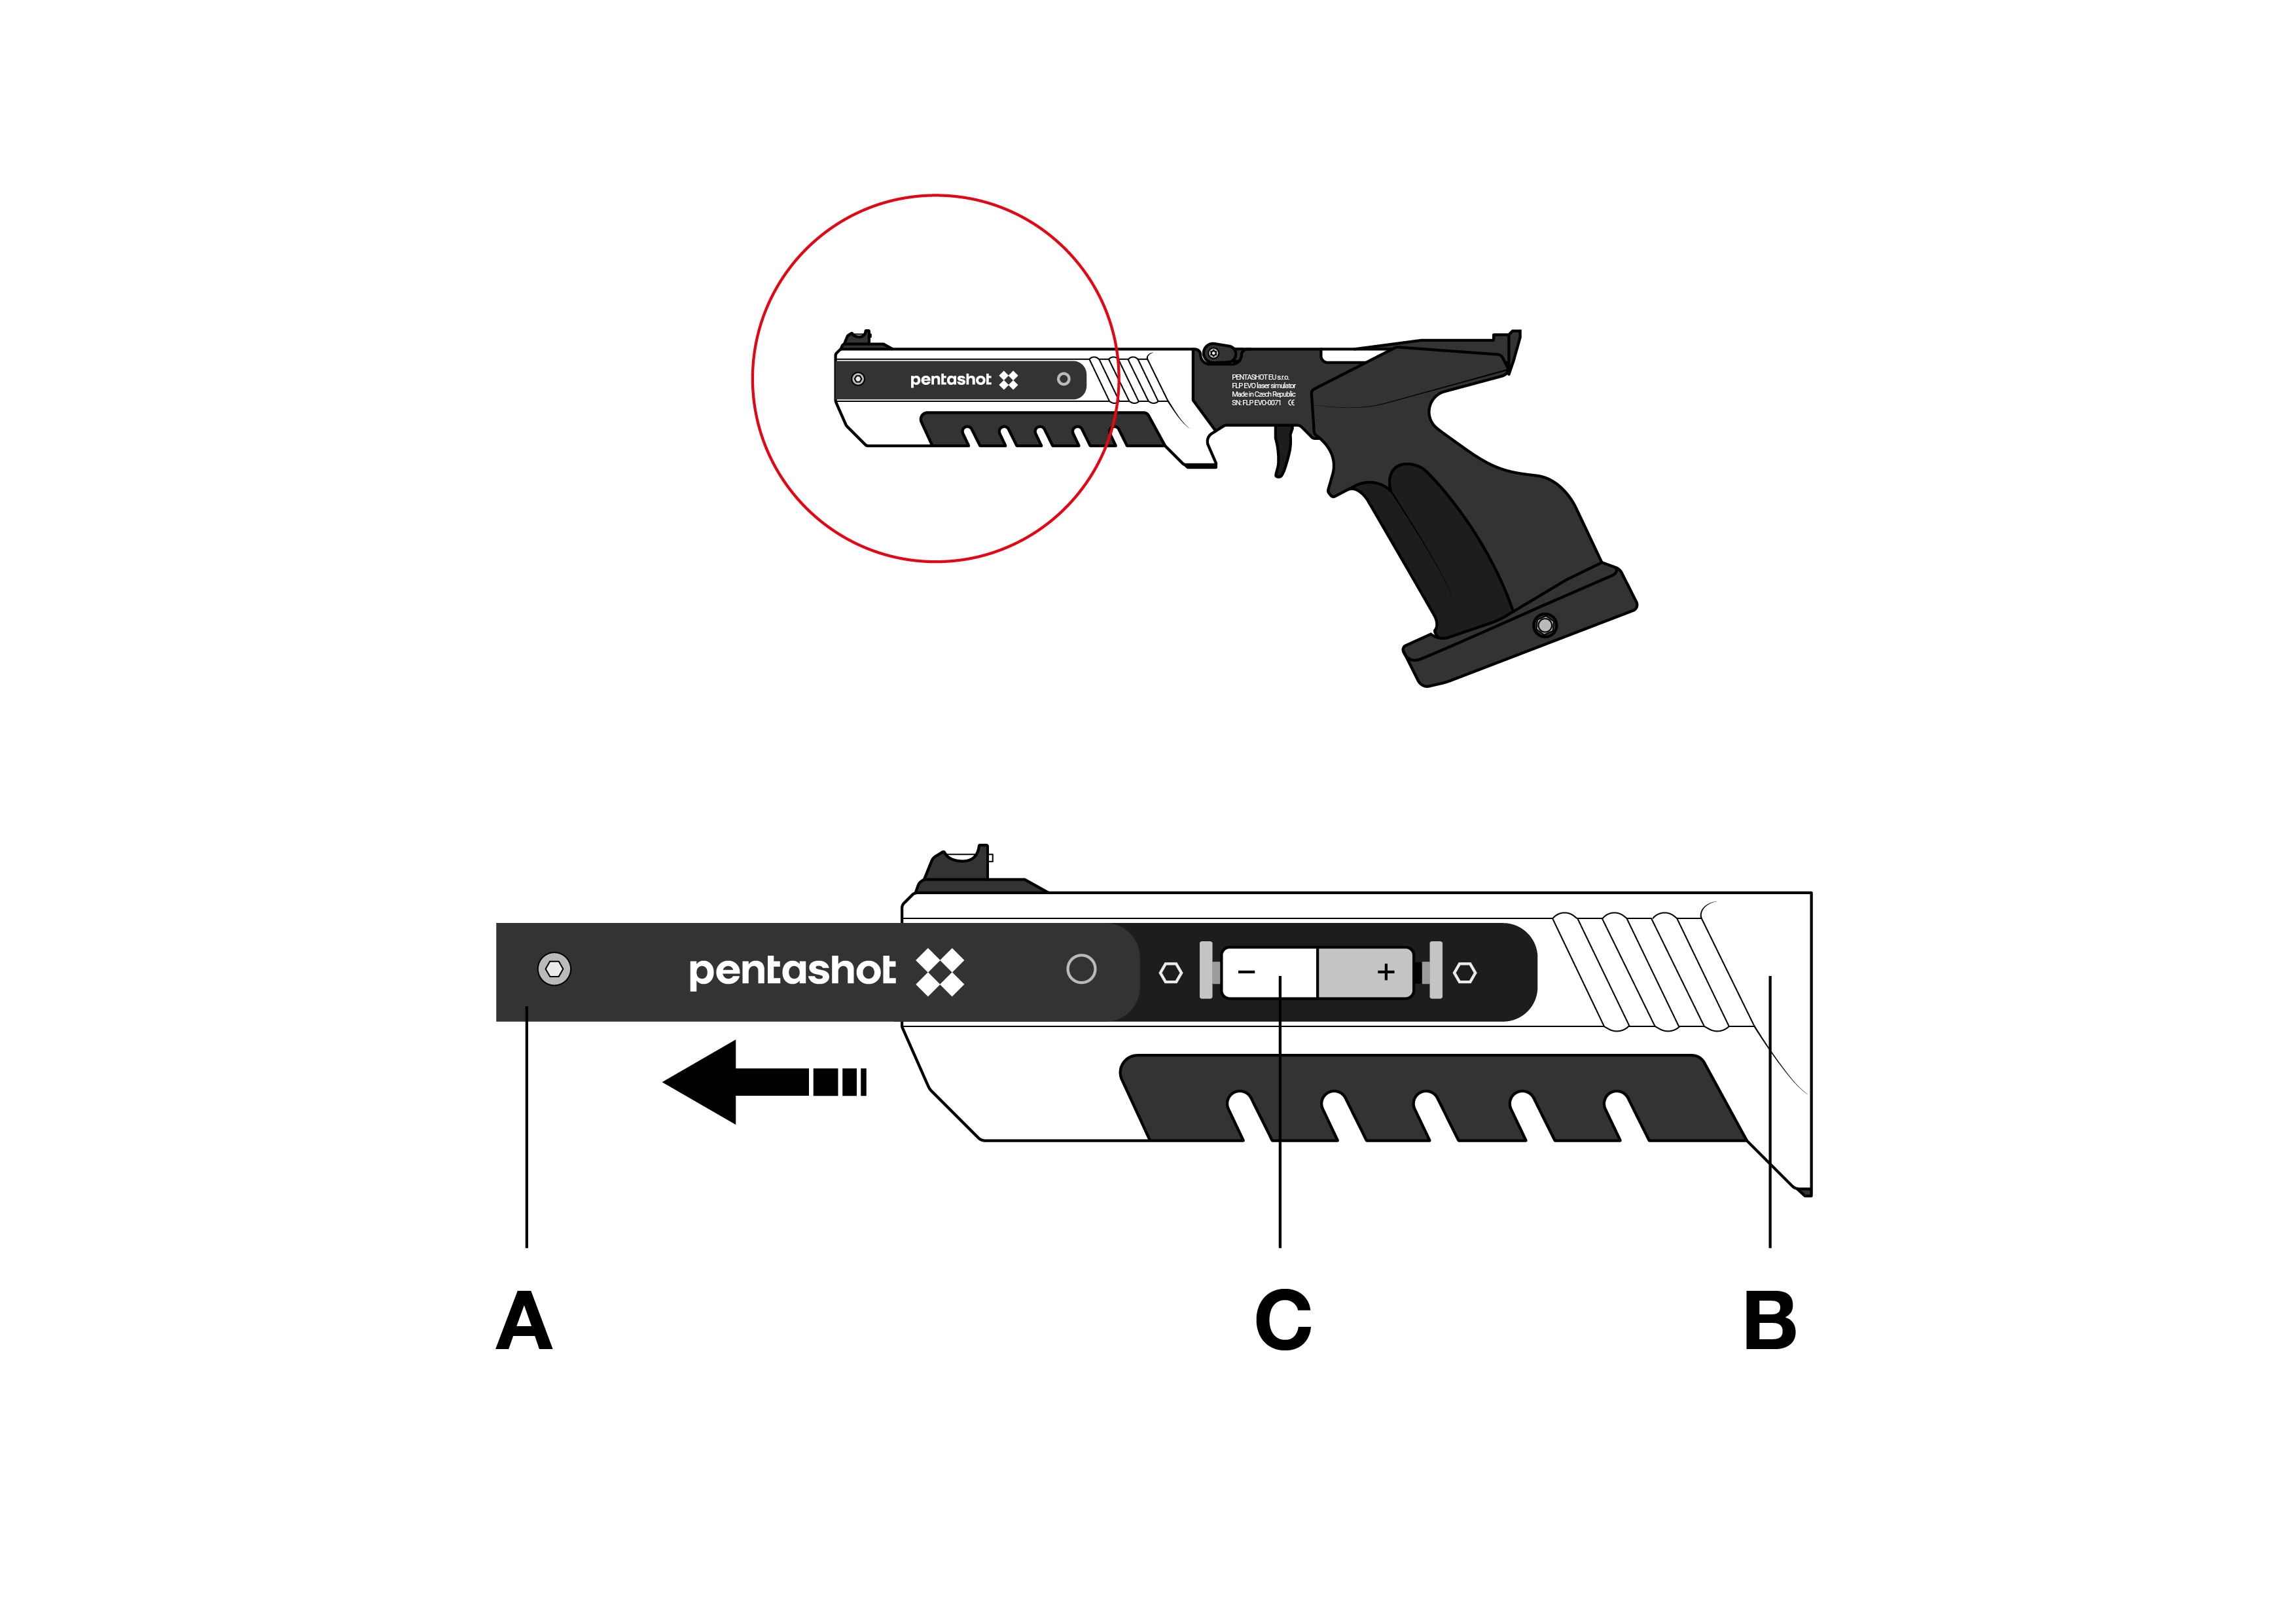
Remove the screw located on the front part of the battery cover and then slide it out.
Remove the discharged battery using the ribbon (C) and insert a new one (AAA 1,5V). Pay attention to the correct polarity of battery!
Reinstall the cover (A).
UPDATE FUNCTION
Only the manufacturer has access to the laser simulator software.
Technical data
Dimensions
355 mm x 150 mm x 50 mm
Simulator type
Single shot laser simulator
Weight
800 g (+- 5%)
Recommended shooting distance
up to 10 m
Laser class
I. (in accordance with EN 60825 – 1:2014 standard)rd)
Laser class certifi cate
No.: 1190743 (ELECTROTECHNICAL TESTING INSTITUTE, Prague, CZECH REPUBLIC)
Laser module type
FLP20
Laser coding
15,6 ms UIPM laser signal
Wavelength
650 nm
Laser beam diameter
4 mm ± 5 % / 10 m
Minimum laser peak value (empty battery)
2,5 mW
Maximum laser peak value (full battery)
3,2 mW
Emitter power supply
1,5V AAA Alcaline battery
Number of shots made with 1 pc AAA type min.
50 000 / at 20° C battery
Operating conditions
+10° C to +50° C; IP 52
Update function
Software update from the manufacturer
The user can only set or maintain the following:
set the laser dot position (the laser dot)
set the trigger position, weight and travel
set the grip angle
change the battery
change the simulator stock
It is forbidden to open or modify the laser simulator, with the exception of changing the battery or grip. The Laser beam parameters can only be changed by the manufacturer or an authorized person. The simulator owner must confi rm his consent to the change in writing. The manufacturer does not assume responsibility for any damage that would arise from the change.
Warranty
A warranty repair shall apply exclusively to defects that have provably arisen during the eff ective warranty period, namely as a result of a material defect or a manufacturing defect. Defects arising in such a manner may be remedied only by the manufacturer or an authorized maintenance and service center. The buyer can make a claim under the warranty against the manufacturer or authorized dealer, as the case may be.
The warranty period shall become eff ective on the day of purchase or delivery of the Goods to the Buyer, and the warranty remains valid for 24 months.
In particular, the following cases are excluded from the warranty repair:
The product has not been returned to the dealer/manufacturer with the proof of purchase.
Wear and tear due to the use of the product or damage to the product (incl. damage caused by unskilled installation, improper commissioning, non-compliance with the procedures defined in the instructions for use, etc.).
Damage to the product caused by contamination, an accidental or disaster event or occurring as a result of natural or external events such as a storm, fire, water, excessive heat or chill, ingress of a liquid, etc.
Mechanical damage to the product (e.g. caused by fall, breaking, etc.) or damage arising during the transportation.
Damage, unauthorized design modifications, improper modification of the product or any other interventions in the product conducted by unauthorized persons or maintenance and service centers.
Storage
It is very important to store the laser simulator under the correct conditions to keep it in good, reliable condition. Always do the following:
Before storing the simulator for an extended time, always remove the battery. This prevents internal damage to the simulator if the battery leaks.
Store the simulator in the original packaging (case) in a dry, dark place out of reach of children.
Do not place any heavy objects on the case, or items that may leak fluids.
Protect the simulator from weather, including frost and moisture. The optimal storage temperature is between +5 and +30° C. The storage location’s air humidity must not exceed 60%. Do not store the simulator in a damp environment where there is high risk of corrosion.
Spare parts
The following replacement parts are available for the simulator:
front sights
rear sights
stock
extra weight
trigger
Order replacement parts by e-mail from business@pentashot.eu or from PENTASHOT partners and dealers. A list of them can be found at www.pentashot.eu.
Only the manufacturer or an authorized individual has the right to replace the simulator’s main parts (optics and electronics, including parts of the trigger mechanism).
Disposal
Once the laser simulator ends its lifetime, do not dispose of it along with other household waste. Take it to a waste disposal site of raw materials or let it be disposed at a specialized company capable of recycling such a material.
The used battery must not be thrown into a standard dustbin. Collect all used the batteries and dispose them at specialized collection points
We use cookies on our website to give you the most relevant experience by remembering your preferences and repeat visits. By clicking “Accept”, you consent to the use of ALL the cookies. However you may visit Cookie Settings to provide a controlled consent.
This website uses cookies to improve your experience while you navigate through the website. Out of these cookies, the cookies that are categorized as necessary are stored on your browser as they are essential for the working of basic functionalities of the website. We also use third-party cookies that help us analyze and understand how you use this website. These cookies will be stored in your browser only with your consent. You also have the option to opt-out of these cookies. But opting out of some of these cookies may have an effect on your browsing experience.
Necessary cookies are absolutely essential for the website to function properly. These cookies ensure basic functionalities and security features of the website, anonymously.
Cookie
Duration
Description
_wpfuuid
11 years
This cookie is used by the WPForms WordPress plugin. The cookie is used to allows the paid version of the plugin to connect entries by the same user and is used for some additional features like the Form Abandonment addon.
cookielawinfo-checkbox-advertisement
1 year
Set by the GDPR Cookie Consent plugin, this cookie is used to record the user consent for the cookies in the "Advertisement" category .
cookielawinfo-checkbox-analytics
11 months
This cookie is set by GDPR Cookie Consent plugin. The cookie is used to store the user consent for the cookies in the category "Analytics".
cookielawinfo-checkbox-functional
11 months
The cookie is set by GDPR cookie consent to record the user consent for the cookies in the category "Functional".
cookielawinfo-checkbox-necessary
11 months
This cookie is set by GDPR Cookie Consent plugin. The cookies is used to store the user consent for the cookies in the category "Necessary".
cookielawinfo-checkbox-others
11 months
This cookie is set by GDPR Cookie Consent plugin. The cookie is used to store the user consent for the cookies in the category "Other.
cookielawinfo-checkbox-performance
11 months
This cookie is set by GDPR Cookie Consent plugin. The cookie is used to store the user consent for the cookies in the category "Performance".
viewed_cookie_policy
11 months
The cookie is set by the GDPR Cookie Consent plugin and is used to store whether or not user has consented to the use of cookies. It does not store any personal data.
Functional cookies help to perform certain functionalities like sharing the content of the website on social media platforms, collect feedbacks, and other third-party features.
Cookie
Duration
Description
wp-wpml_current_language
session
This cookie stores the currently selected website language.
Analytical cookies are used to understand how visitors interact with the website. These cookies help provide information on metrics the number of visitors, bounce rate, traffic source, etc.
Cookie
Duration
Description
CONSENT
2 years
YouTube sets this cookie via embedded youtube-videos and registers anonymous statistical data.
Performance cookies are used to understand and analyze the key performance indexes of the website which helps in delivering a better user experience for the visitors.
Advertisement cookies are used to provide visitors with relevant ads and marketing campaigns. These cookies track visitors across websites and collect information to provide customized ads.
Cookie
Duration
Description
VISITOR_INFO1_LIVE
5 months 27 days
A cookie set by YouTube to measure bandwidth that determines whether the user gets the new or old player interface.
YSC
session
YSC cookie is set by Youtube and is used to track the views of embedded videos on Youtube pages.
yt-remote-connected-devices
never
YouTube sets this cookie to store the video preferences of the user using embedded YouTube video.
yt-remote-device-id
never
YouTube sets this cookie to store the video preferences of the user using embedded YouTube video.