 English
  Hungarian
  Polish
  French
  Russian
  Czech
Czech  Italian
  Portuguese
  Spanish
  German
 Safety notes and important information
Keep the emitter clean; wipe off dust with a dry cloth. Never use cleaning agents, solvents or chemicals. Never press any object onto the optics hole.
Regularly check the battery inside the simulator body for corrosion or leaks.
If you will not be using the simulator for more than a week, you must remove the battery. Also remove the battery before plane travel.
BEFORE USAGE
- The simulator must be used in accordance with these Instructions only. Never use the simulator for purposes other than those for which it is designed. Failure to follow these instructions may expose the user to dangerous laser radiation.
- Do not break the security stamp, otherwise you will lose the warranty on the product.
- Use alkaline AAA batteries only. However, never use rechargeable AAA batteries.
- When in public, carry the simulator in its original case or in a bag. Persons not familiar with this type of simulators may mistake it for a regular weapon and alarm the police.
DURING USAGE
- Never aim at people, animals or uncontrolled areas.
- While handling the simulator, observe the general rules for manipulation with a real weapon.
WARNING! Failure to follow the above stated instructions may expose the user to dangerous laser radiation.
AFTER USAGE
- After use, store the simulator in its original case.
- Protect the simulator from direct sunlight and rain in keeping with the UIPM rules.
LASER RADIATION
DO NOT LOOK DIRECTLY INTO THE LASER BEAM!
CLASS I. LASER DEVICE
Description
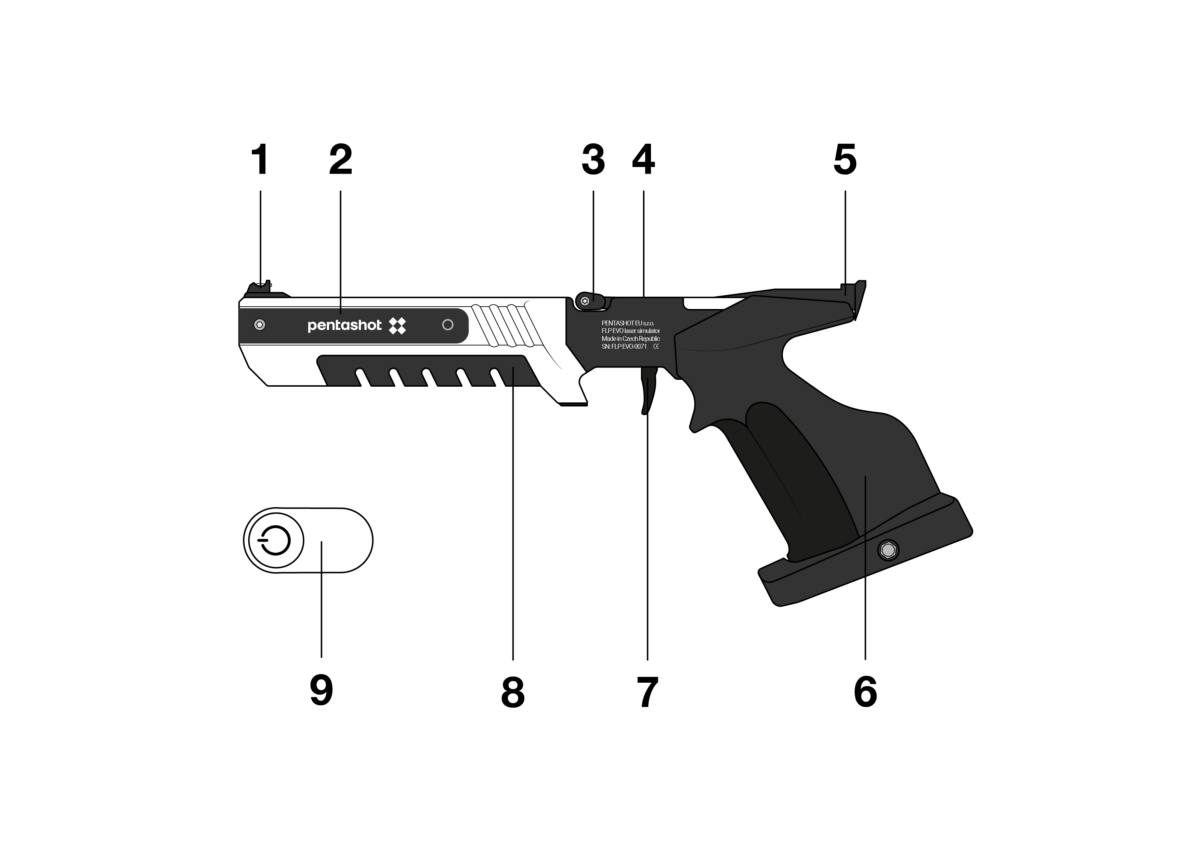
1 — Front sights
2 — Battery cover/battery
3 — LED diode
4 — Loading lever
5 — Rear sights
6 — Anatomical grip
7 — Trigger
8 — Starting magnet
9 — Weight area
PURPOSE
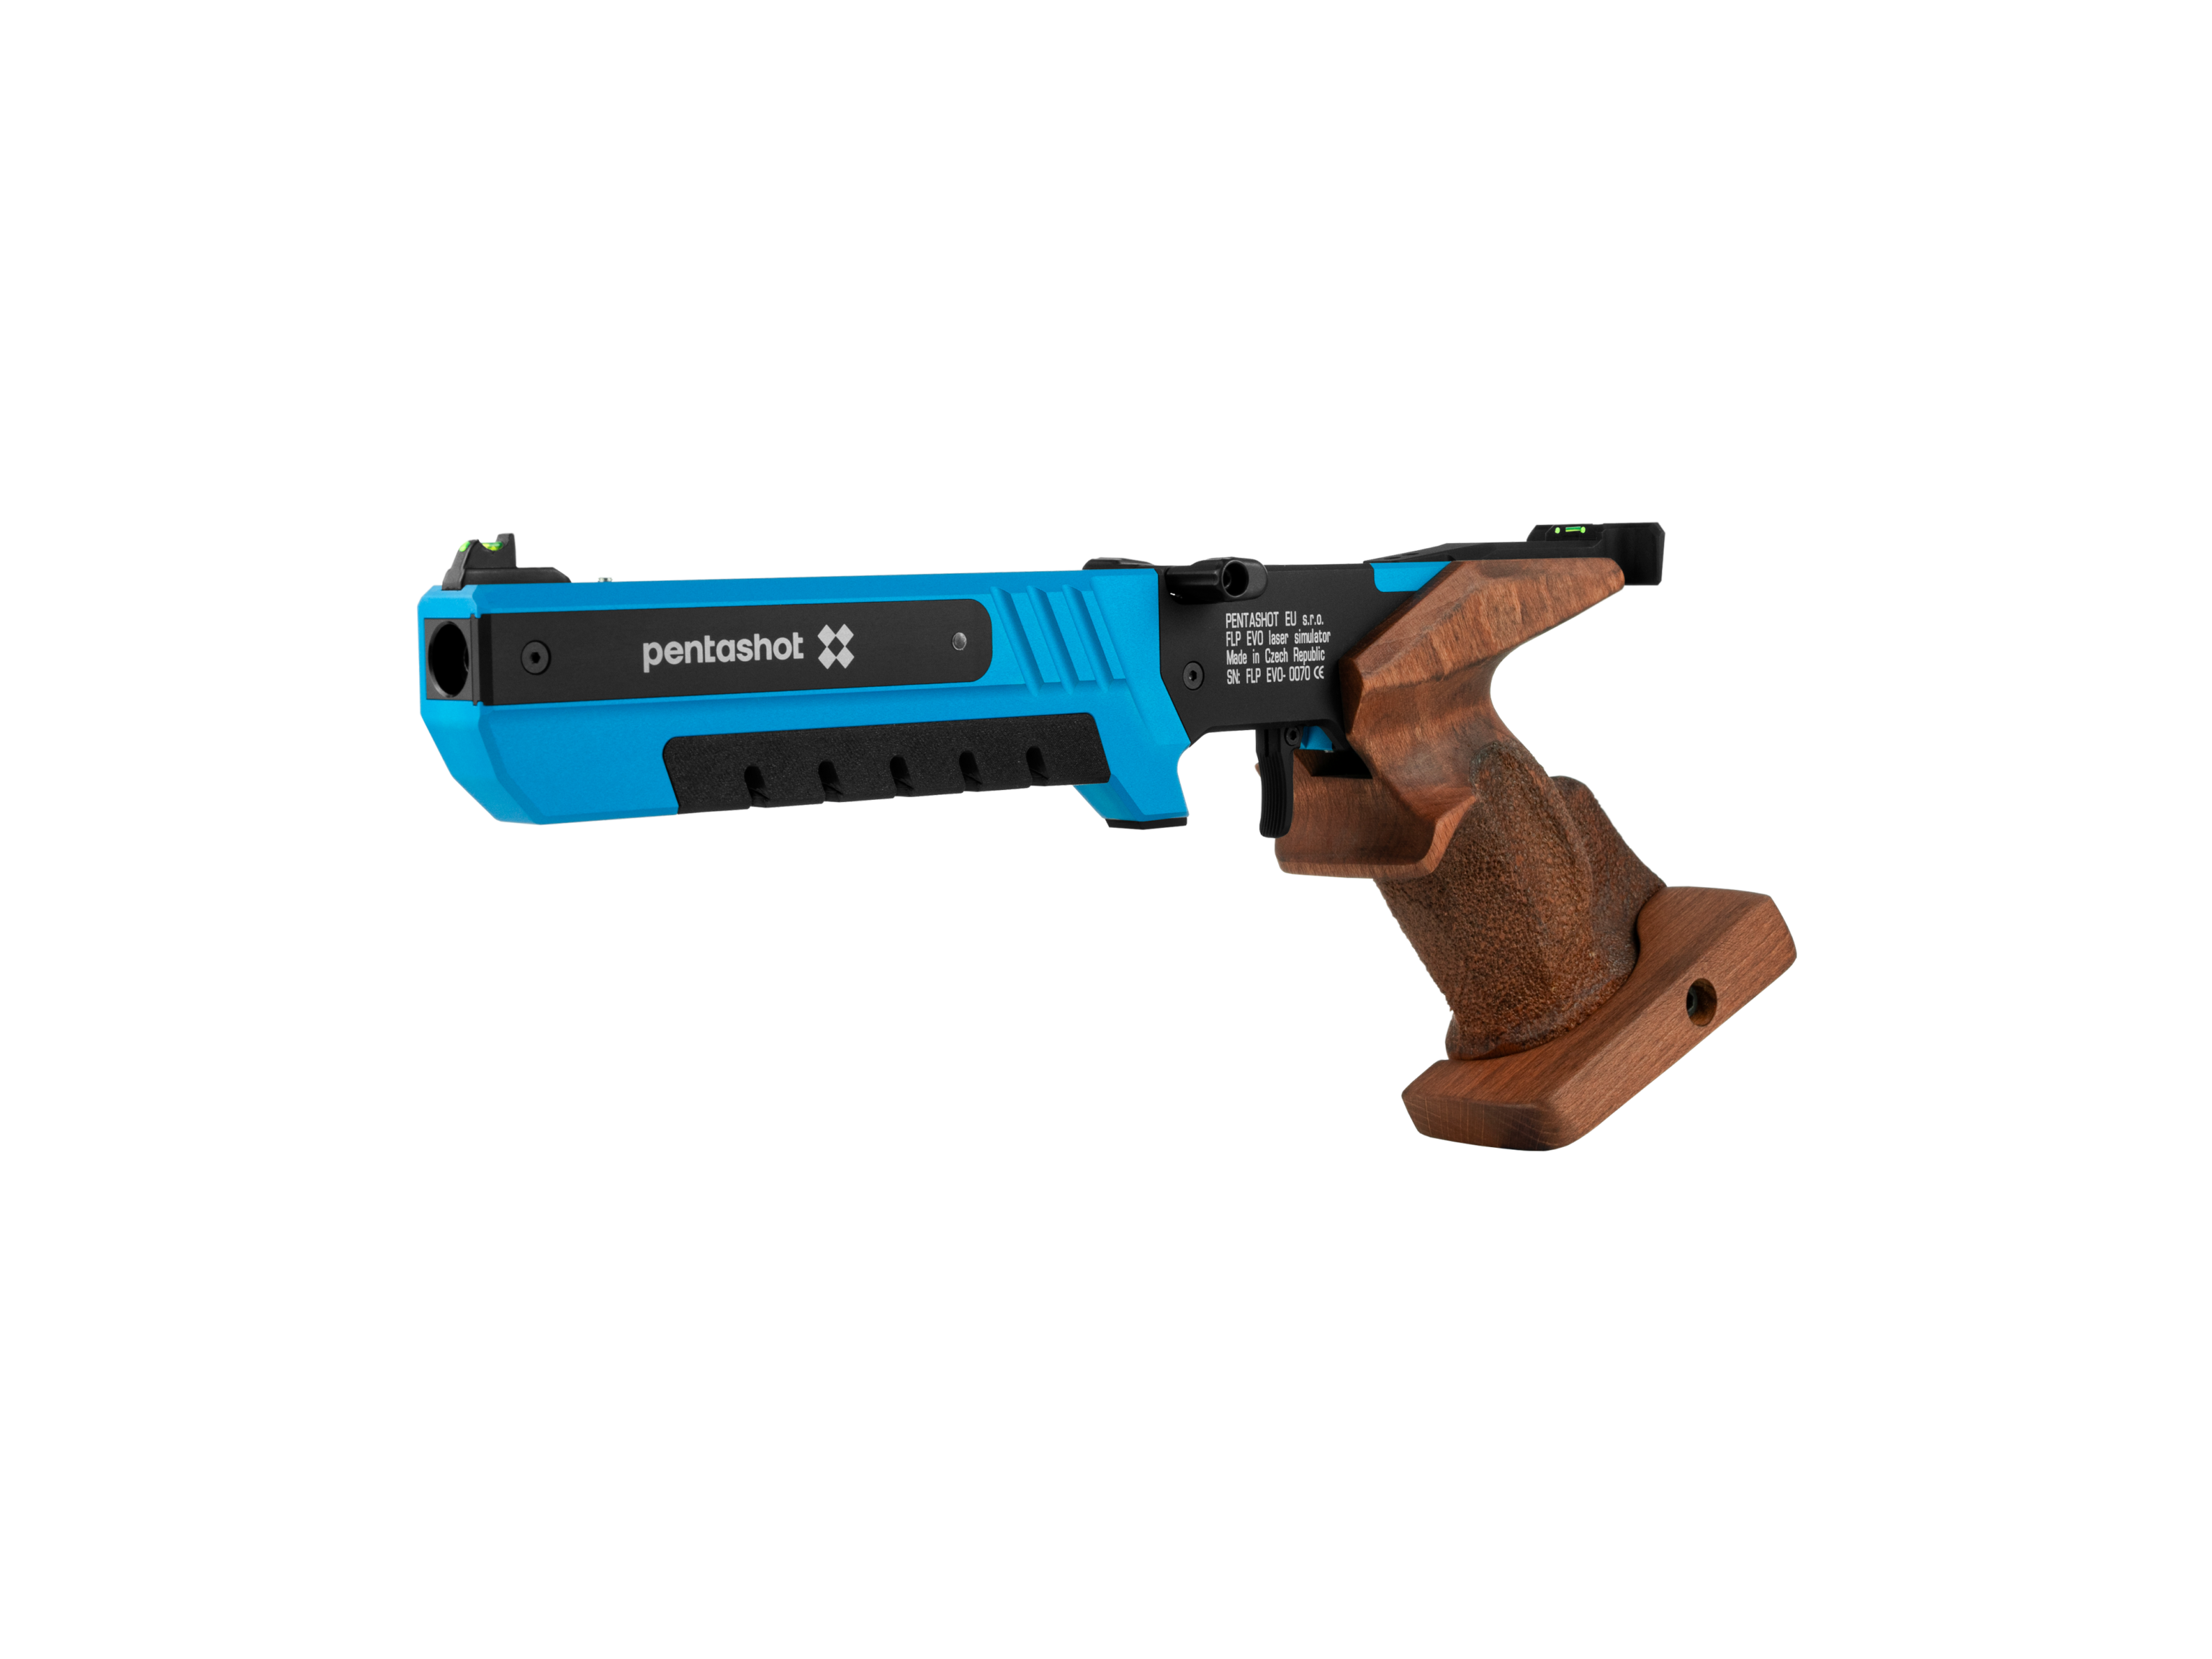
The FLP EVO laser simulator is designed for use at instructional courses, trainings or modern pentathlon competitions. It is intended for laser beam shooting initiated by a trigger.
The FLP EVO laser simulator employs the FLP20 laser module with a 15.6 ms code as an emitter. The code is fully compatible with the International Modern Pentathlon Union (UIPM) standards.
Preparing the laser simulator for use
SWITCHING ON
Attach the chip (8) to the simulator body and move it from right to left. This will switch simulator ON and the LED (9) will fl ash. The number of fl ashes indicates the battery status:
- 5 flashes – the battery is 100% full
- 4 flashes – the battery is at 75% charge level
- 3 flashes – the battery is at 50% charge level
- 2 flashes – the battery is at 25% charge level
- 1 flash – the battery is discharged, replace it.
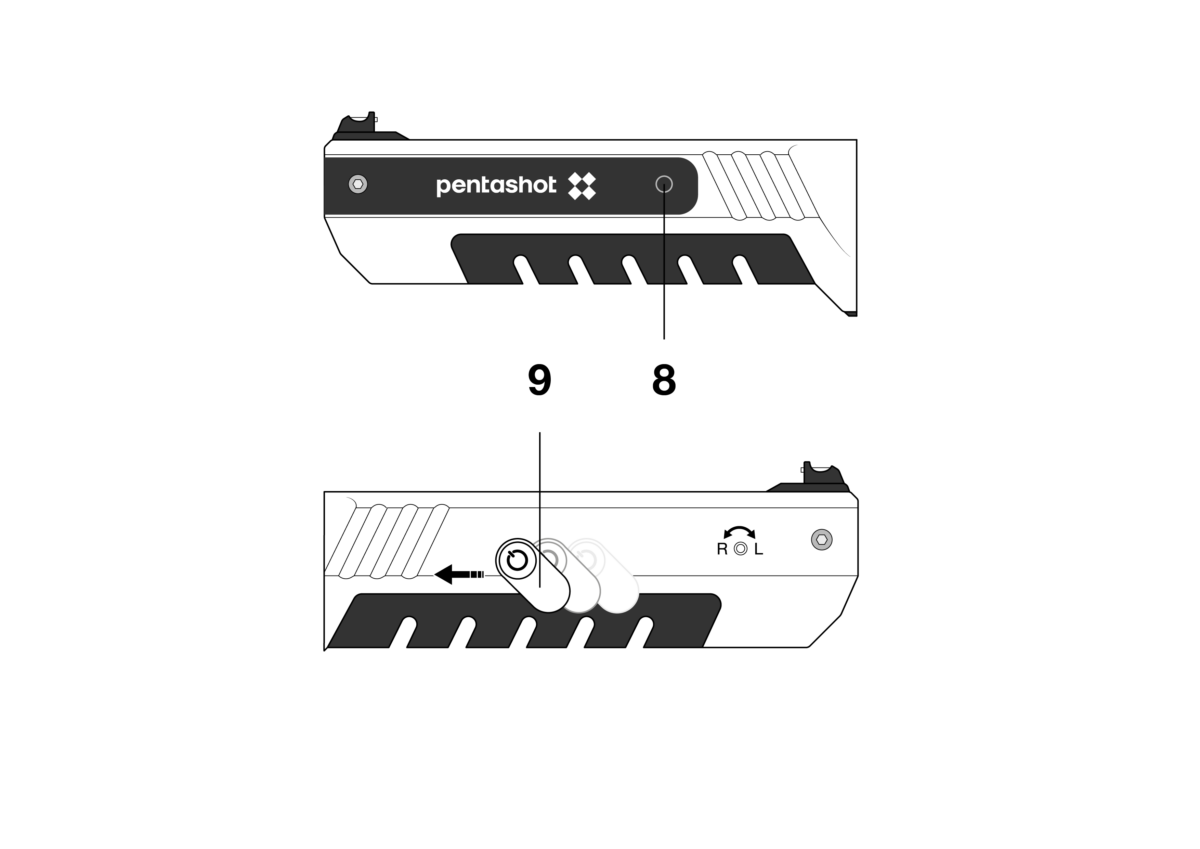
After the battery test, the LED light remains constantly blue to indicate the laser is on and ready for use.
The LED fl ashing continuously blue means the battery is discharged and it should be immediately replaced.
SWITCHING OFF
The laser container will switch off approximately 20 minutes after the last shot. In case you need to switch it off immediately, remove the battery from the simulator body.
SETTING THE LASER DOT POSITION
To adjust the simulator sights, aim at a white wall or a white object from a distance of 10 meters and check the alignment of the red laser dot and simulator sights. If necessary, use the adjusting screws to align the laser dot:
- Turning the screw (10a) clockwise
- Turning the screw (10a) counterclockwise
- Turning the screw (10b) clockwise
- Turning the screw (10b) counterclockwise
- laser dot moves to the right
- laser dot moves to the left
- laser dot goes upward
- laser dot goes downward
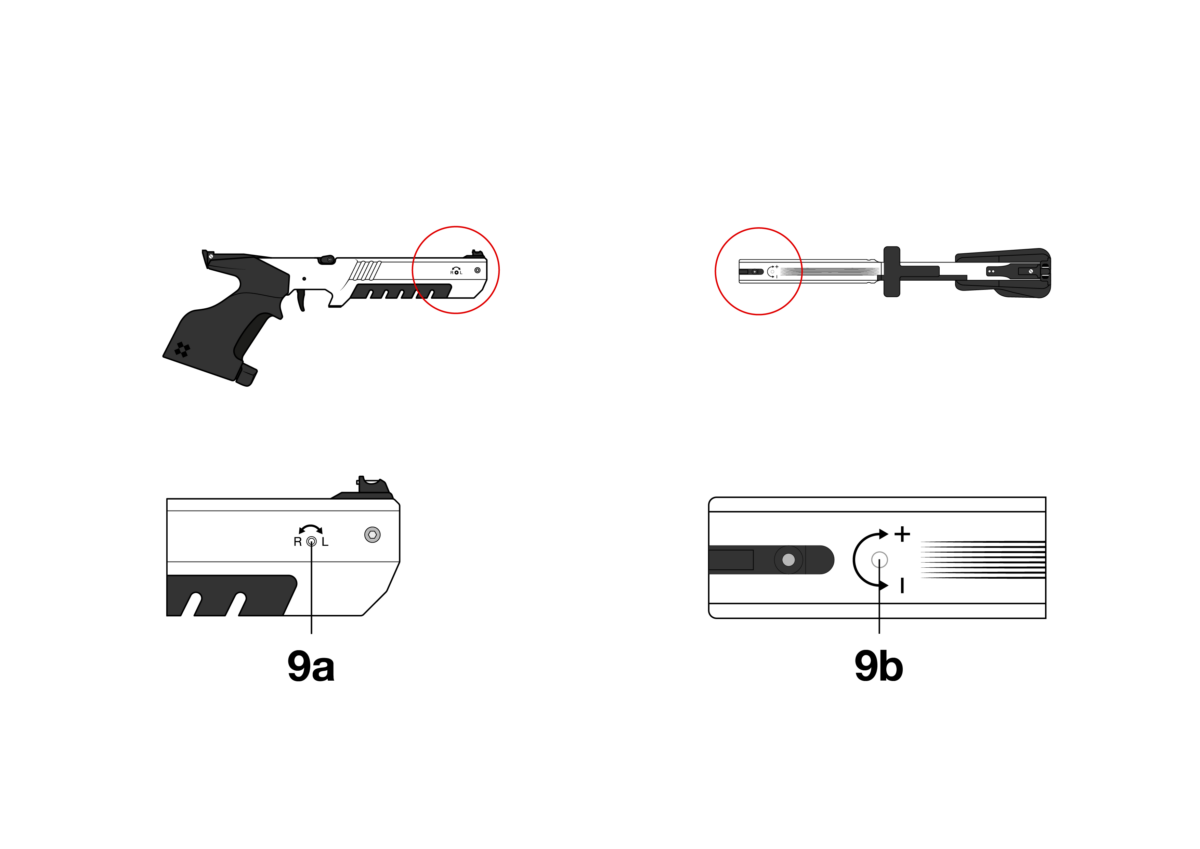
IMPORTANT: The movement of the adjusting screws must be very small.
SETTING THE TRIGGER POSITION
After loosening the screw (A) you can change the position of the trigger forward or backward.

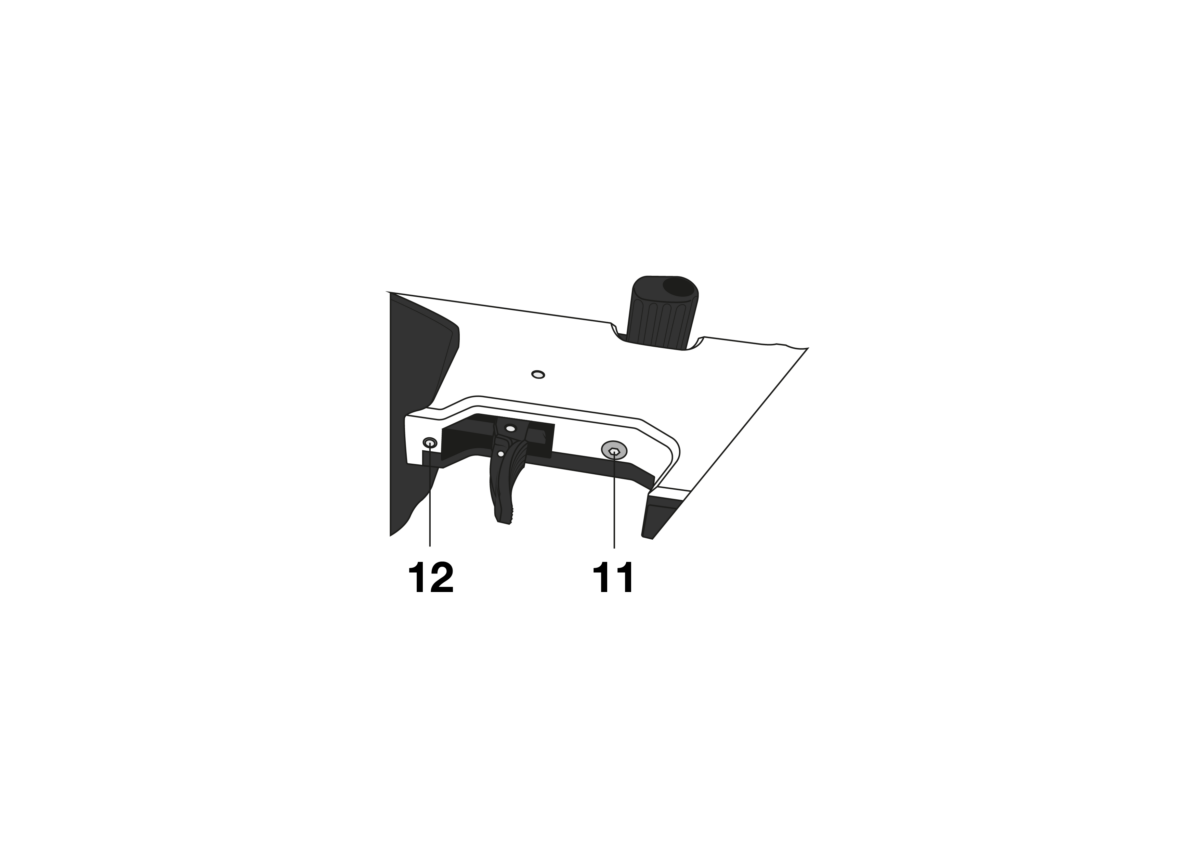
SETTING THE SEAR ENGAGEMENT AND TRAVEL
Sear engagement setting
Thesear engagement is already exactly adjusted by the manufacturer and it is not recommended to change it. In case you still need to change its setting, carry out the following:
- Turn the screw (11) counterclockwise by one turn.
- Load the simulator by means of the lever.
- Turn the screw (11) very slowly clockwise untill simulator shoots by itself.
- Turn the screw (11) counterclockwise by one 1/4 turn.
By this, the sear engagement is set. Check the correct function by few shots.
First stage travel
Turning the screw (14) clockwise reduce the fi rst stage travel. Turning the screw
counterclockwise (14) increases the fi rst stage travel.
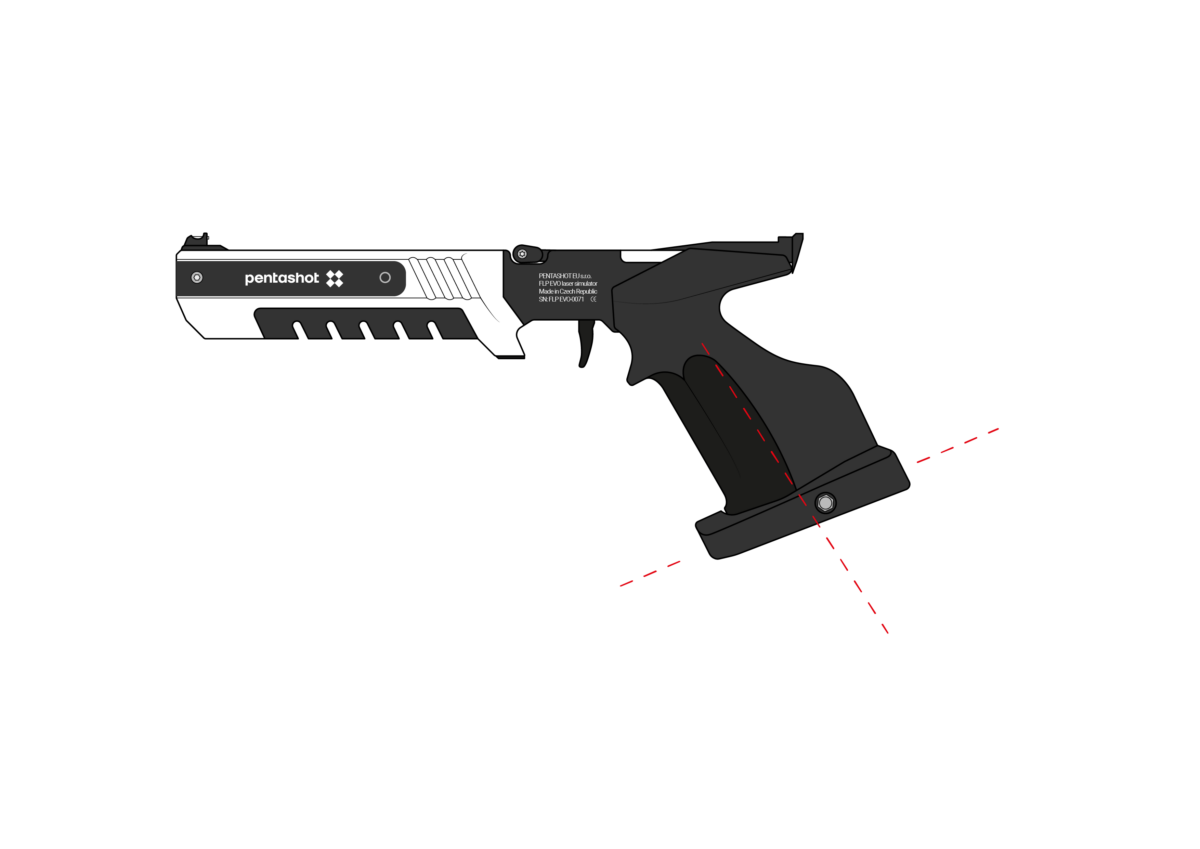
SETTING THE GRIP ANGLE
Use the supplied hexagonal key to loosen the small screw on the simulator grip bottom. Set a new position of the grip and fi x it by tightening the small screw.
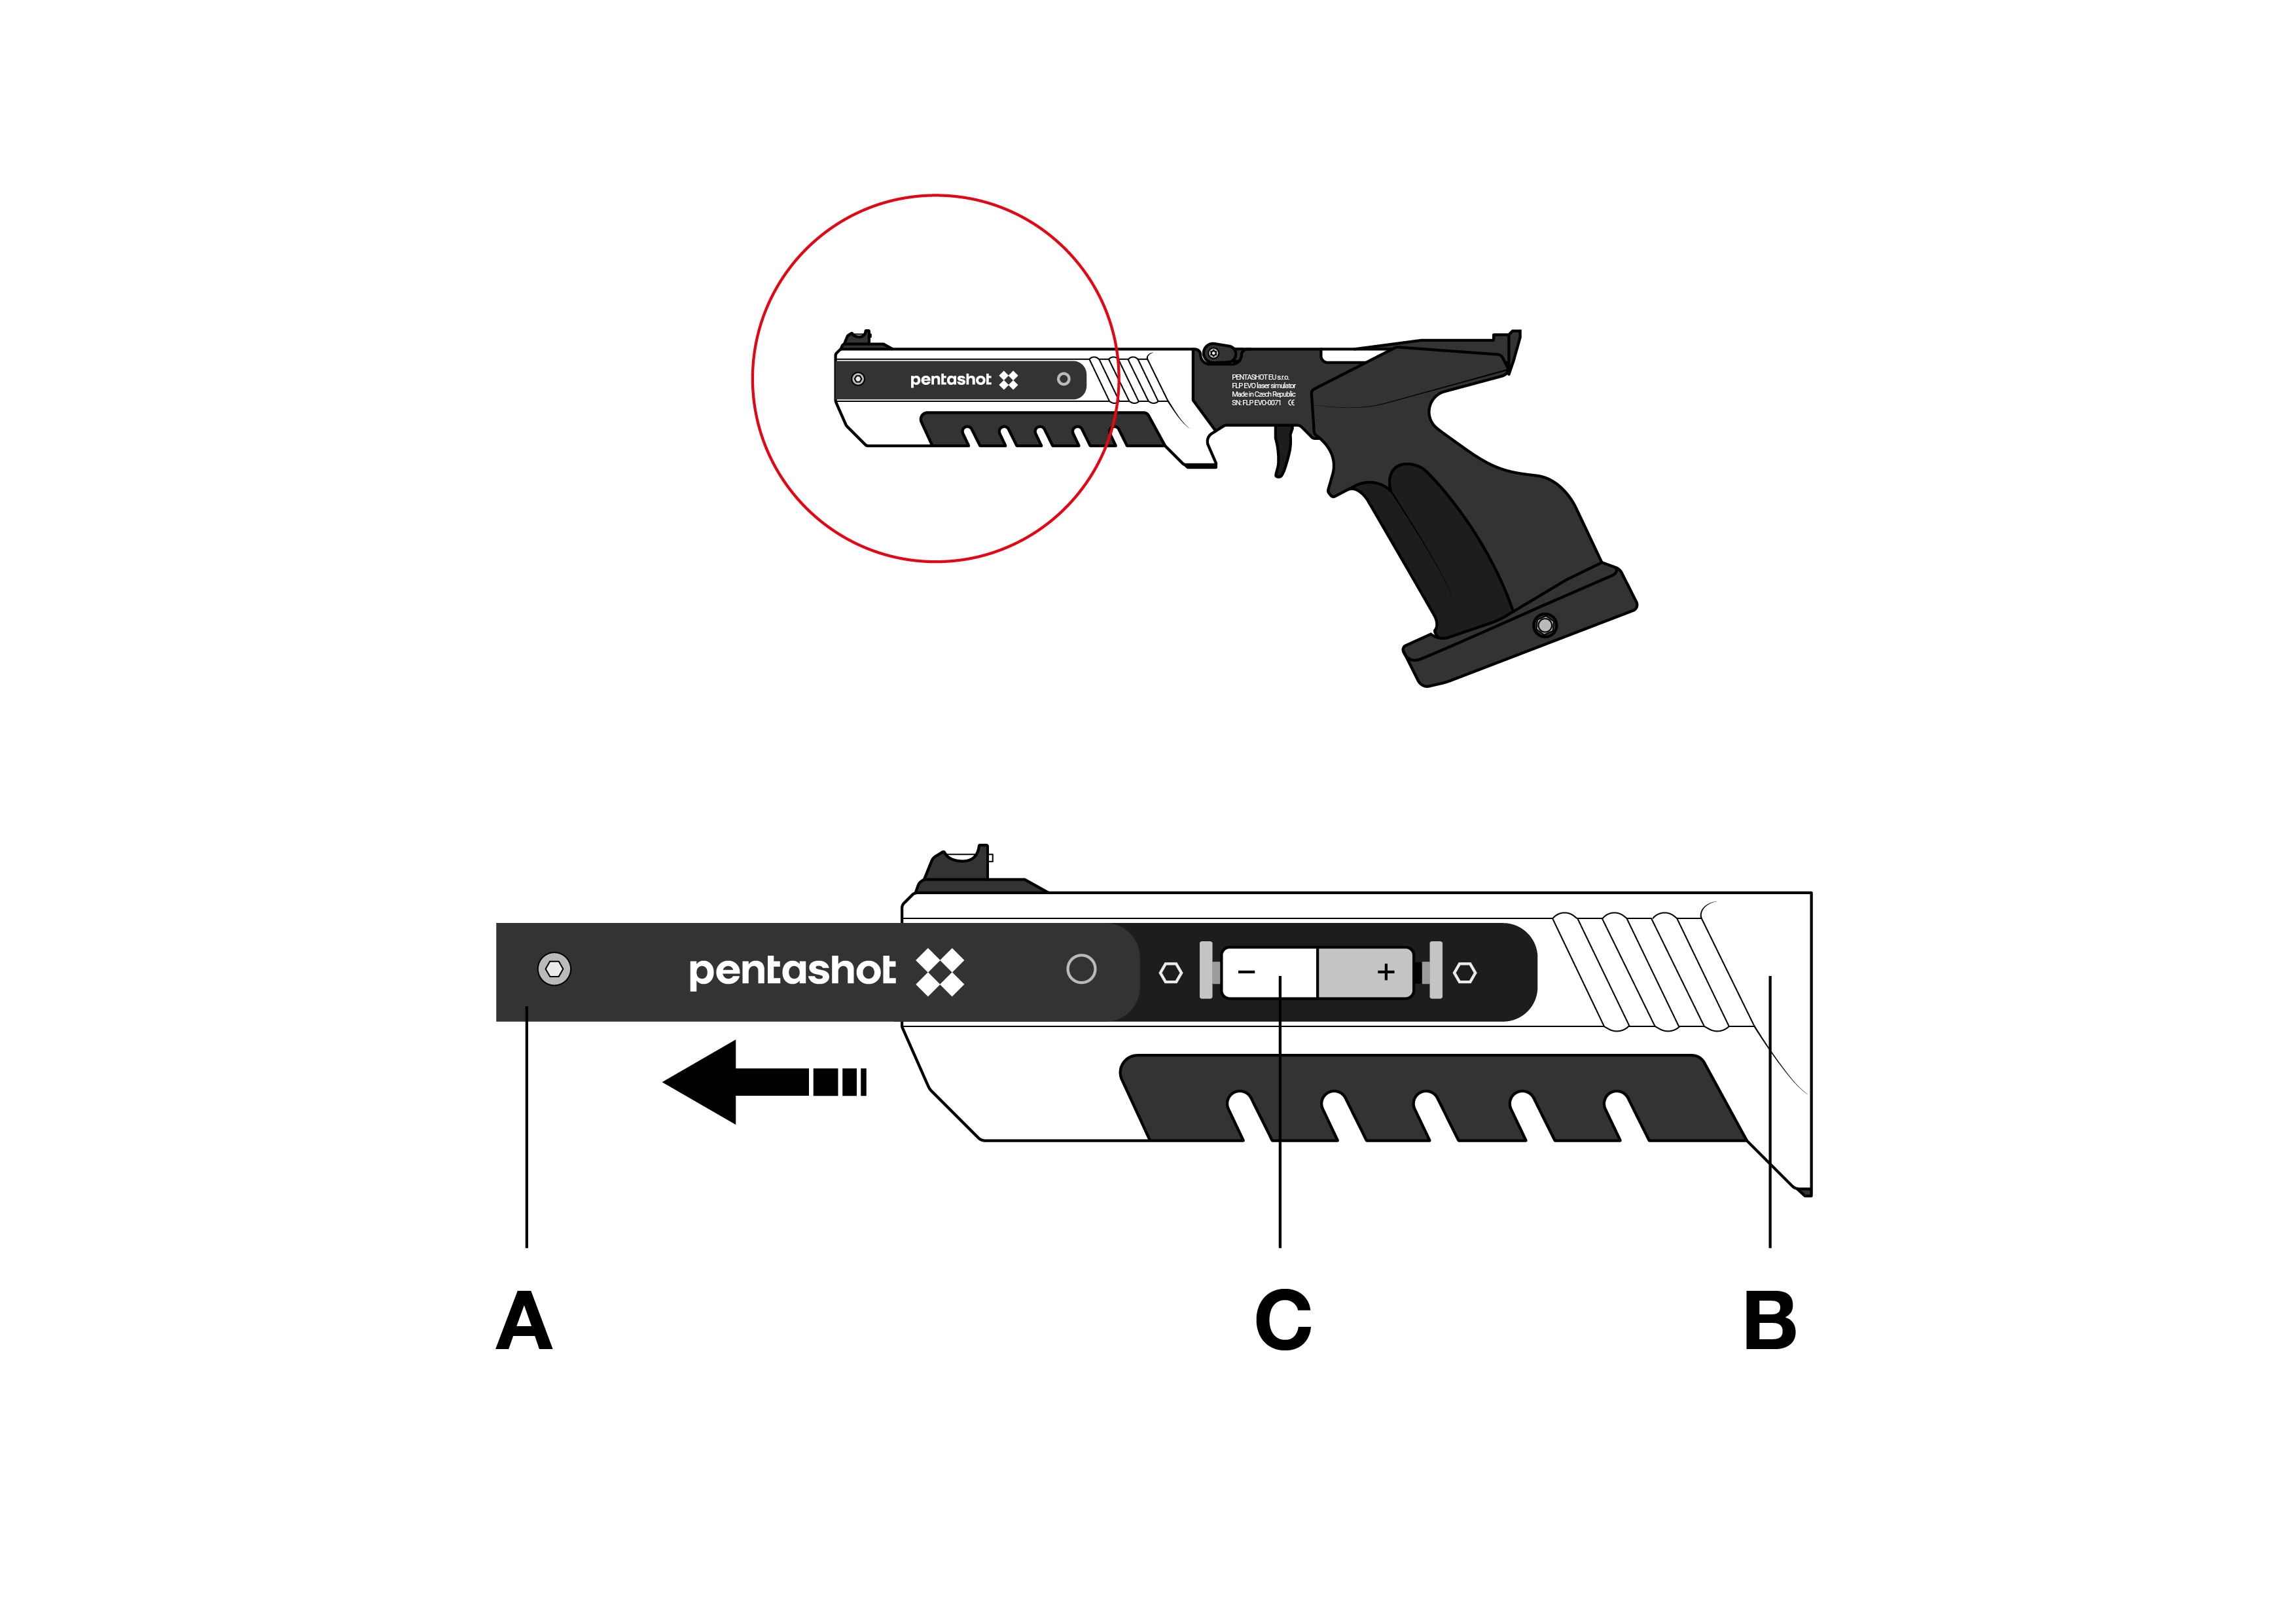
BATERRY REPLACEMENT
When the LED indicator fl ashes once or is constantly fl ashing, replace the battery.
- Remove the screw located on the front part of the battery cover and then slide it out.
- Remove the discharged battery using the ribbon (C) and insert a new one (AAA 1,5V). Pay attention to the correct polarity of battery!
- Reinstall the cover (A).
UPDATE FUNCTION
Only the manufacturer has access to the laser simulator software.
Technical data
| Dimensions | 355 mm x 150 mm x 50 mm |
| Simulator type | Single shot laser simulator |
| Weight | 800 g (+- 5%) |
| Recommended shooting distance | up to 10 m |
| Laser class | I. (in accordance with EN 60825 – 1:2014 standard)rd) |
| Laser class certifi cate | No.: 1190743 (ELECTROTECHNICAL TESTING INSTITUTE, Prague, CZECH REPUBLIC) |
| Laser module type | FLP20 |
| Laser coding | 15,6 ms UIPM laser signal |
| Wavelength | 650 nm |
| Laser beam diameter | 4 mm ± 5 % / 10 m |
| Minimum laser peak value (empty battery) | 2,5 mW |
| Maximum laser peak value (full battery) | 3,2 mW |
| Emitter power supply | 1,5V AAA Alcaline battery |
| Number of shots made with 1 pc AAA type min. | 50 000 / at 20° C battery |
| Operating conditions | +10° C to +50° C; IP 52 |
| Update function | Software update from the manufacturer |
The user can only set or maintain the following:
- set the laser dot position (the laser dot)
- set the trigger position, weight and travel
- set the grip angle
- change the battery
- change the simulator stock
It is forbidden to open or modify the laser simulator, with the exception of changing the battery or grip. The Laser beam parameters can only be changed by the manufacturer or an authorized person. The simulator owner must confi rm his consent to the change in writing. The manufacturer does not assume responsibility for any damage that would arise from the change.
Warranty
A warranty repair shall apply exclusively to defects that have provably arisen during the eff ective warranty period, namely as a result of a material defect or a manufacturing defect. Defects arising in such a manner may be remedied only by the manufacturer or an authorized maintenance and service center. The buyer can make a claim under the warranty against the manufacturer or authorized dealer, as the case may be.
The warranty period shall become eff ective on the day of purchase or delivery of the Goods to the Buyer, and the warranty remains valid for 24 months.
In particular, the following cases are excluded from the warranty repair:
- The product has not been returned to the dealer/manufacturer with the proof of purchase.
- Wear and tear due to the use of the product or damage to the product (incl. damage caused by unskilled installation, improper commissioning, non-compliance with the procedures defined in the instructions for use, etc.).
- Damage to the product caused by contamination, an accidental or disaster event or occurring as a result of natural or external events such as a storm, fire, water, excessive heat or chill, ingress of a liquid, etc.
- Mechanical damage to the product (e.g. caused by fall, breaking, etc.) or damage arising during the transportation.
- Damage, unauthorized design modifications, improper modification of the product or any other interventions in the product conducted by unauthorized persons or maintenance and service centers.
Storage
It is very important to store the laser simulator under the correct conditions to keep it in good, reliable condition. Always do the following:
- Before storing the simulator for an extended time, always remove the battery. This prevents internal damage to the simulator if the battery leaks.
- Store the simulator in the original packaging (case) in a dry, dark place out of reach of children.
- Do not place any heavy objects on the case, or items that may leak fluids.
- Protect the simulator from weather, including frost and moisture. The optimal storage temperature is between +5 and +30° C. The storage location’s air humidity must not exceed 60%. Do not store the simulator in a damp environment where there is high risk of corrosion.
Spare parts
The following replacement parts are available for the simulator:
- front sights
- rear sights
- stock
- extra weight
- trigger
Order replacement parts by e-mail from business@pentashot.eu or from PENTASHOT partners and dealers. A list of them can be found at www.pentashot.eu.
Only the manufacturer or an authorized individual has the right to replace the simulator’s main parts (optics and electronics, including parts of the trigger mechanism).
Disposal
Once the laser simulator ends its lifetime, do not dispose of it along with other household waste. Take it to a waste disposal site of raw materials or let it be disposed at a specialized company capable of recycling such a material.
The used battery must not be thrown into a standard dustbin. Collect all used the batteries and dispose them at specialized collection points