
 English
  German
  Portuguese
  Italian
  French
  Russian
  Polish
  Hungarian
  Spanish
  Czech
Czech Safety notes and important information
Keep the emitter clean; wipe off dust with a dry cloth. Never use cleaning agents, solvents or chemicals. Never press any object onto the optics hole.
Regularly check the battery inside the simulator body for corrosion or leaks.
If you will not be using the simulator for more than a week, you must remove the battery. Also remove the battery before plane travel.
Before use
- The simulator must be used only according to these instructions. Never use the simulator for purposes for which it was not intended. Failure to follow these instructions can expose the user to dangerous laser radiation.
- Never break the safety sticker — this will void the product warranty.
- In public, carry the simulator in its original case or bag. People who don’t know this type of simulator may mistake it for an ordinary weapon and alert the police.
During use
- Never aim at people, animals or uncontrolled locations.
- When handling the simulator, follow the general rules for handling real weapons.
After use
- After use, store the simulator in its original case.
- Protect the simulator from direct sunlight and rain in keeping with the UIPM rules.
LASER RADIATION
DO NOT LOOK DIRECTLY INTO THE LASER BEAM!
CLASS I. LASER DEVICE
Description
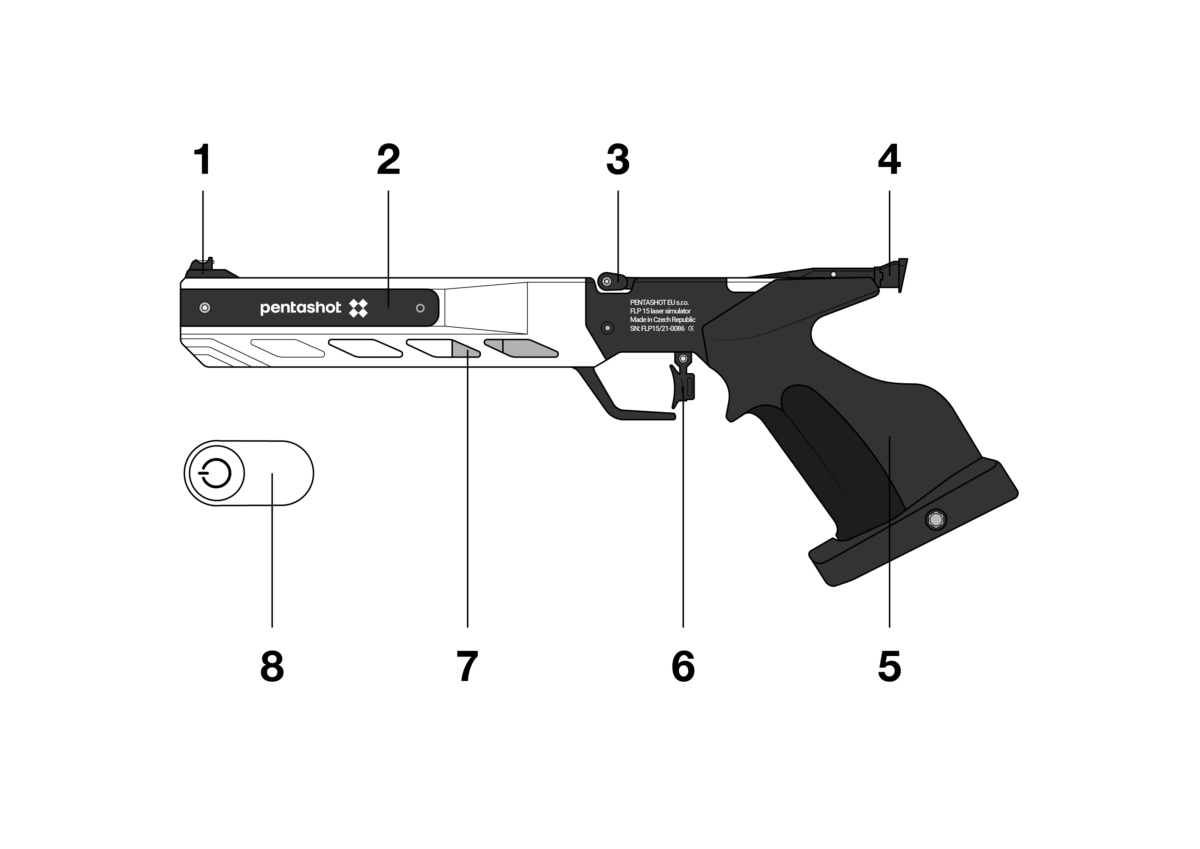
1 — Front sights
2 — Battery cover / battery
3 — Loading lever
4 — Rear sights
5 — Anatomical grip *
6 — Trigger
7 — Weight area (with two weigts á 40 grams each)
8 — Starting magnet
* Universal grip is also available.
PURPOSE
The GLS e.Start laser simulator is for use in instructional courses, training or competition in modern pentathlon. It is designed to shoot a laser beam activated by a trigger.
The GLS e.Start laser simulator is used like an FLP20-e laser module emitter with a 15.6 ms code.
This code is completely compatible with the standards of the International Modern Pentathlon Union (UIPM).
Preparing the laser simulator for use
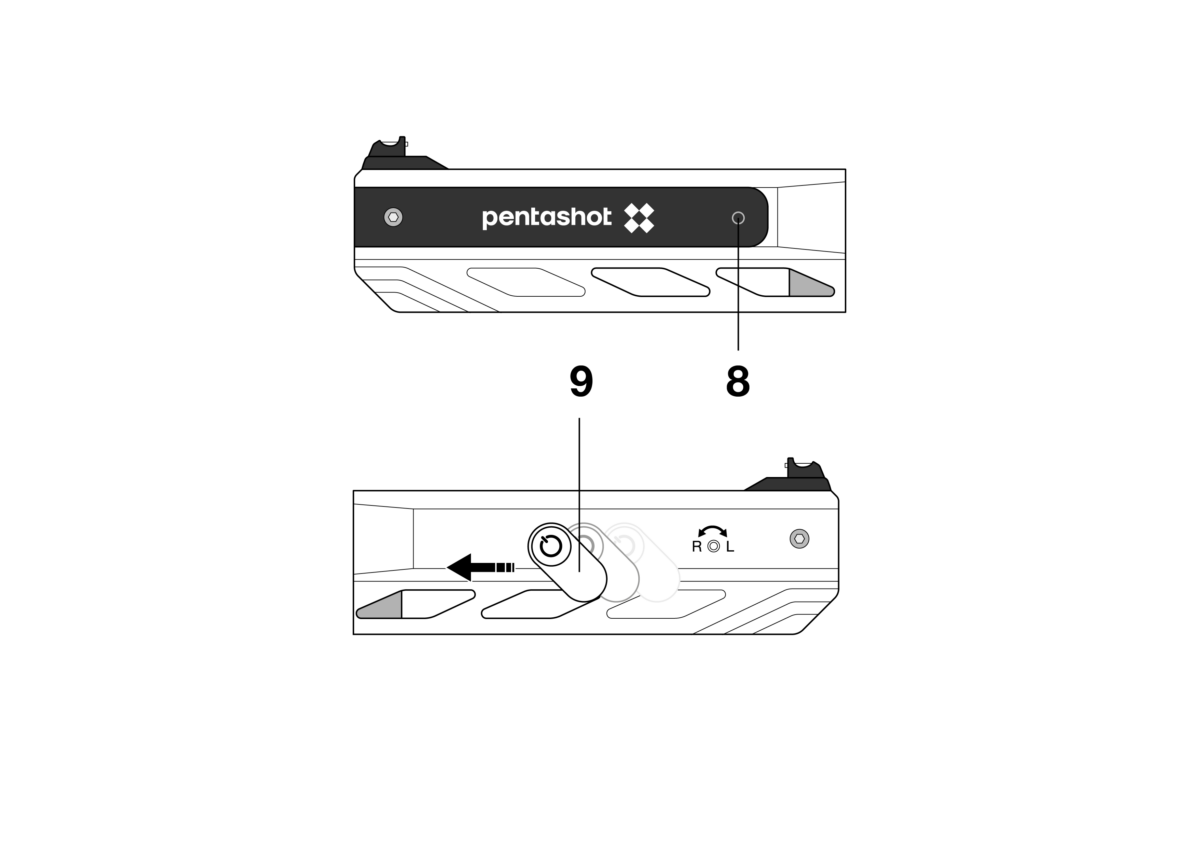
TURNING THE SIMULATOR ON
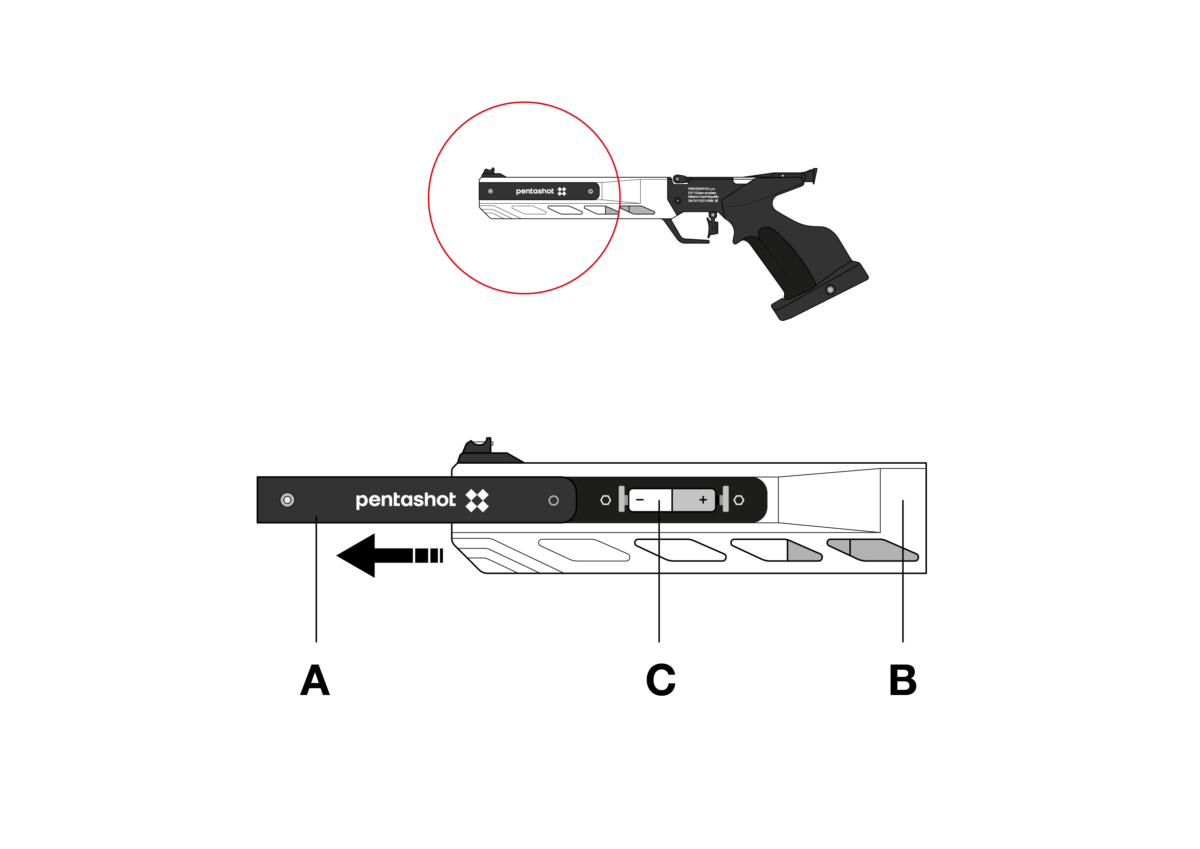
Attach the chip (8) to the simulator body and move it from right to left. This will switch simulator ON and the LED (9) will flash. The number of flashes indicates the battery status:
- 5 flashes – the battery is 100% full
- 4 flashes – the battery is at 75% charge level
- 3 flashes – the battery is at 50% charge level
- 2 flashes – the battery is at 25% charge level
- 1 flash – the battery is discharged, replace it.
TURNING THE SIMULATOR OFF
The laser container will switch off approximately 20 minutes after the last shot. In case you need to switch it off immediately, remove the battery from the simulator body.
LASER DOT ALIGNMENT
To adjust the simulator sights, aim at a white wall or a white object from a distance of 10 meters and check the alignment of the red laser dot and simulator sights. If necessary, use the adjusting screws to align the laser dot:
- Turning the screw (10a) clockwise
- Turning the screw (10a) counterclockwise
- Turning the screw (10b) clockwise
- Turning the screw (10b) counterclockwise
- laser dot moves to the right
- laser dot moves to the left
- laser dot goes downward
- laser dot goes upward
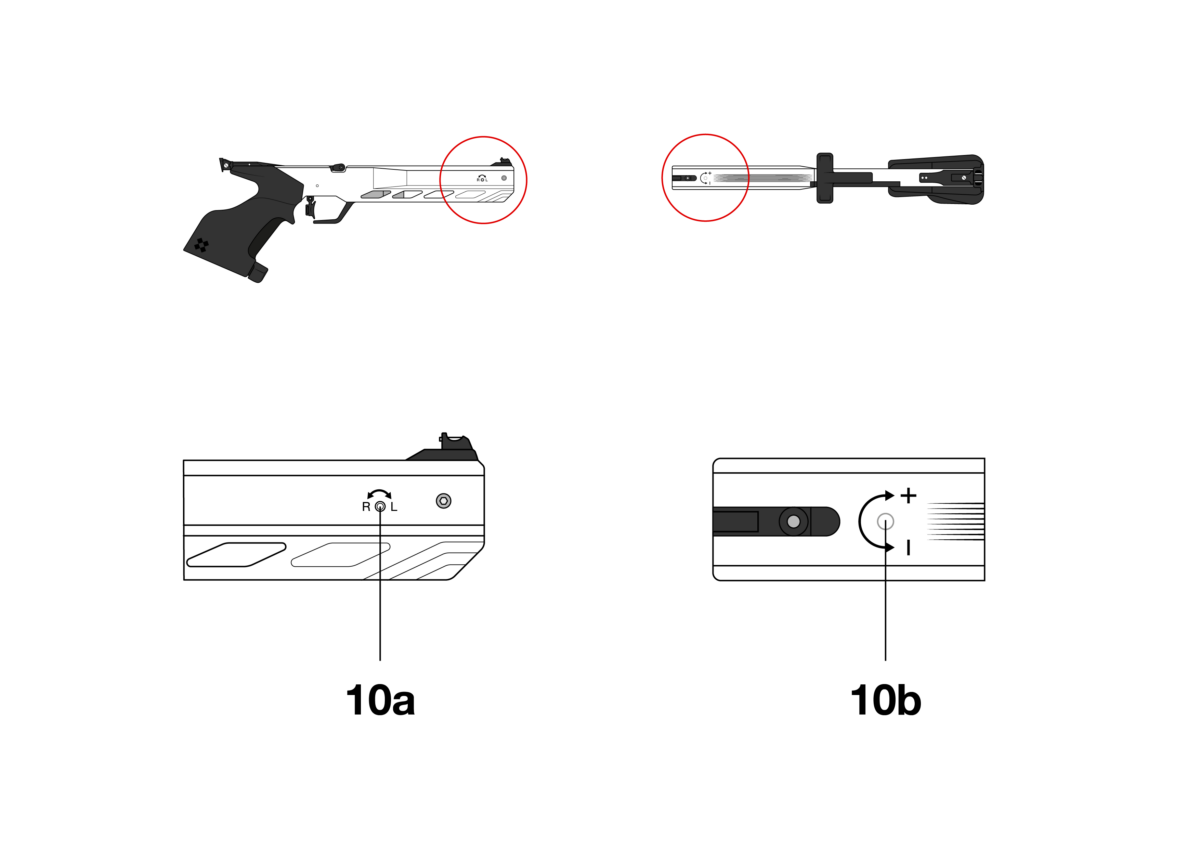
ADJUSTING THE SIMULATORS SIGHTS
IMPORTANT: The movement of the adjusting screws must be very small.
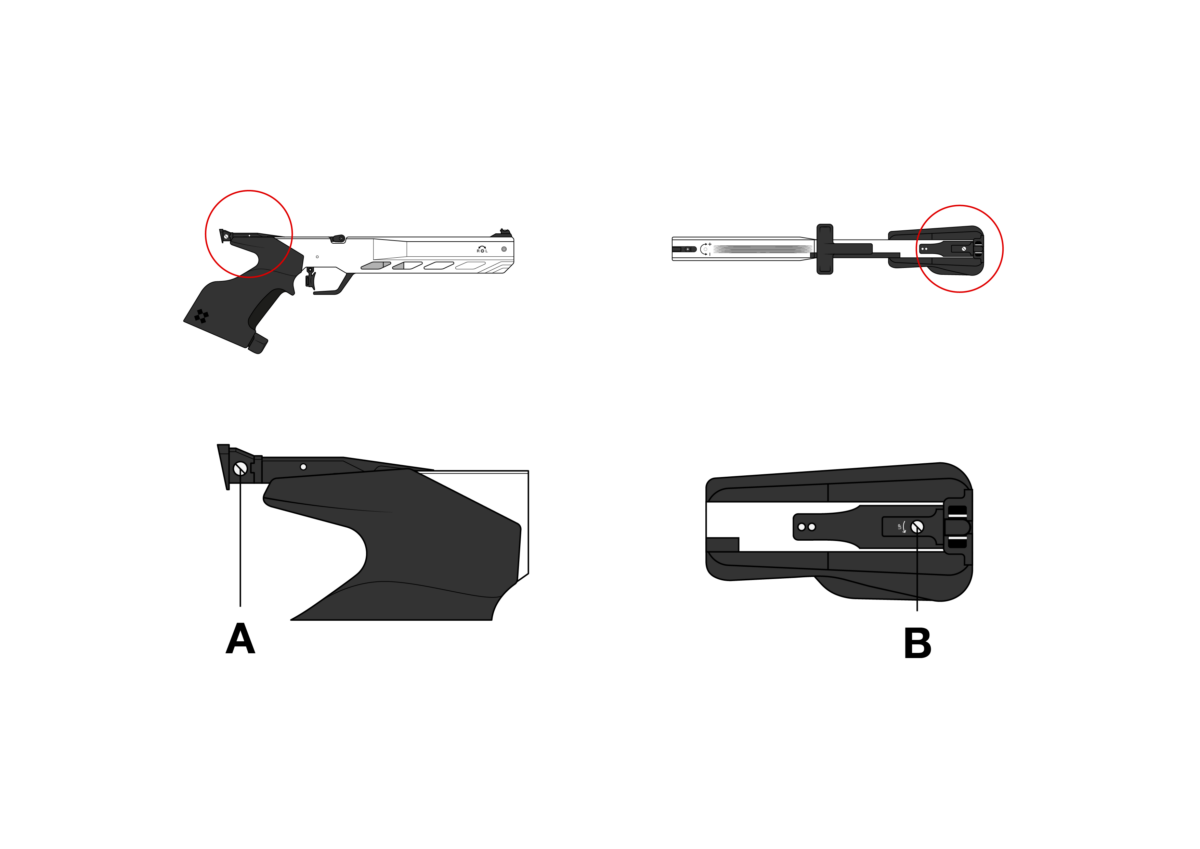
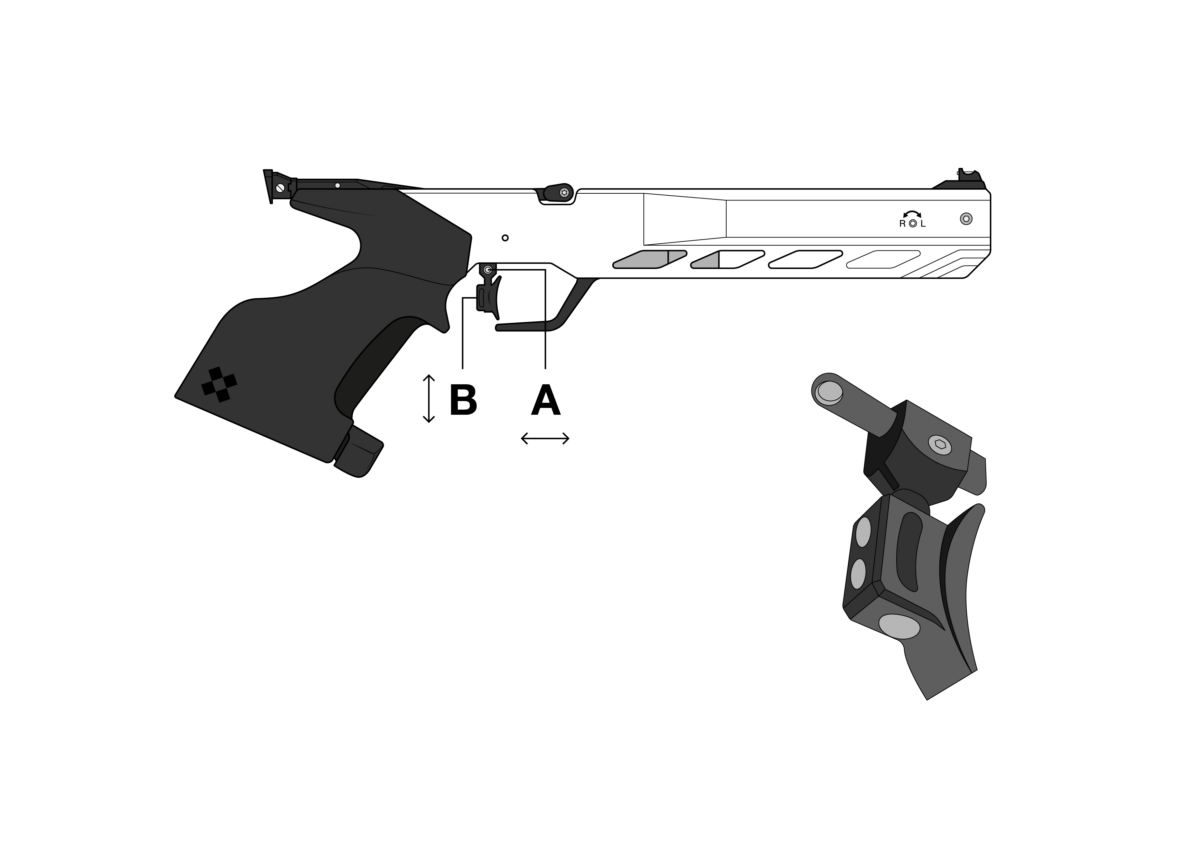
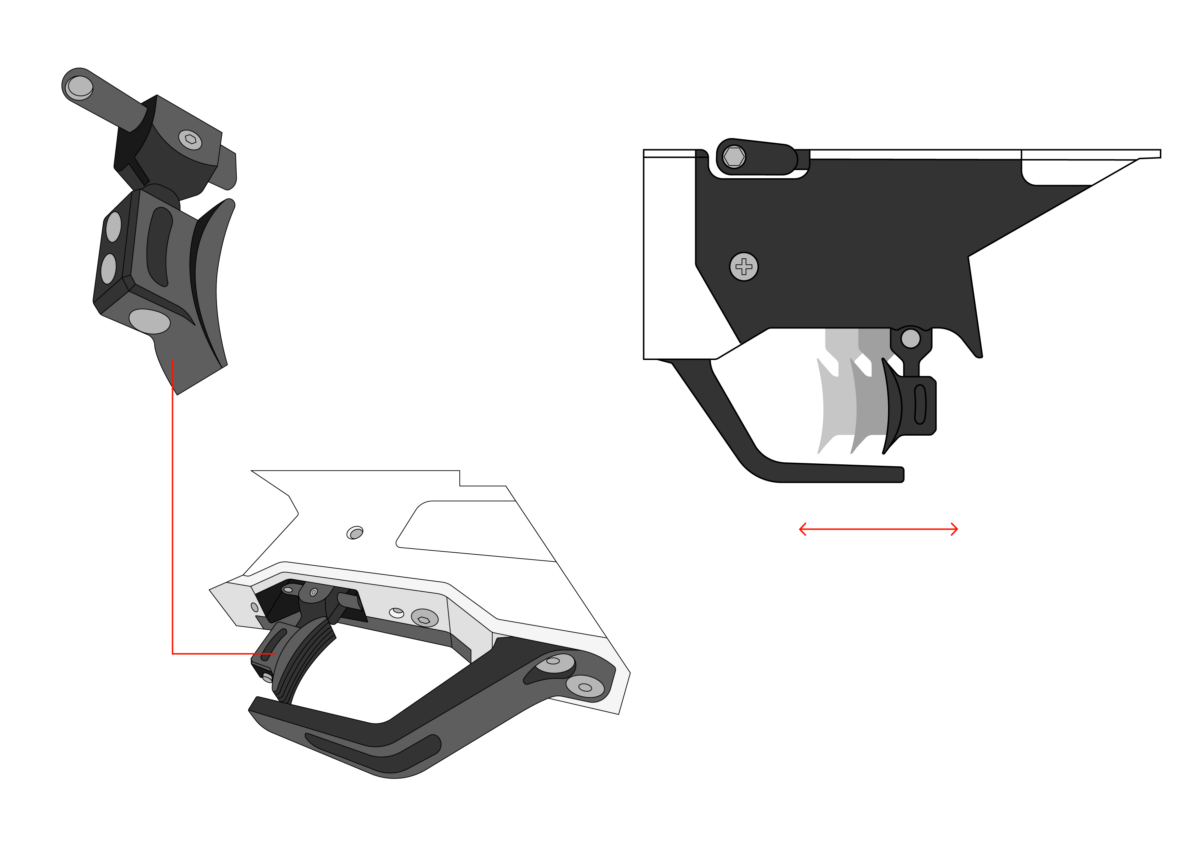
TRIGGER POSITION SETTING
After loosening the screw (A) you can change the position of the trigger forward or backward.
After loosening the screws (B) you can change the position of the trigger upwards or downwards.
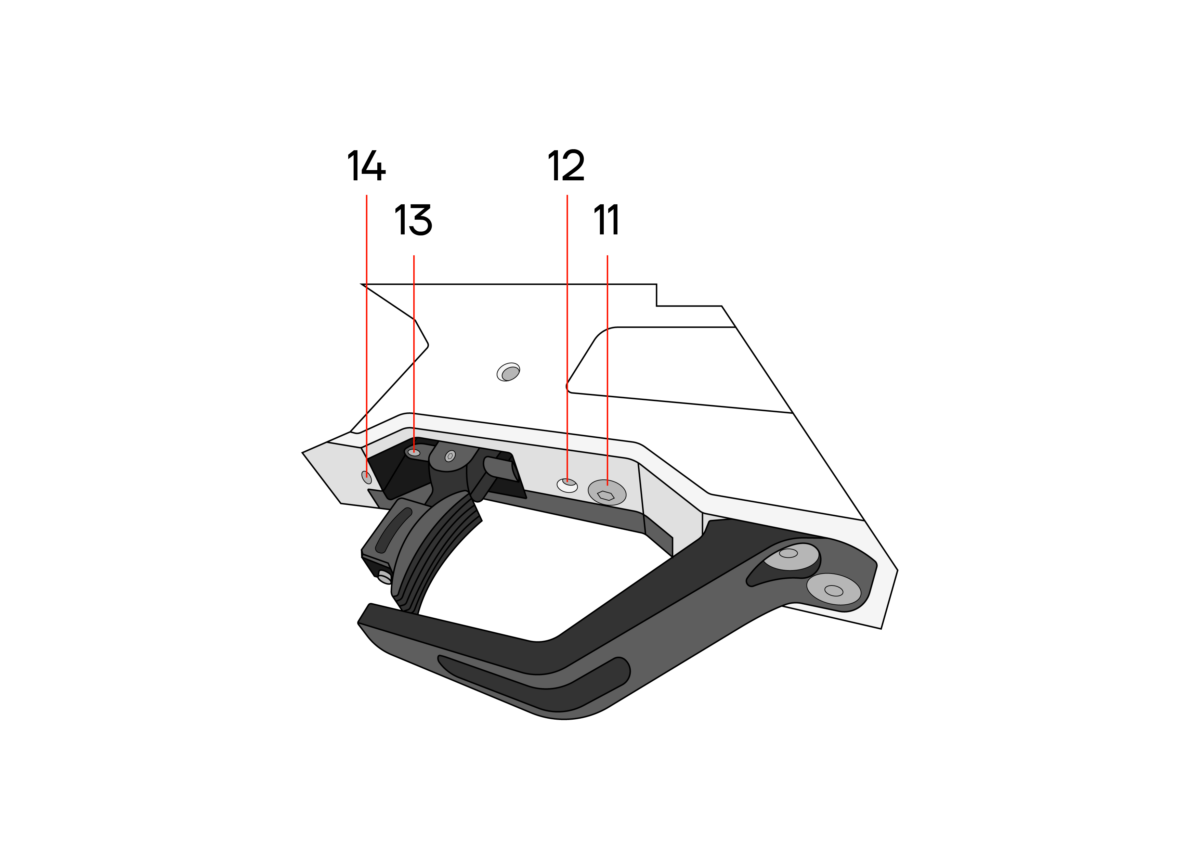
SETTING THE TRIGGER WEIGHT AND TRAVEL
Second stage weight
The second stage weight is already exactly adjusted by the manufacturer and it is not recommended to change it. In case you still need to change its setting, carry out the following:
- Turn the screw (11) counterclockwise by one turn.
- Load the simulator by means of the lever.
- Turn the screw (11) very slowly clockwise untill simulator shoots by itself.
- Turn the screw (11) counterclockwise by one ¼ turn.
By this, the second stage weight is set. Check the correct function by few shots.
First stage weight
Turning the screw (12) clockwise increases the first stage trigger weight. Turning the screw (12) counterclockwise reduces the first stage trigger weight.
First stage travel weight
Turning the screw (13) clockwise increases the first stage travel weight. Turning the screw (13) counterclockwise reduces the first stage travel weight.
First stage travel
Turning the screw (14) clockwise reduce the first stage travel. Turning the screw counterclockwise (14) increases the first stage travel.
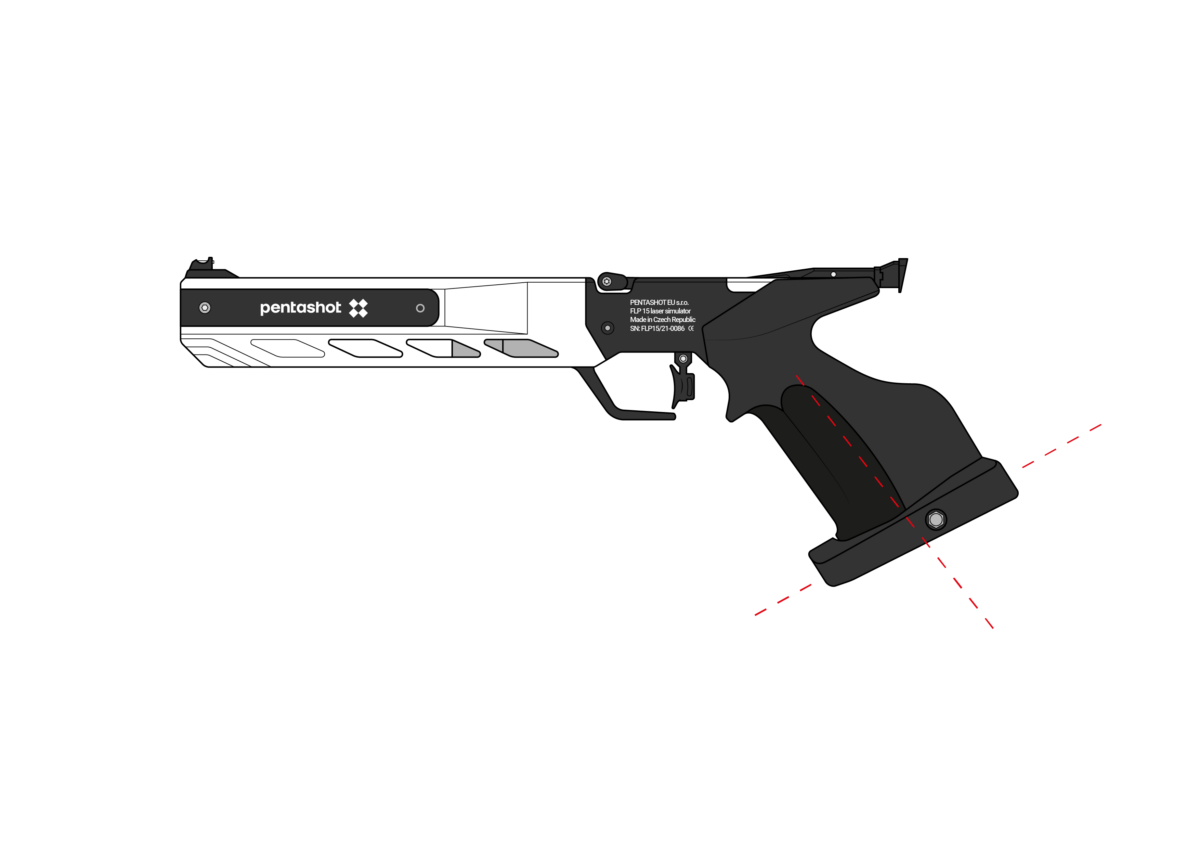
GRIP ADJUSTMENT
Use the supplied hexagonal key to loosen the small screw on the simulator grip bottom. Set a new position of the grip and fix it by tightening the small screw.
REPLACING BATTERY
When the LED indicator flashes once or is constantly flashing, replace the battery.
- Unscrew the battery cover (A) from the simulator body (B).
- Remove the discharged battery using the ribbon (C) and insert a new one (AAA 1,5V).
Pay attention to the correct polarity of battery! - Reinstall the cover (A).
UPDATE FUNCTION
Only the manufacturer has access to the laser simulator software.
Technical data
| Dimensions | 370 mm x 150 mm x 50 mm |
| Laser simulator type | Single shot |
| Weight | basic 720g , 800g with supplied weights |
| Recommended shooting distance | From 3 m to 10 m |
| Laser class | I. (in accordance with EN 60825 – 1:2014 standard) |
| Laser class certificate | No.: 1170100 (ELECTROTECHNICAL TESTING INSTITUTE, Prague, CZECH REPUBLIC) |
| Laser module | FLPM20 |
| Laser signal | UIPM 15,6s laser signal |
| Wavelenght | 650 nm |
| Laser beam diameter | 4 mm ± 5 % / 10 m |
| Minimum laser peak value | 2,5 mW |
| Maximum laser peak value | 3,2 mW |
| Emitter power supply | 1,5V alcaline battery |
| Number of shots with 1 pc of AAA type battery | Min. 50 000 / at 20 °C |
| Operating conditions | From +10 °C to +50 °C |
| Update function | Software update from the manufacturer |
THE USER IS ALLOWED TO PERFORM THE FOLLOWING MAINTENANCE AND ADJUSTMENTS:
- adjusting the simulator sights (laser dots)
- adjusting the trigger position
- adjusting the grip angle
- replacing the battery
- replacing the simulator grip
It is forbidden to open or modify the laser simulator, other than to change the battery or grip. Only the manufacturer or an authorized person is to change the laser beam parameters. The owner of the simulator must confi rm his consent to the change in writing. The manufacturer will accept no liability for damages resulting from such a change.
Warranty
The warranty applies only to defects in materials and workmanship that can be shown to have appeared during the warranty period. Such defects can be repaired only by the manufacturer or an authorized service representative. The purchaser can make warranty claims to the manufacturer or authorized service representative, depending on the circumstances.
The warranty period begins on the day of purchase or delivery to the purchaser and remains valid for 24 months.
The following cases are expressly excluded from warranty repair:
- The product was not presented to the seller or manufacturer with proof of purchase.
- Wear as a result of product use or damage to the product (including damage caused by unqualified installation, incorrect start-up, failure to observe the procedures specifi ed in the user manual, etc.).
- Damage to the product due to contamination, accidental or catastrophic events, or due to natural or outdoor events, such as storm, fi re, water, excessive heat or cold, penetration by liquids, etc.
- Physical damage to the product (caused by falling breakage, etc.) or damage caused during transport.
- Damage, unauthorized design changes, incorrect modifi cations to the product or other interventions into the product made by unauthorized people or service centres.
Storage
It is very important that the laser simulator be stored under the right conditions, so that it will sta reliable and in good condition. Always do the following:
- Before storing the simulator for an extended time, always remove the batteries. This prevents damage to the inside of the simulator if the batteries leak.
- Store the simulator in the original package (case) in a dry, dark location out of the reach of children.
- Do not place any heavy objects on the case, or objects that may leak fl uids.
- Protect the simulator from weather, including frost and humidity. The optimal storage temperature is +5°C to 30°C. The air humidity at the storage location must not exceed 60%. Do not store the simulator in a damp environment where there is a high risk of corrosion.
Replacement parts
The following replacement parts are available for the simulator:
- front sights
- grip
- weight
- trigger
You can order replacement parts by e-mailing to sales@pentashot.com or from PENTASHOT partners and sellers. You can find a list of them at www.pentashot.com .
Only the manufacturer or an authorized person is allowed to replace the main parts of the simulator (optics and electronics, including parts of the trigger mechanism).
Disposal
After the laser simulator’s useful life is over, it is not to be discarded with other household waste. Take it to a collection facility or have it disposed of by a specialized company authorized for the purpose.
Used batteries must not be thrown out with standard household waste. Take all used batteries to specialized collection locations.